Objects / Culture Archives
Pimcore objects are records that enable the management of structured data. Based on a class that defines the structure and attributes, objects can be used for almost any structured data, whether people, documents, photo galleries, events, or places.
Object classes
Pimcore Objects represent the descriptive units of the archive. Each object belongs to a Class, which defines its type and field structure (descriptive schema).
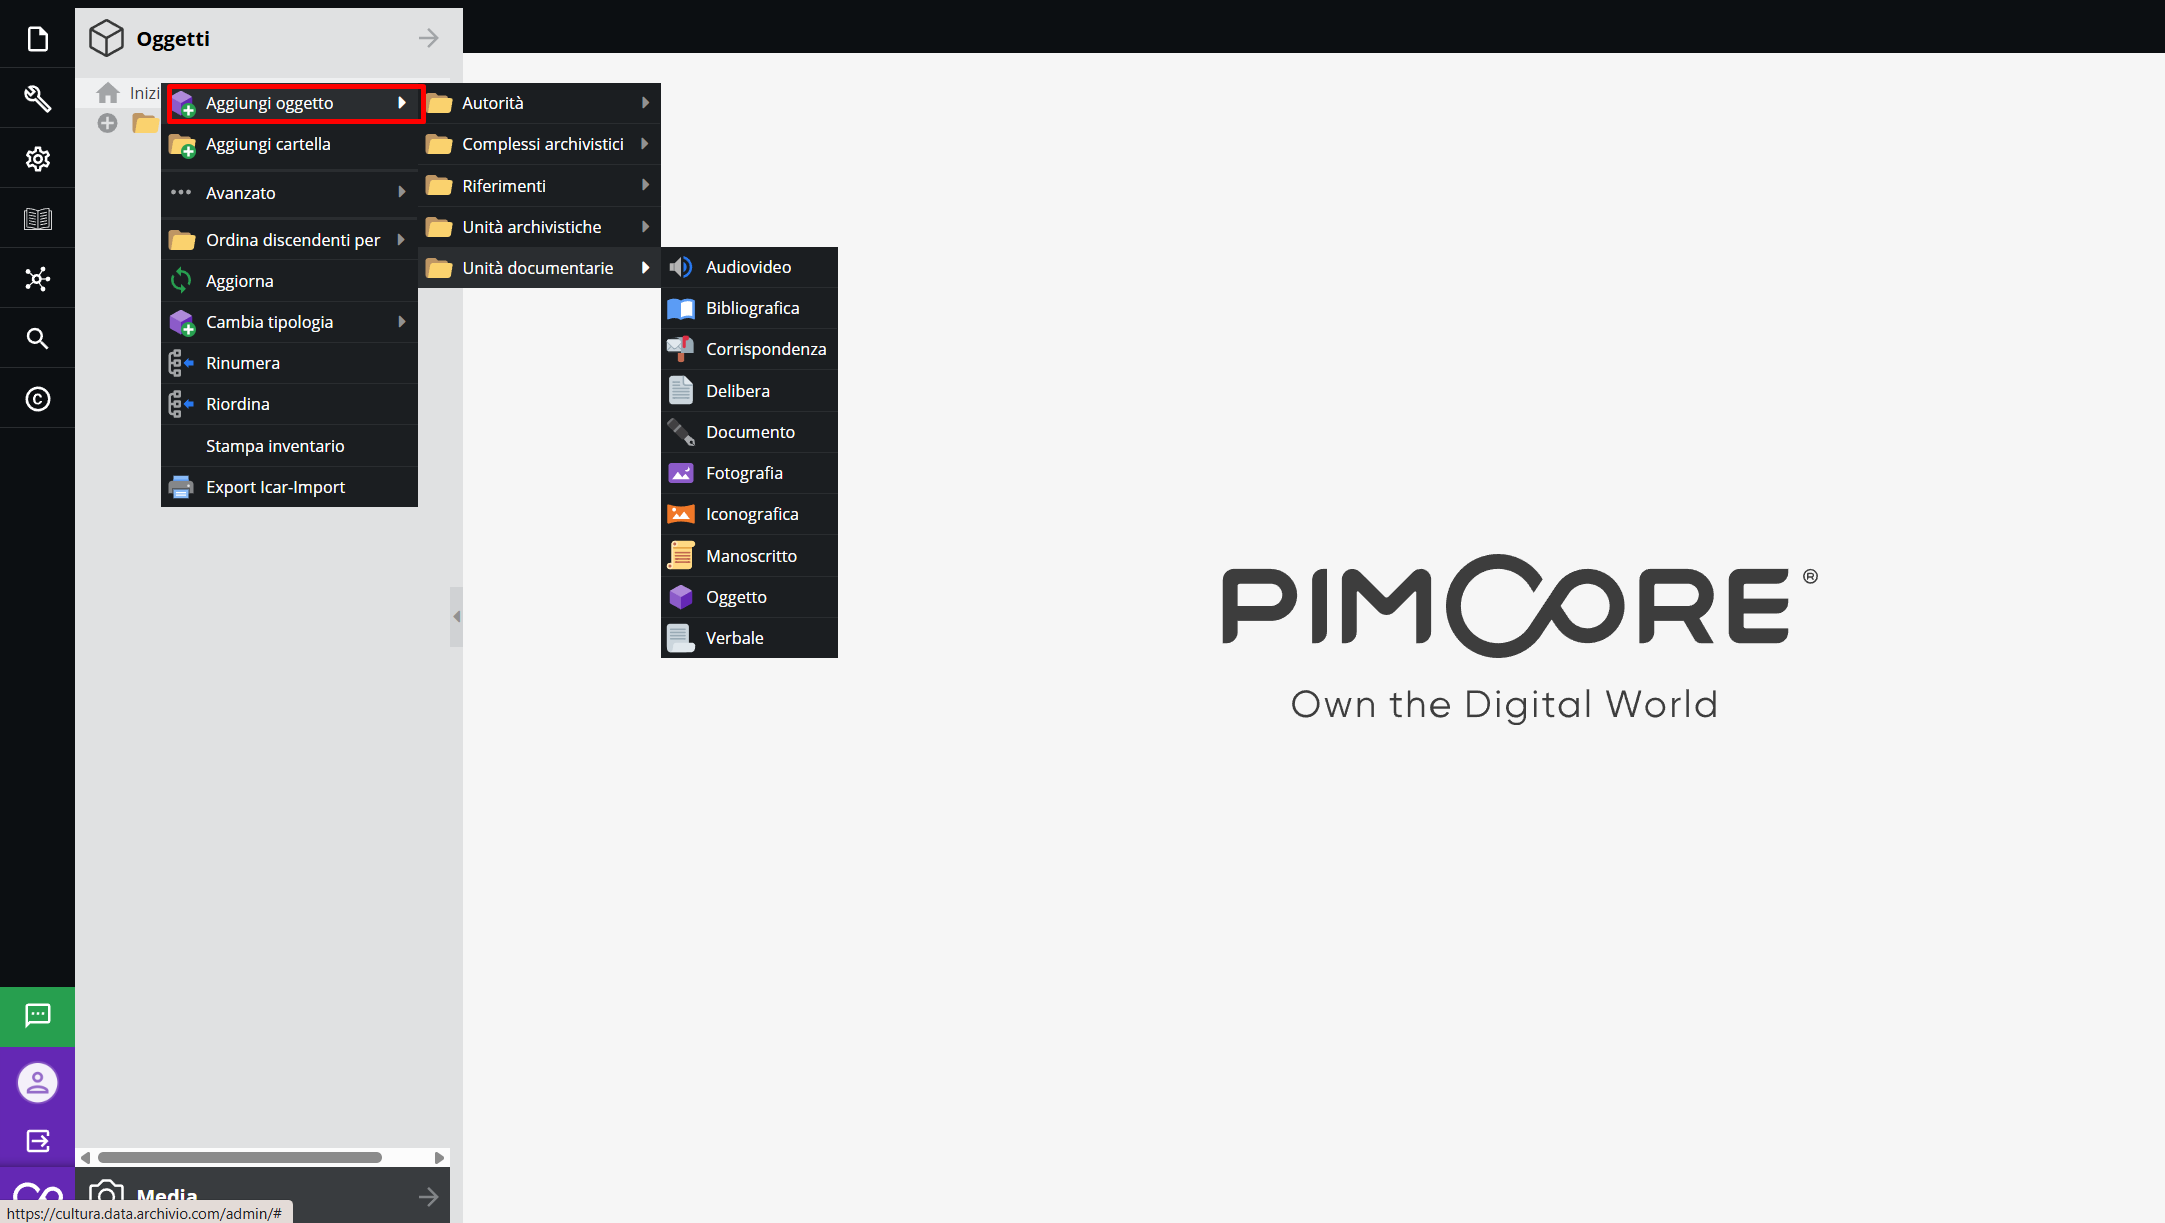
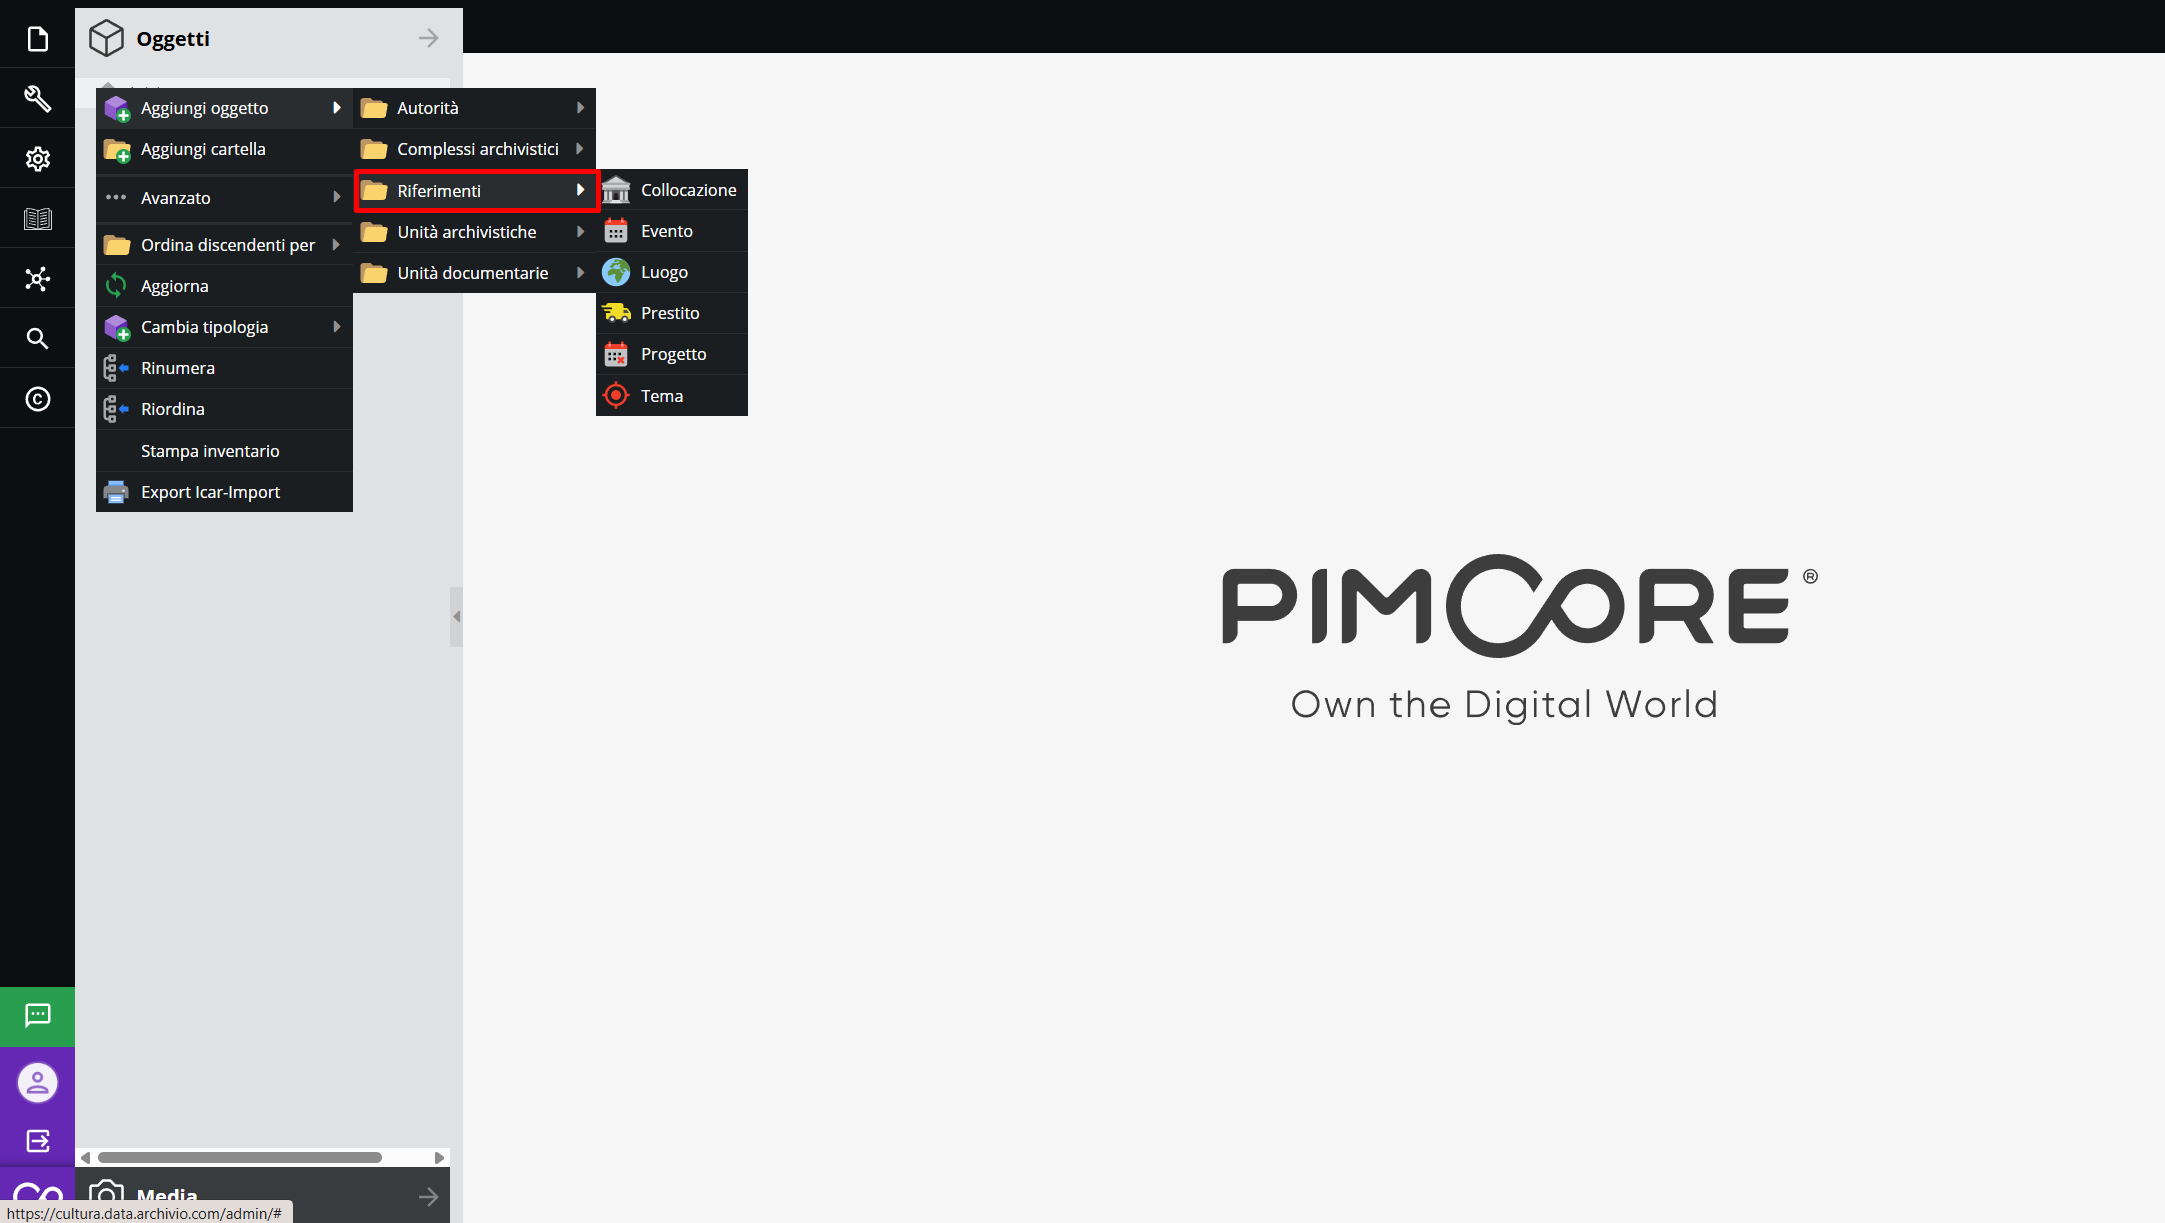
The class is assigned when creating the record: by right-clicking on the desired node in the tree structure, you can select the “Add object” option, navigating through the configured macro-sections.
Archival complexes
The forms present in the Archival complexes macro-section serve to delineate the hierarchical structure of the archive, thus corresponding to its divisions and aggregations. They allow representing the various levels of aggregation, from general to specific. You can create records for the following hierarchical levels: Superfonds, Fonds, Subfonds, Series, Collection, Level.
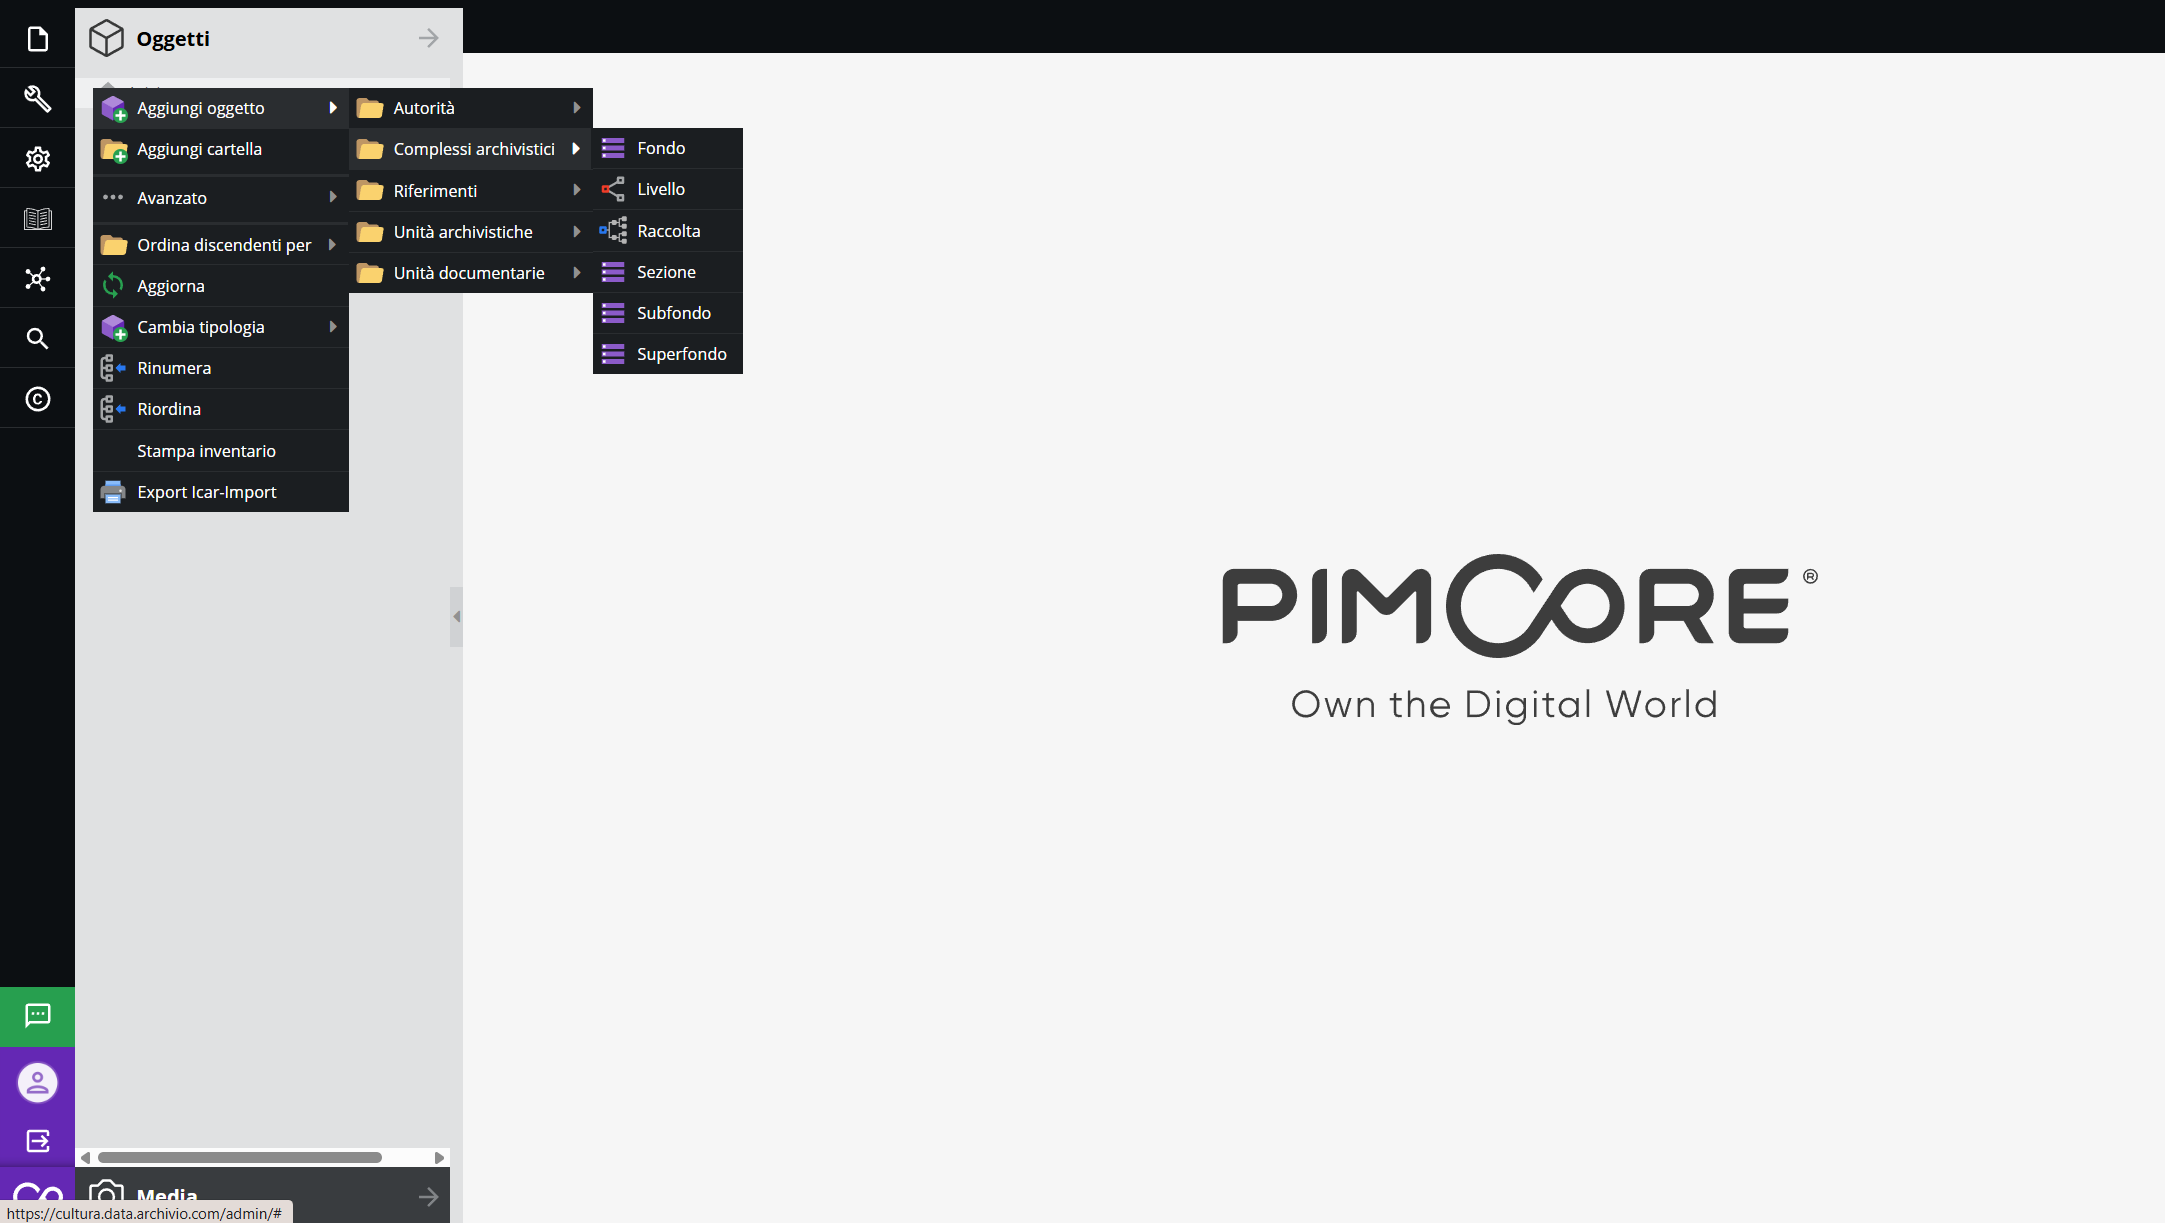
The descriptive schemas of these forms follow the international archival description standard ISAD(G).
Archival Units
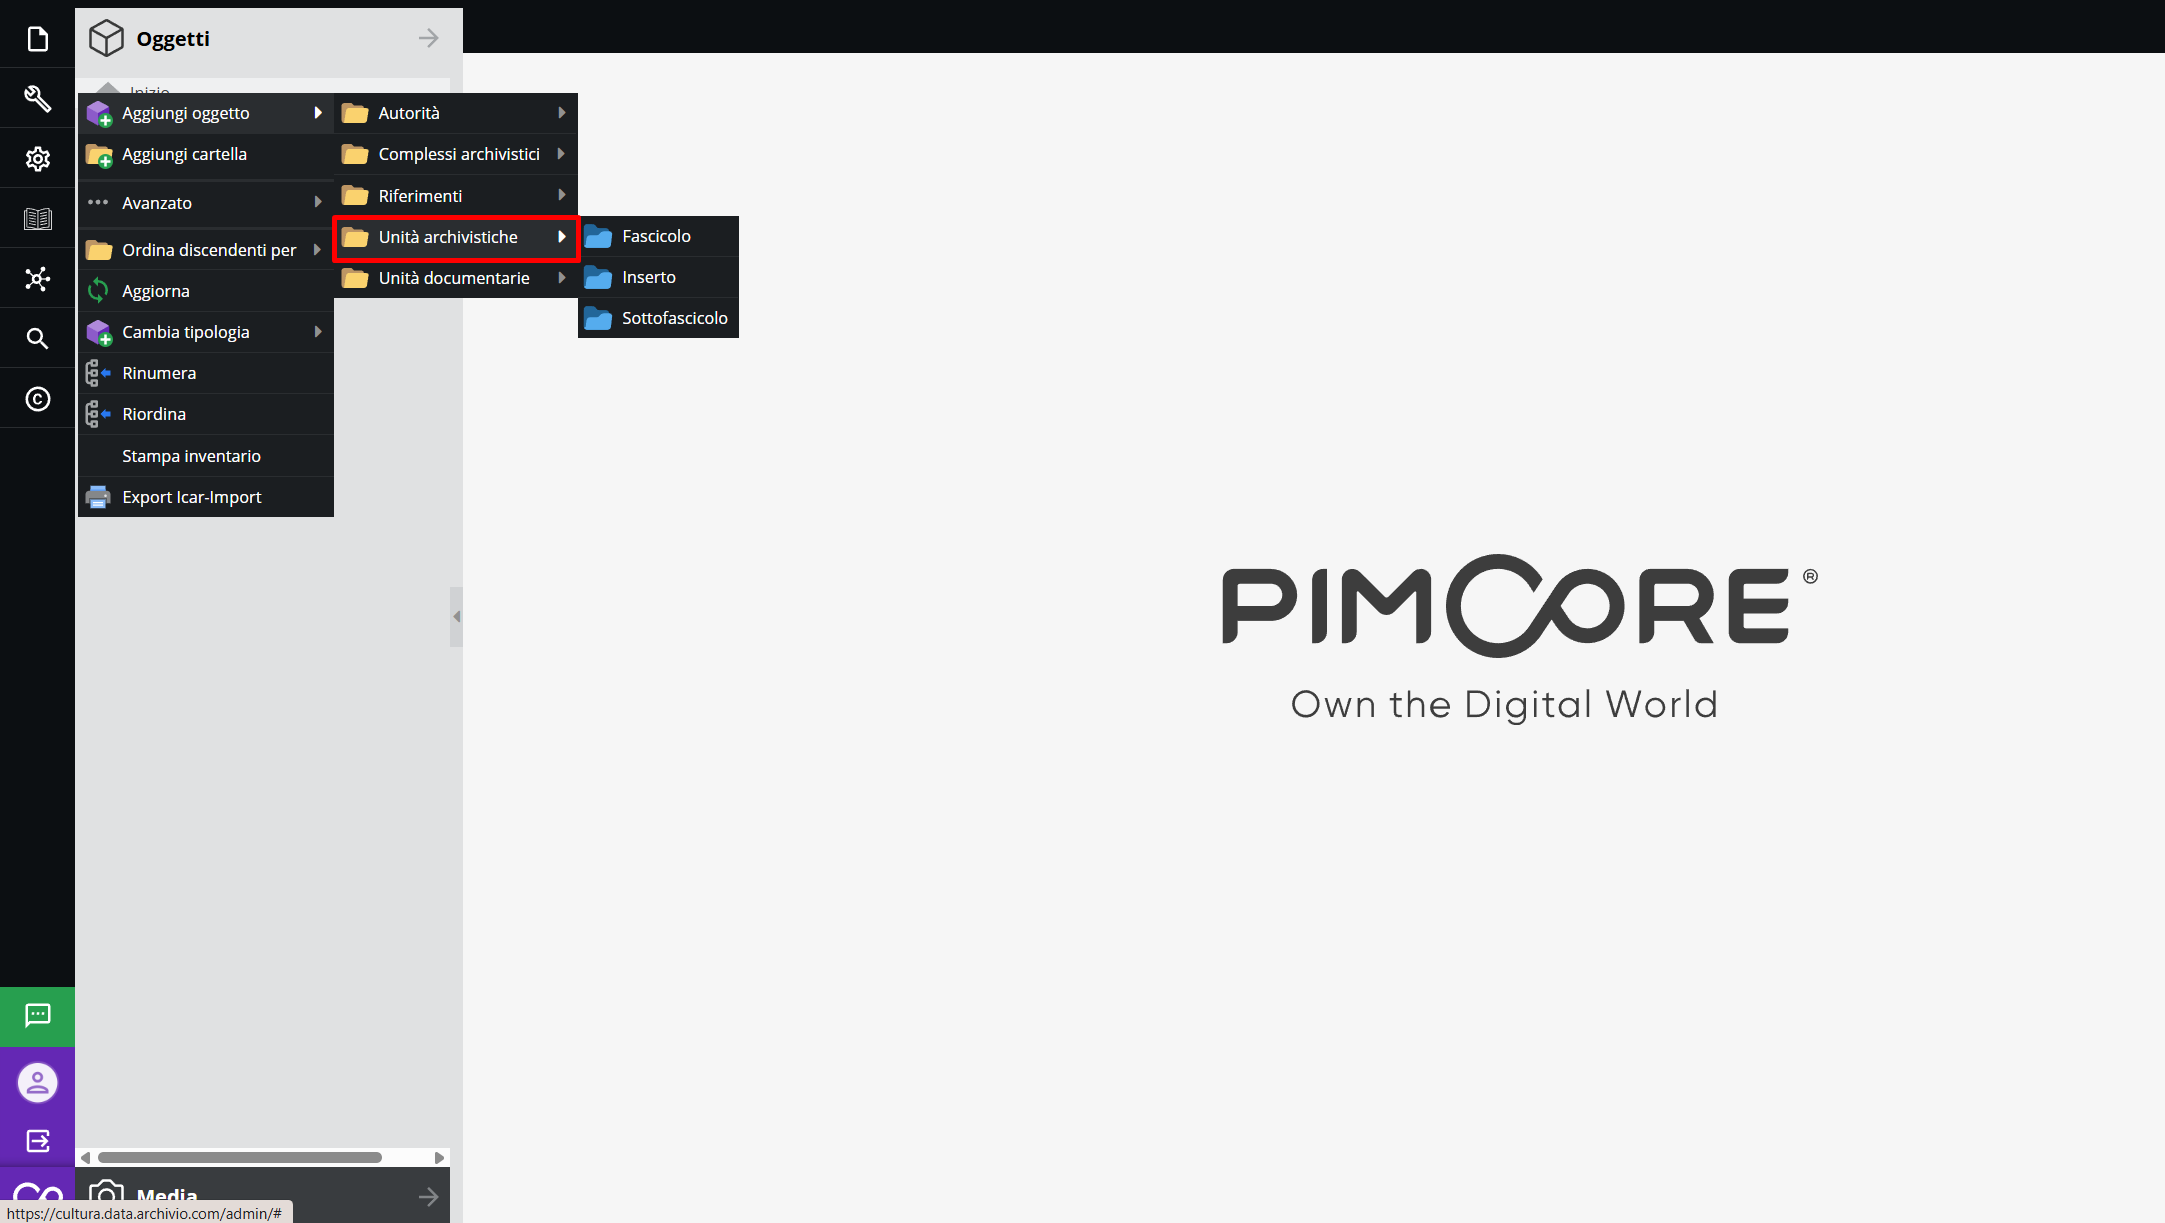
The “Archival units” macro-section is hierarchically located below Archival complexes (Fonds and Series) and is governed by the ISAD(G) standard.
The available classes are:
- Folder: The fundamental unit of the archive, consisting of documents grouped according to an organic link (by matter, subject, or administrative process).
- Sub-folder: Internal division of the folder, used to separate documents related to specific sub-phases of the same matter.
- Insert: Further documentary subdivision within a folder or sub-folder, often used to aggregate attachments or technical documents related to a single act.
Authorities
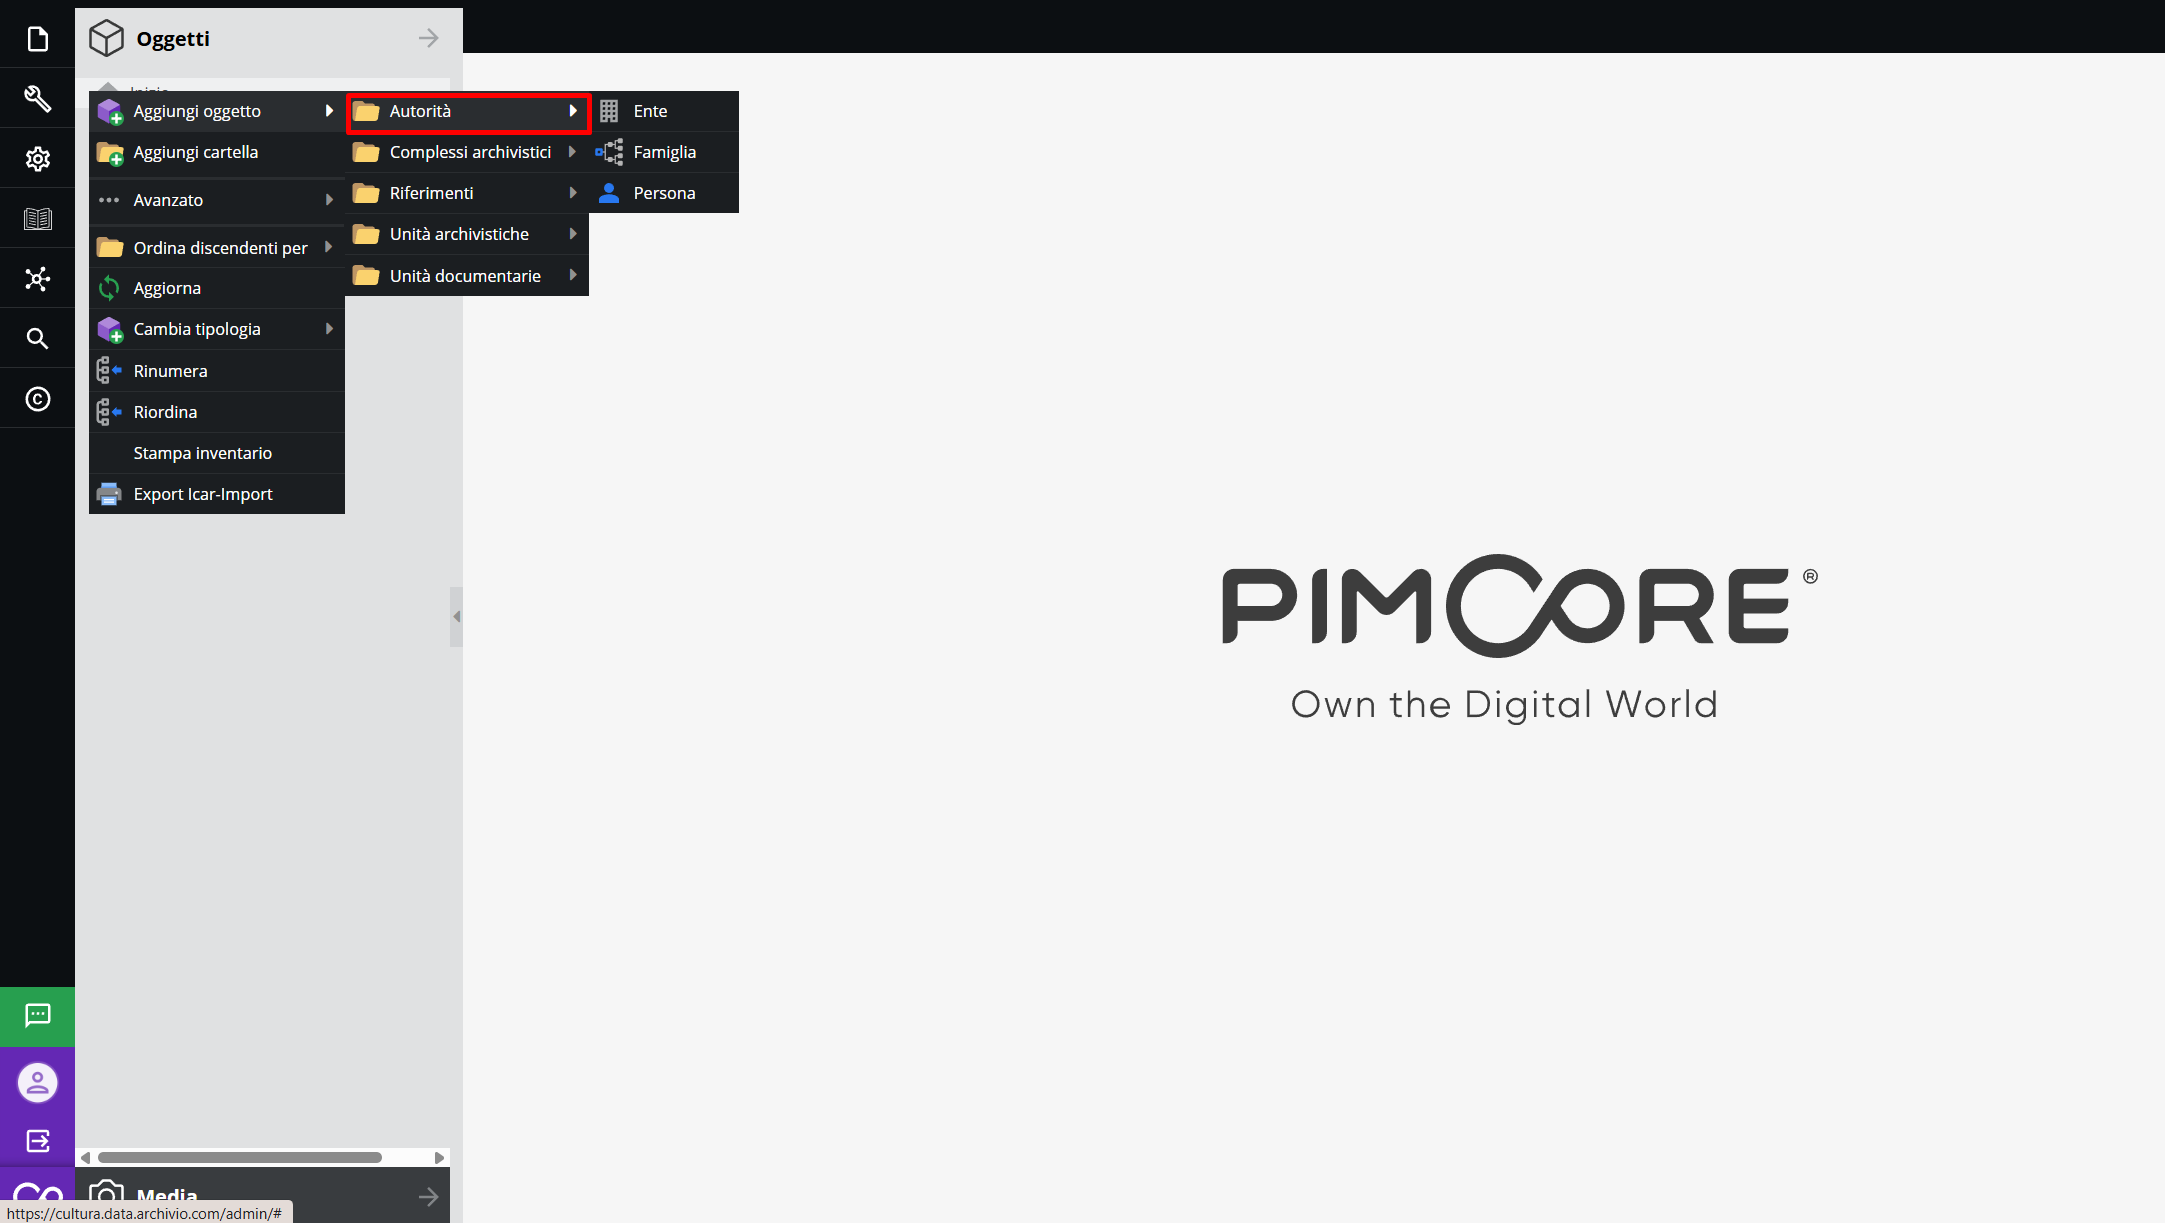
This group contains authority records, structured according to the ISAAR(CPF) standard. These are descriptive forms for Corporate Bodies, Families, and Persons.
These records serve a dual function:
- Normalization: they ensure that a name (e.g., an author or an office) is always written the same way throughout the archive.
- Relationship: they allow linking creating entities, custodial history, or mentioned subjects to physical and digital documents, reconstructing the institutional or biographical history of the entity being documented.
References
This section accommodates object classes that serve as external “access points” or cross-cutting data. These records do not directly describe archival units, but rather external entities or logistical data related to them.
It includes records related to: Locations, Events, Places, Loans, Projects, and Topics.
All object classes concerning external occurrences fall under this section, which can be linked to paper and digital documentation. Using these objects increases the consistency and reliability of data in the Archive and ensures the quality of archival information, avoiding duplication and improving search efficiency.
Documentary units
This group contains document types, i.e., all classes dedicated to the analytical description of individual documents or artifacts that constitute the archive's heritage.
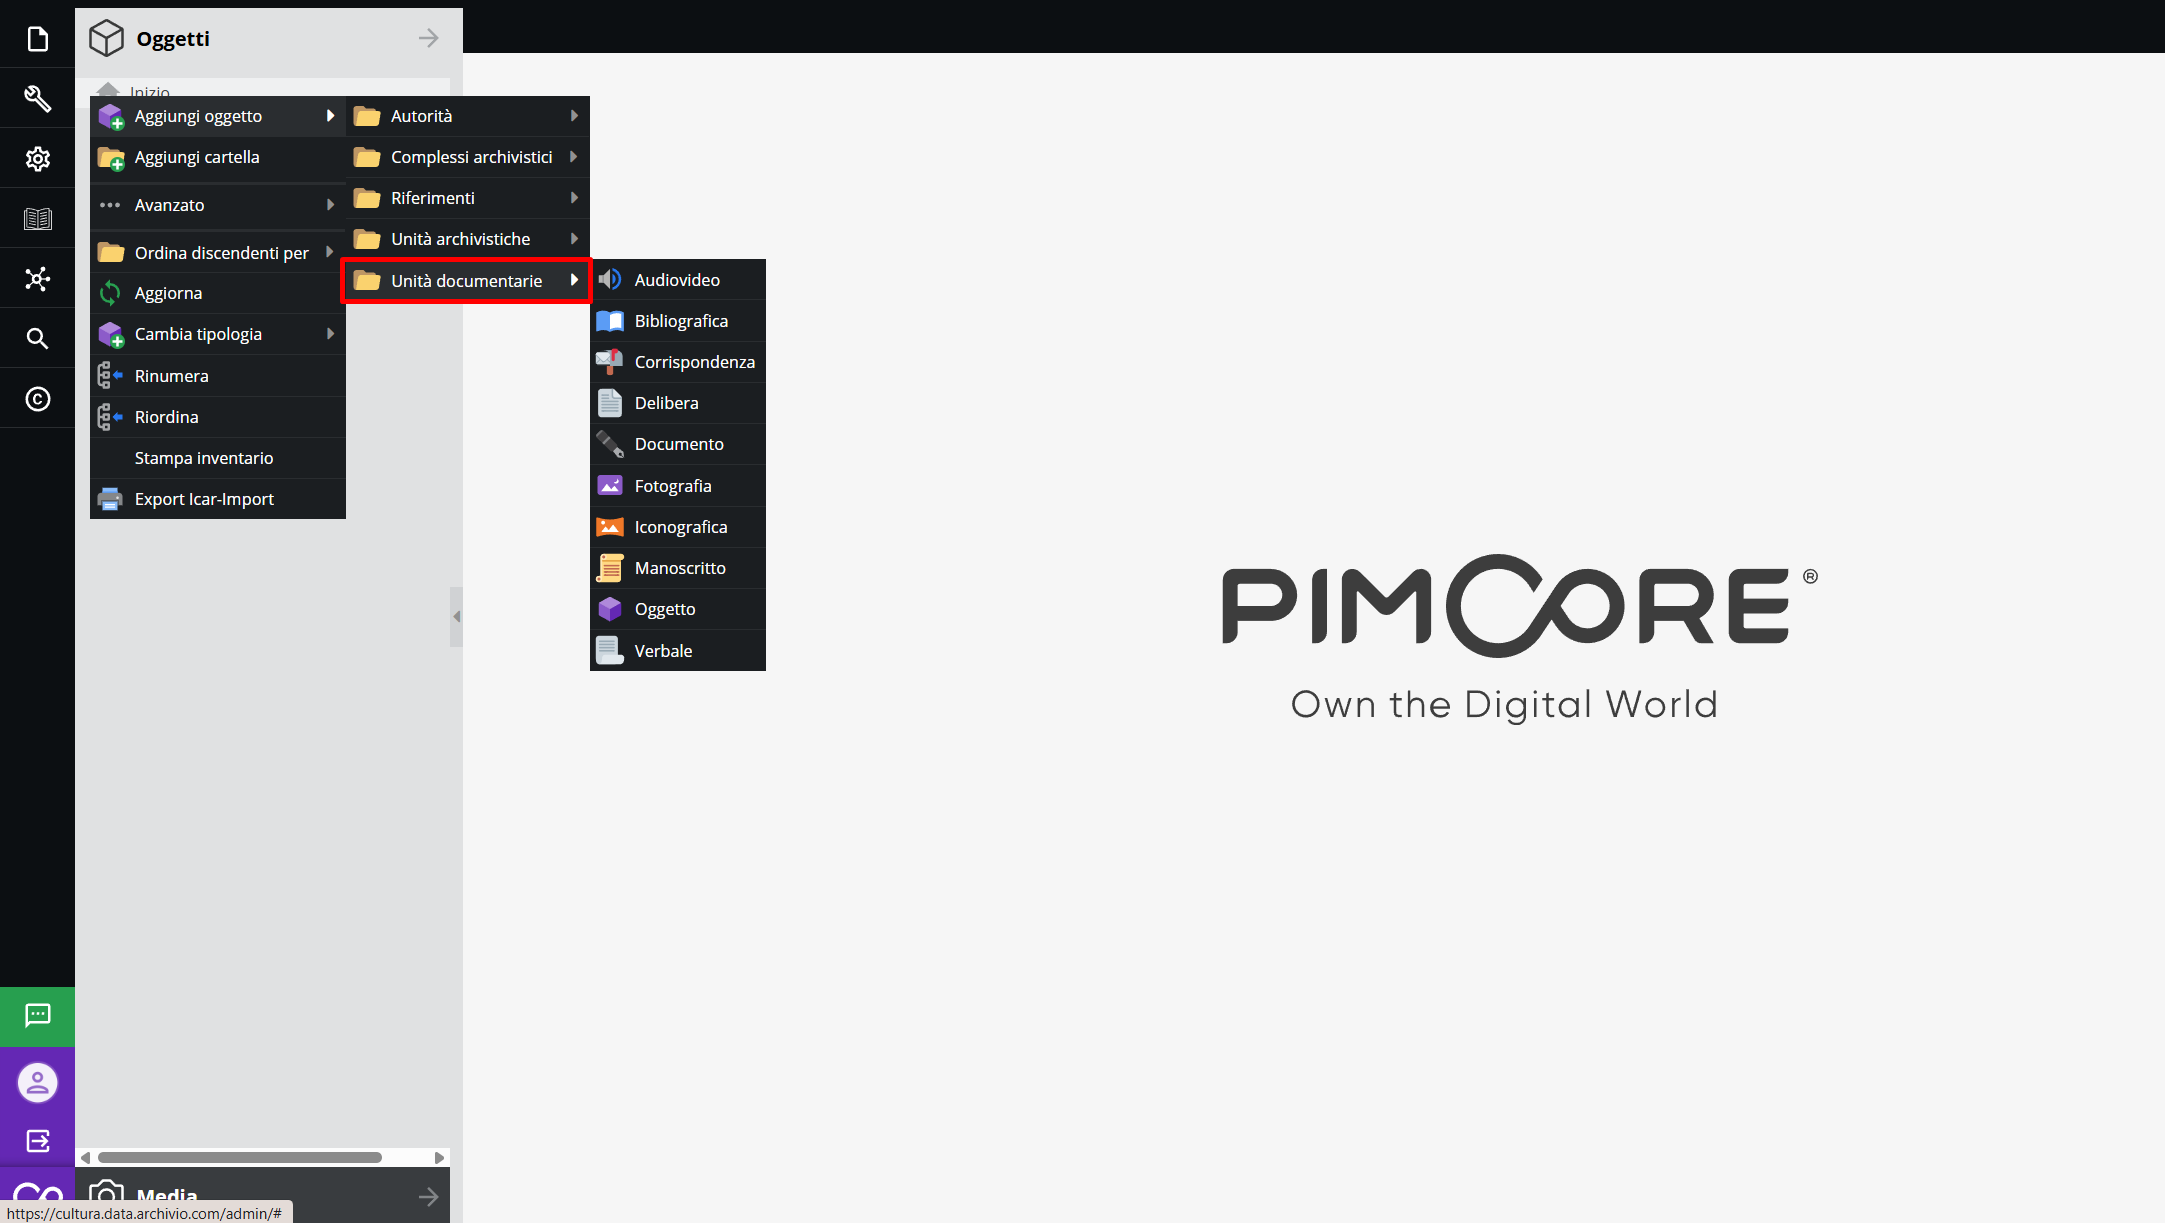
Each class has a specific descriptive schema, designed to accommodate technical and historical metadata specific to each document type.
Information areas of the forms
The main information areas characterizing the different object classes are illustrated below, analyzing the fields they may contain. Certain sections and descriptive elements common to all or most classes in the system are analyzed in the section “Fields common to multiple forms”.
Archival complexes and Archival units
Forms of type "Archival complex" are used to describe the logical hierarchy of the archive, from top levels down to the minimum unit of aggregation (defined by the “folder” descriptive unit).
Descriptive units are generally divided into sections (here also called “information areas”) and a Summary, which can be explored according to the cataloger's needs by selecting them from the top bar on the page.
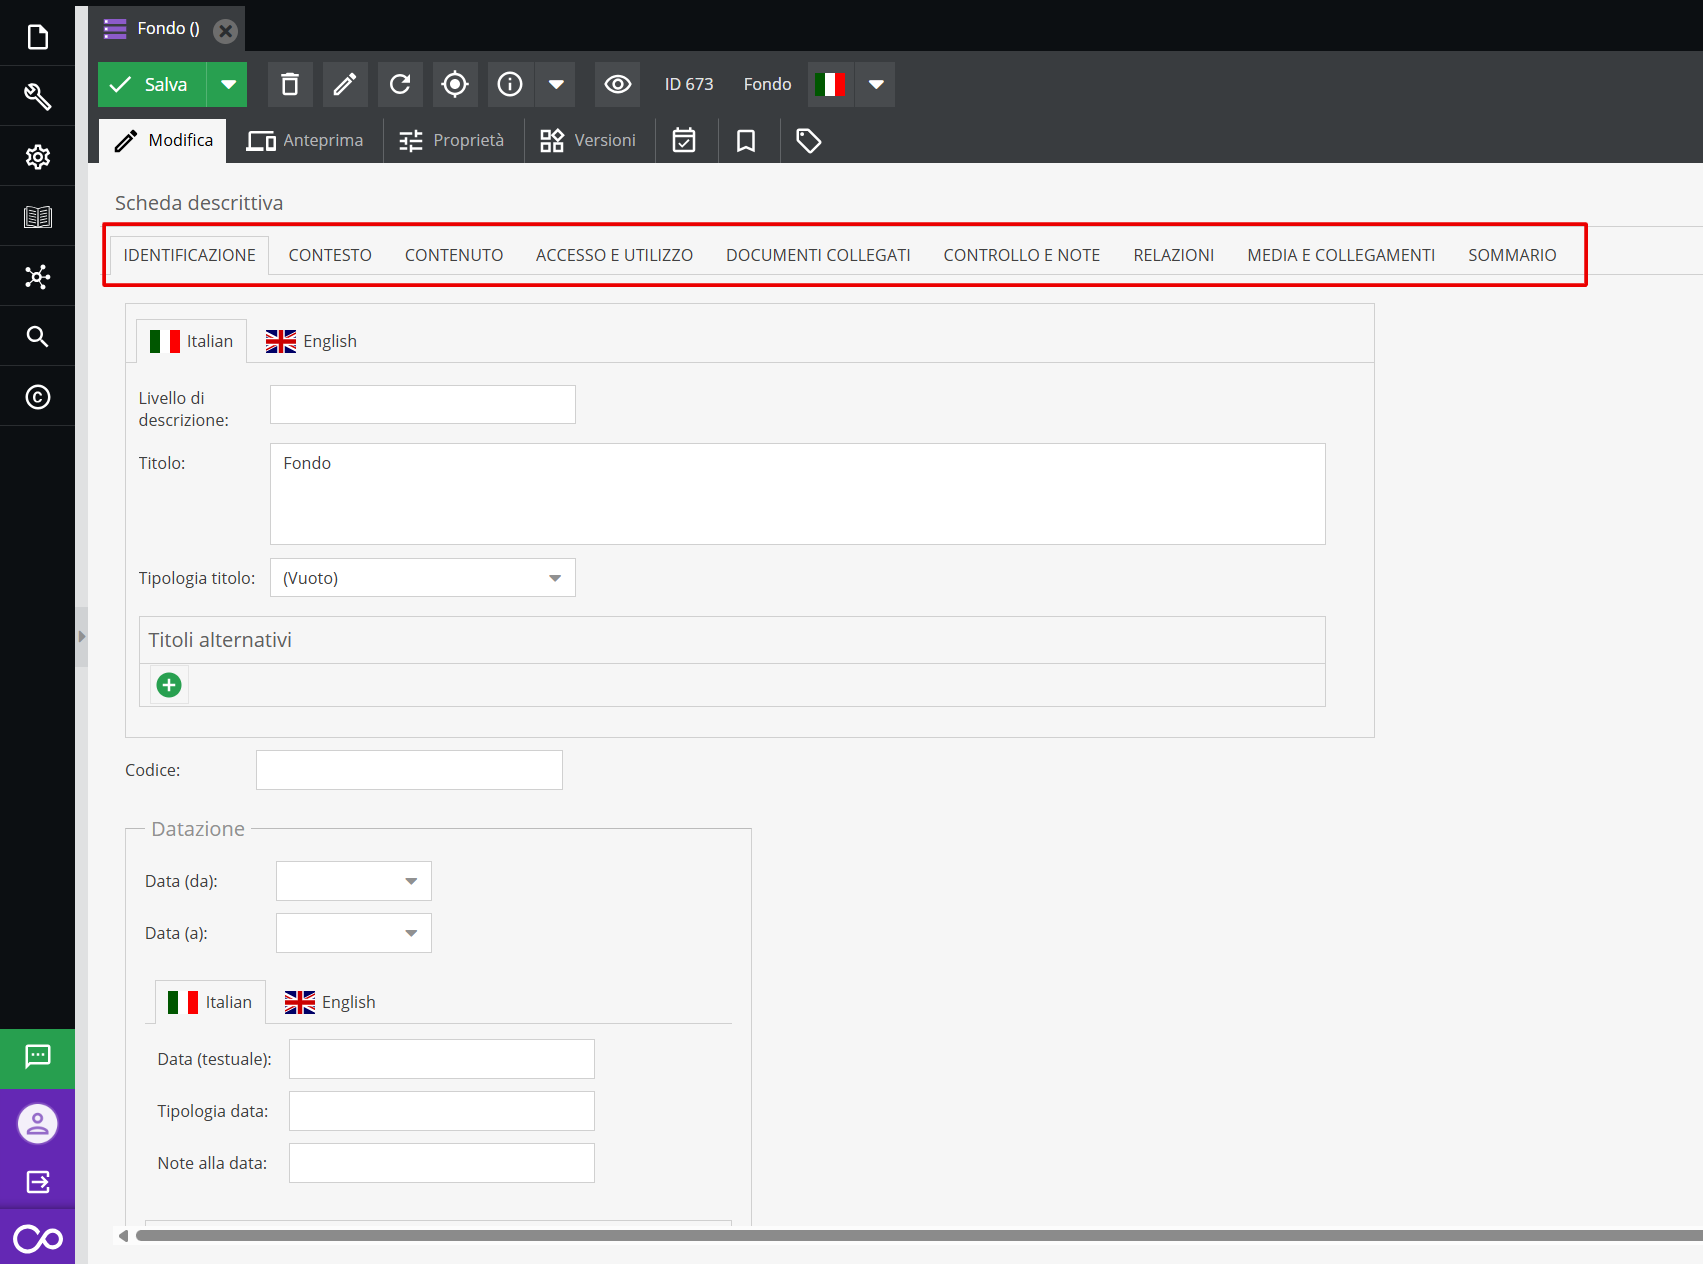
“Identification” Area This section contains fundamental data for the unique identification of the unit:
-
Level of description [cf. ISAD(G) 3.1.4.]: dropdown menu or text field allowing you to specify the archival level of the descriptive unit within the fonds arrangement. If it is a subordinate level complex, you can specify whether it is a series, subseries, or sub-subseries (for the “level” class); for an archival unit (folder), specify for example its internal subdivisions (sub-folder) or further documentary subdivisions (insert).
-
Title [cf. ISAD(G) 3.1.2.]: Name of the complex or unit. The system allows specifying whether the title is original (present on the documentation) or assigned by the cataloger (dropdown menu).
-
Provisional and definitive numbering: identification code, provisional or definitive, composed of prefix, sequential number, and suffix. Where possible, record every official numeric or alphanumeric code useful for the unique identification of the described unit.
-
Extent [cf. ISAD(G) 3.1.5.]: Quantitative indication of the documentation (e.g., number of boxes, folders, linear meters). For folders, it can indicate the number of physical units or sub-folders contained.
The “Calculated extent” field automatically counts the underlying descriptive units (e.g., number of folders in a series or inserts in a folder). This tool provides an immediate and constantly updated view of the actual extent of the archival complex, without manual input.
“Context” Area
- Administrative/Biographical history [cf. ISAD(G) 3.2.2.]: text field to provide an administrative/institutional history or biographical profile of the creating entity (or entities), placing the documentation in its context to facilitate understanding.
- Archival history [cf. ISAD(G) 3.2.3.]: text field to provide information regarding the provenance and history of the described unit, significant for the authenticity, integrity, and interpretation of the documentation.
- Immediate source of acquisition or transfer [cf. ISAD(G) 3.2.4.]: text field to indicate the entity from which the unit of description was acquired, the date, and/or the title of acquisition.
“Content” Area
- Scope and content [cf. ISAD(G) 3.3.1.]: text field to concisely outline the scope (chronological and geographical) and content (such as document type, subjects treated, administrative procedures) of the descriptive unit relevant to the level of description.
- System of arrangement [cf. ISAD(G) 3.3.4.]: text field providing specific information on the internal structure of the unit, its logical organization, and classification system adopted (e.g., alphabetical, chronological, by registry number, etc.).
- Appraisal, destruction and scheduling information [cf. ISAD(G) 3.3.2.]: text field to indicate appraisal and disposal operations carried out or planned on the unit of description over time, especially if relevant to the interpretation of the documentation.
- Accruals [cf. ISAD(G) 3.3.3.]: text field to report whether the described complex is “open” or “closed”.
“Access and use” Area
- Language / Scripts of material [cf. ISAD(G) 3.4.3.]: controlled vocabulary with a dropdown menu to indicate the language(s) used in the documentation within the unit of description.
- Conditions governing access [cf. ISAD(G) 3.4.1.]: indication of legal or physical conditions regulating access to the descriptive unit. Any restrictions on public consultation arising from privacy regulations (sensitive data), state secrecy, or fragile physical condition of the original medium discouraging handling should be noted here.
- Conditions governing reproduction [cf. ISAD(G) 3.4.2.]: text field to report copyright notes or technical limitations on photo reproduction.
- Physical characteristics and technical requirements [cf. ISAD(G) 3.4.4]: text field providing information on any physical characteristics and technical requirements relevant to the use of the unit of description.
- Finding aids [cf. ISAD(G) 3.4.5]: text field to report all finding aids relating to the unit of description, such as pre-existing paper inventories, indexes, databases, or catalogs.
“Allied materials” Area
- Existence and location of originals [cf. ISAD(G) 3.5.1]: text field to indicate the existence, location, availability, and/or destruction of originals.
- Existence and location of copies [cf. ISAD(G) 3.5.2]: text field to indicate the existence, location, and availability of copies of the unit of description.
- Publication note [cf. ISAD(G) 3.5.4]: text field to cite and/or provide information on publications referring to or based on the study of the unit of description.
Authorities
Authority records are entities external to the hierarchical tree of the fonds, yet closely interrelated with it. They possess descriptive autonomy, allowing entities (creators, custodians, or mentioned subjects) to be indexed independently of physical documents. The descriptive schemas on which the classes presented here (Corporate Bodies, Families, Persons) were modeled have been defined respecting an essential set of elements from the ISAAR(CPF) standard. The descriptive forms are divided into sections (here also called “information areas”) and a Summary, which can be navigated according to cataloging needs by selecting them from the top bar on the page.
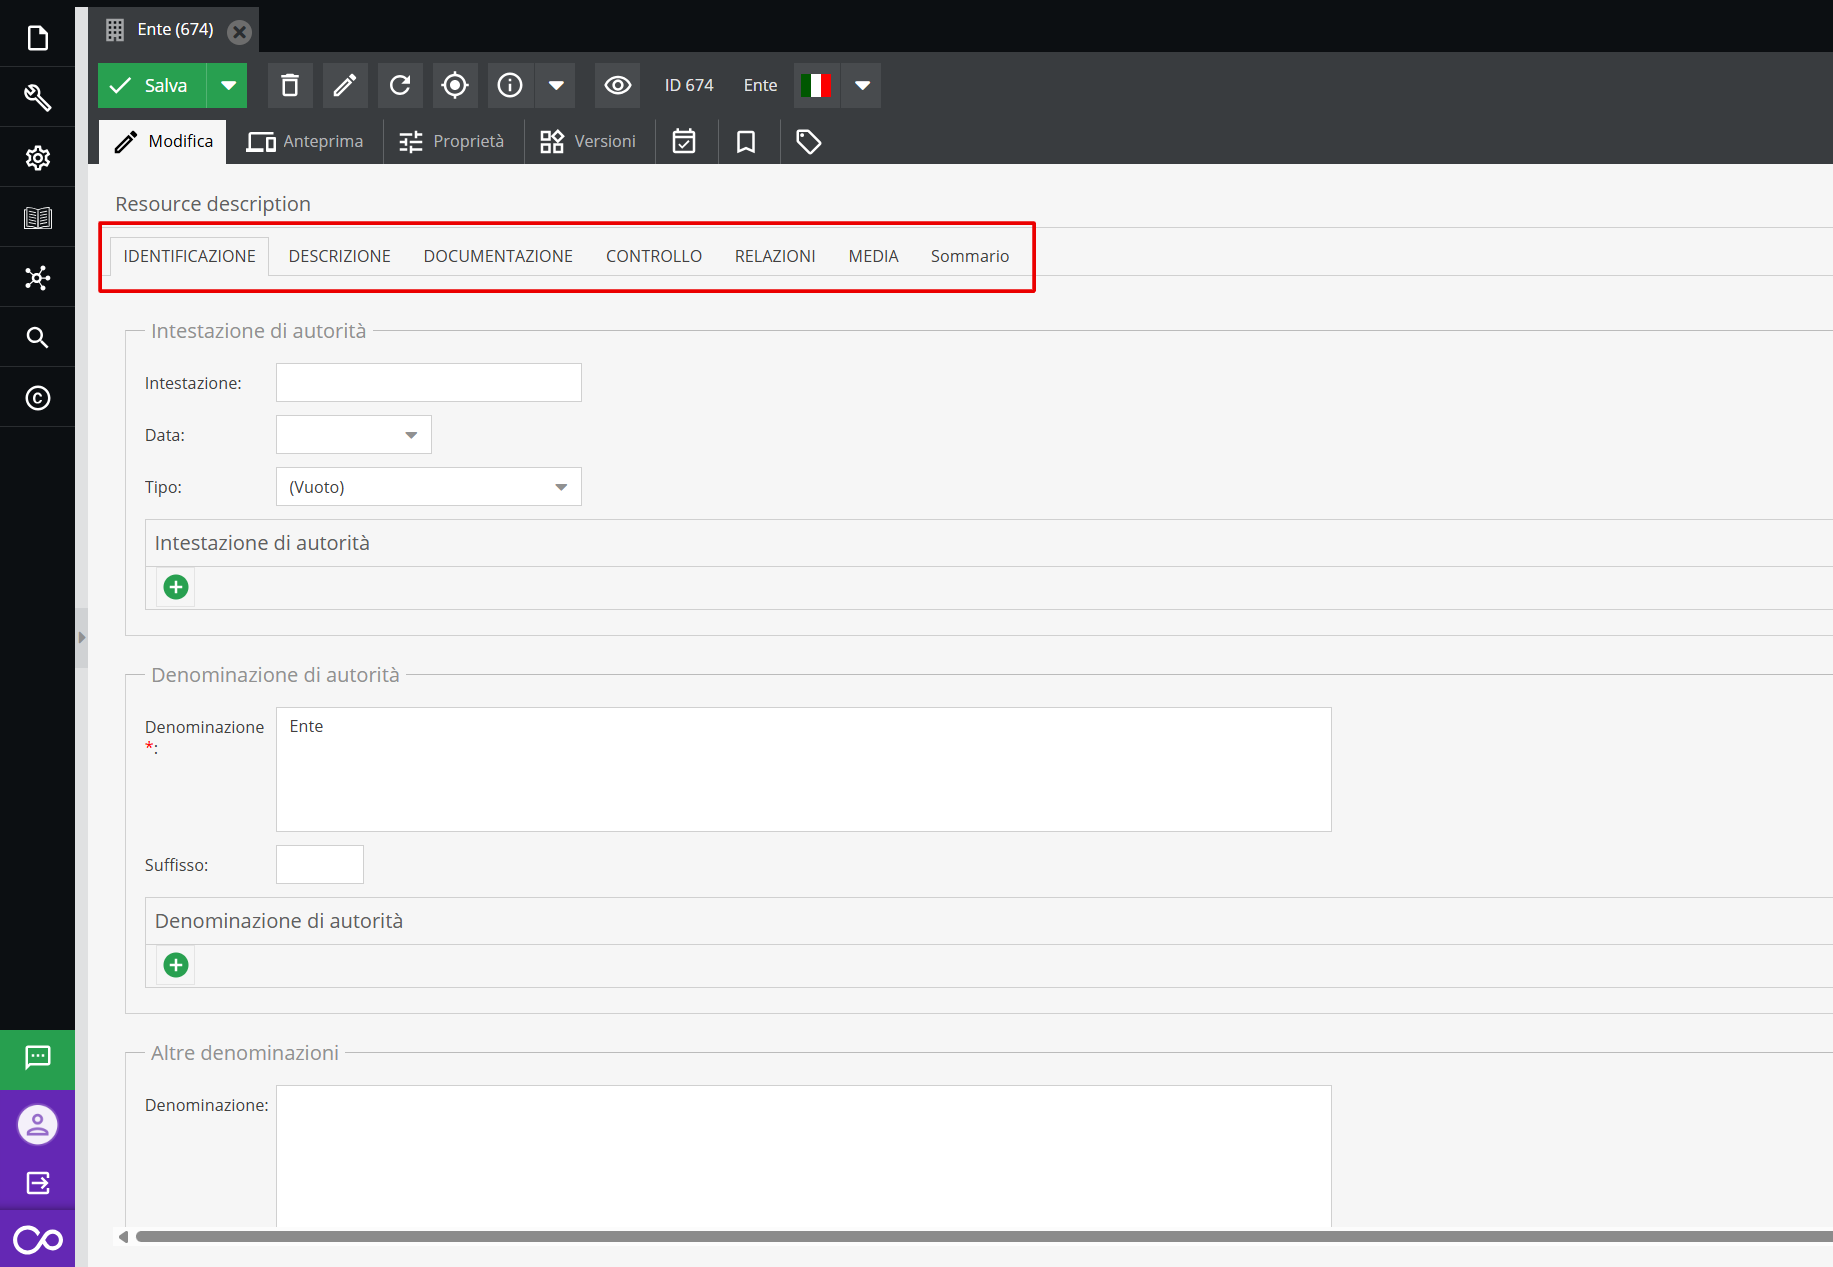
“Identity” Area
- Authorized form(s) of name [cf. ISAAR 5.1.2]: text field to enter the authorized form of the name of the corporate body, person, or family.
- Other forms of name [cf. ISAAR 5.1.5]: Repeatable field for entering name variants (parallel forms, acronyms, historical names).
“Description” Area
- Dates of existence [cf. ISAAR 5.2.1]: two separate fields to indicate the chronological lifespan of the entity. For Corporate Bodies, foundation and dissolution dates are indicated; for Persons, birth and death dates.
- History [cf. ISAAR 5.2.2.]: text field to provide a concise history of the corporate body, family, or person.
- Legal status [cf. ISAAR 5.2.4.]: text field to report the legal status of the entity (e.g., public entity, joint-stock company, unincorporated association).
- Functions, occupations and activities: corresponding to field 5.2.5 of the ISAAR standard. Describe in the text field the main activities carried out by the subject (e.g., positions held, professions, spheres of institutional action).
References
Classes in this group constitute “cross-cutting” records, allowing descriptive units belonging to different fonds to be linked under a single common denominator (e.g., the same Place, Topic, or Event). Starting from the classes listed in the corresponding section under Object classes, below are some fields related to the Place and Loan classes, among the most commonly used across project environments.
The descriptive forms of the above-mentioned classes are characterized by a division into sections (here also defined as “information areas”) and a Summary, which can be navigated according to the cataloger's needs by selecting them from the top bar on the page.
“Identification” Area of the Place form
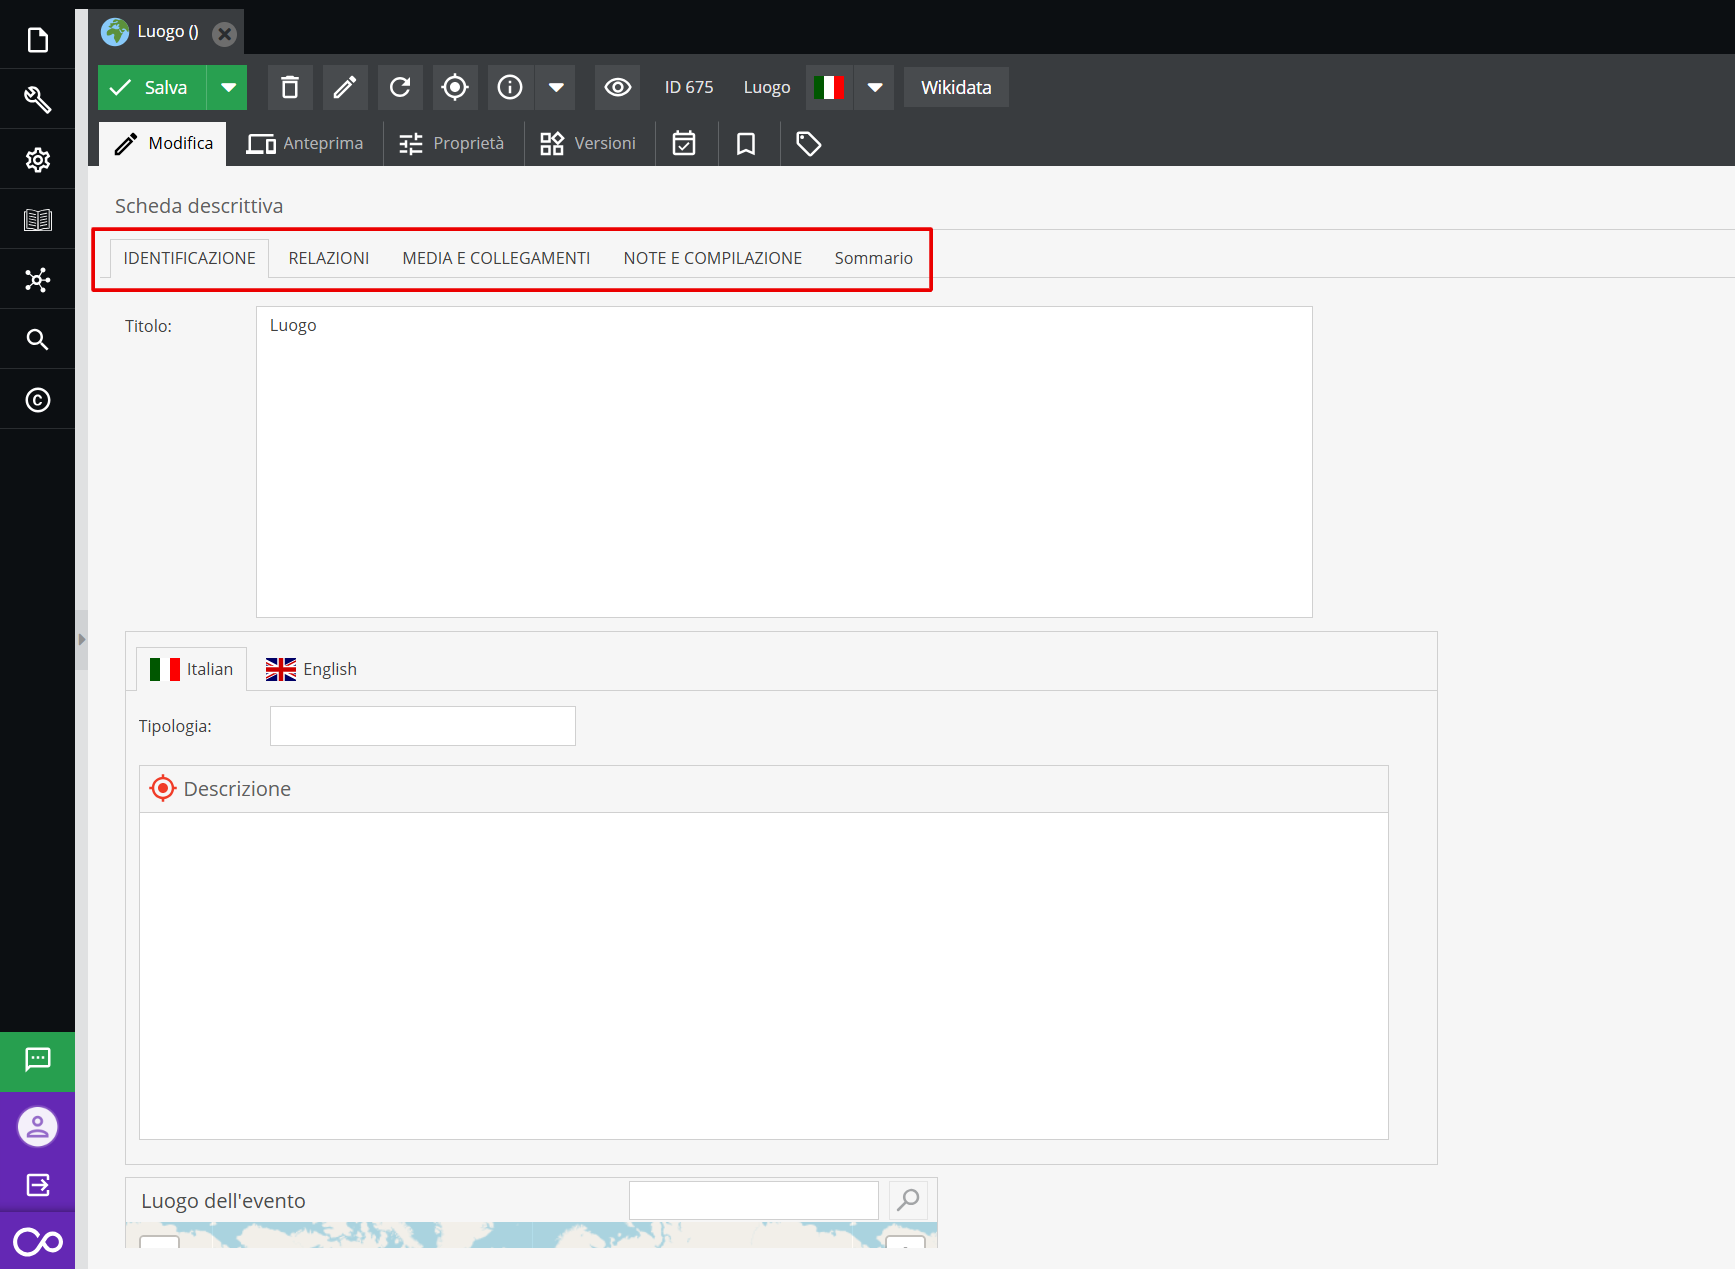
- Title: name assigned to the place.
- Type: text field specifying the nature of the described place (e.g., Registered office, Production unit, Filming location).
- Description: text field to describe the place in question, its history, and relationship with the creating entity or custodian.
- Event location: Geolocation field, based on Google Maps, for entering the specific address of the place. You can enter a text address or GPS coordinates (Latitude/Longitude) for precision mapping.
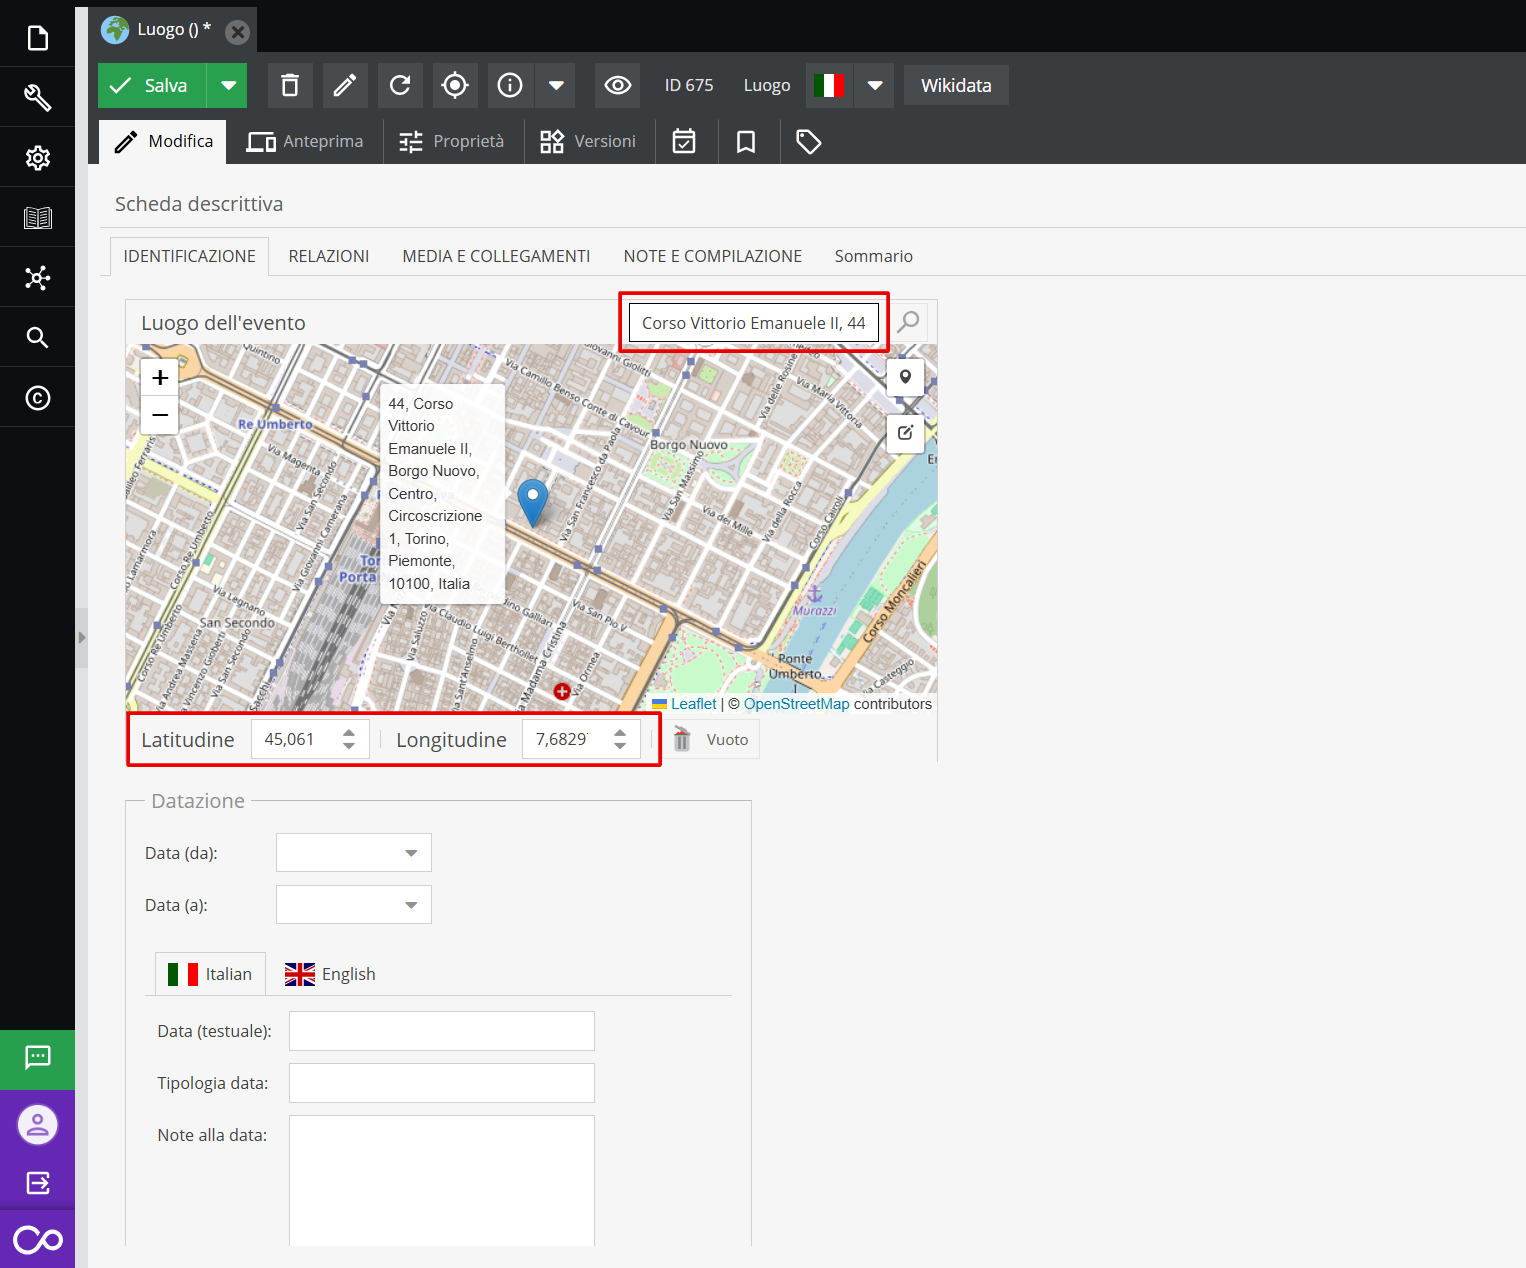
- Dating: chronological boundaries of existence or use of the place by the entity can be recorded here.
“Identification” Area of the Place form
- Title: name assigned to the place.
- Type: text field specifying the nature of the described place (e.g., Registered office, Production unit, Filming location).
- Description: text field to describe the place in question, its history, and relationship with the creating entity or custodian.
- Event location: Geolocation field, based on Google Maps, for entering the specific address of the place. You can enter a text address or GPS coordinates (Latitude/Longitude) for precision mapping.
- Dating: chronological boundaries of existence or use of the place by the entity can be recorded here.
“Identification” Area of the Loan form
The Loan form is the tool dedicated to managing physical movement and administrative traceability of archival and documentary units. It allows documenting outgoing item flows (e.g., for exhibitions or restorations) or incoming flows (e.g., temporary third-party deposits), ensuring protection and oversight functions over heritage assets.
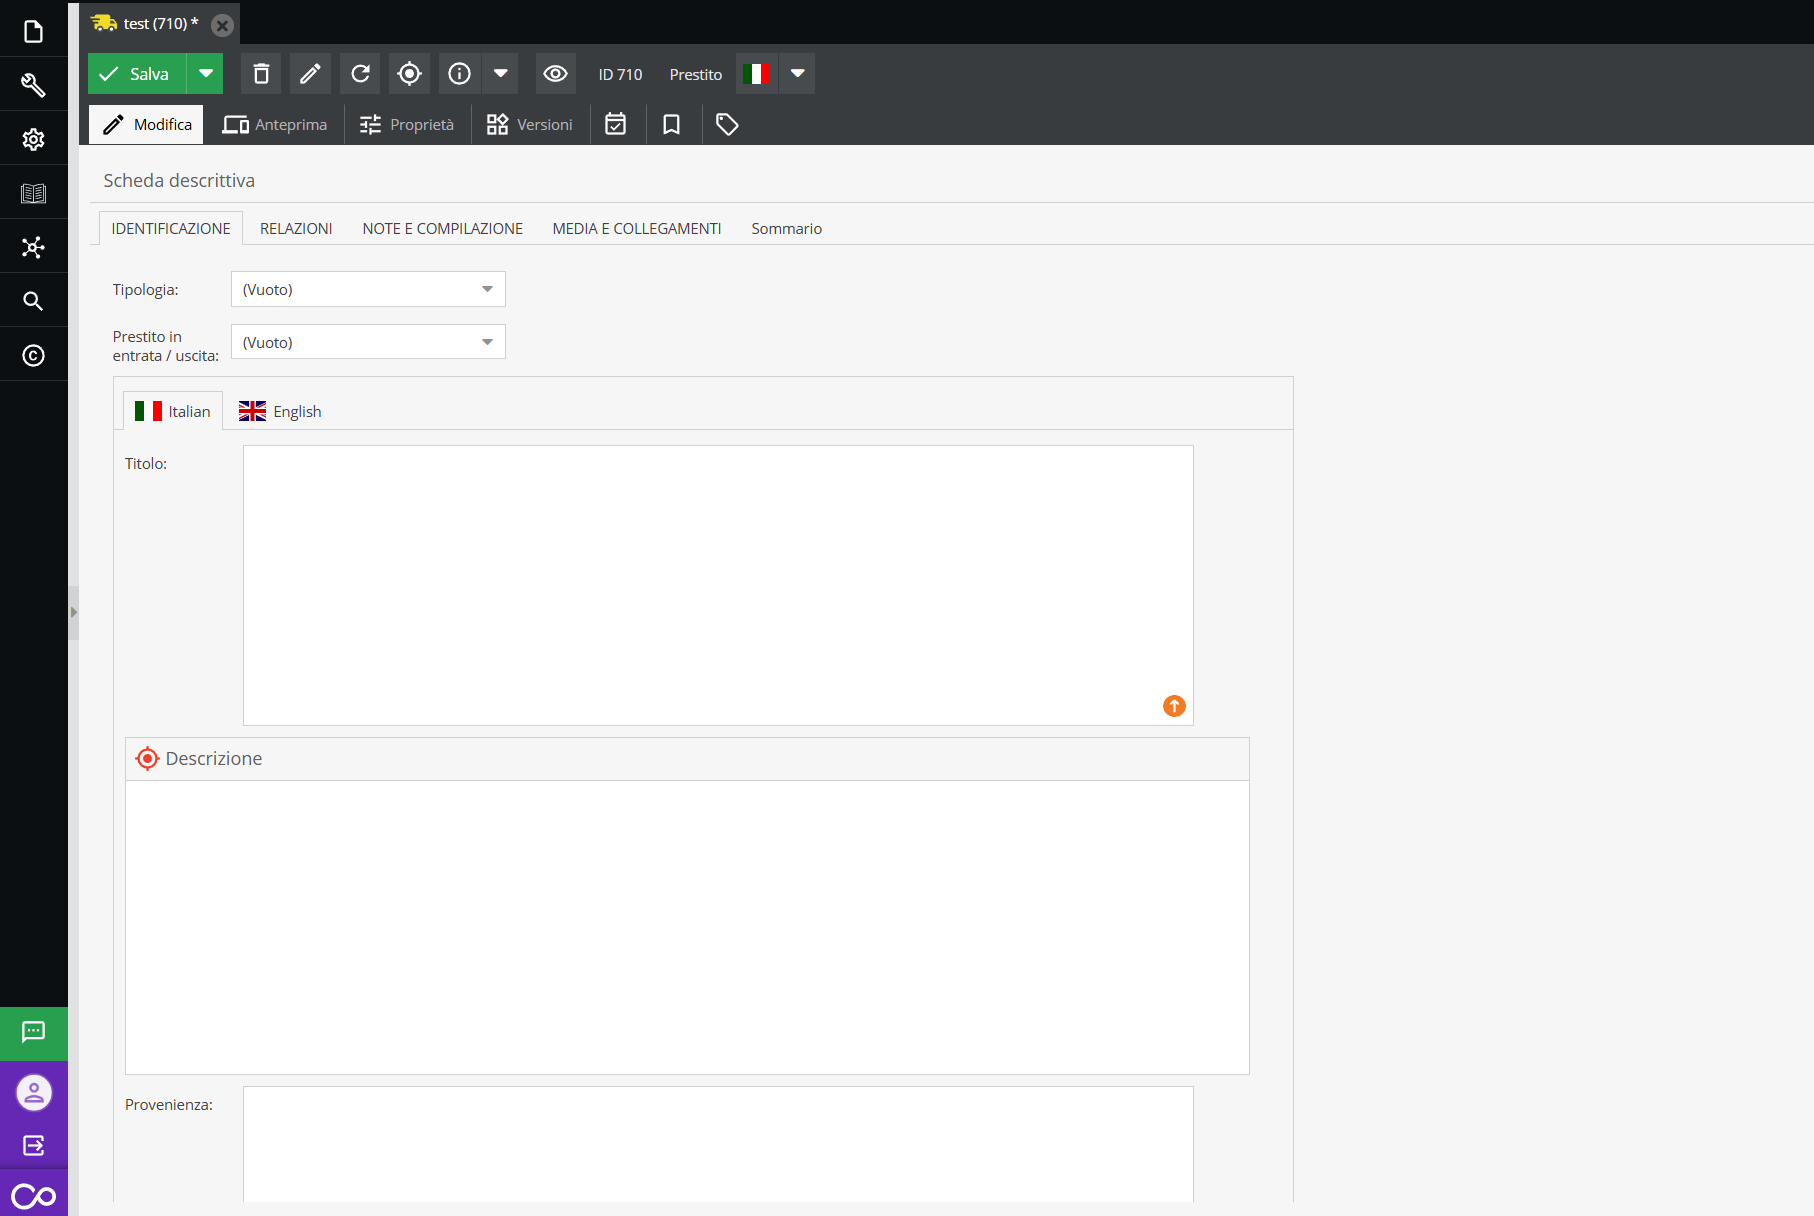
The “Identification” area features fields targeted at managing logistical flows:
- Type: controlled vocabulary dropdown menu allowing classification of the operation's nature (e.g., Exhibition, Restoration, Study, Deposit).
- Incoming / Outgoing Loan: selector to identify the direction of the logistical flow and the resulting legal and conservation responsibilities.
- Description: text field for contract condition details, conservation state of the item upon departure/arrival, or scientific purpose of the movement.
- Provenance: indicates the third party involved in the movement.
- Dating: chronological boundaries of the loan.
Documentary units
Simple descriptive units (documents, photographs, objects, audio/video, etc.) reside in this macro-section, allowing the mapping of the archive's heterogeneous holdings.
This guide does not delve into the analytical detail of individual area fields, but presents below an overview of environments and data types manageable for each class.
- Audio/Video: class dedicated to cataloging video footage and sound recordings (tapes, films, digital files). Forms integrate metadata targeted at multimedia management: from dialogue language to color rendition, up to the nature of the original physical support. A central aspect is time measurement, with fields designed to accommodate exact duration (hours, minutes, seconds) and technical data of the digital format.
- Bibliographic: used for library material, monographs, or periodicals. Features specific fields such as “Contained in” and “Volume”, allowing the analytical description of contributions hosted within larger works, such as journal articles or essays in collective works and miscellanies.
- Documents, Resolutions, Minutes, Correspondence: These classes, despite different purposes (administrative or epistolary), share structured fields indicating extent, language, script type, support nature, physical dimensions, marks, and emblems present.
- Photography: form structured for managing prints, negatives, and contact sheets. In addition to chromatic characteristics, the system allows specifying material and execution technique. Description is enriched by fields for inscriptions, coats of arms, or manufacturer marks, alongside technical data of the digital format.
- Iconographic: intended for fine graphic material such as prints, drawings, posters, and cartographic material, with fields describing technique, support, and scale of representation.
- Manuscript: specific form for philological identification of codices, diaries, or fragments, featuring fields such as Incipit and Explicit, plus specific notes on the codicological nature of the piece.
- Object: class dedicated to cataloging physical artifacts, relics, or three-dimensional objects (e.g., medals, tools) related to the fonds, focusing on material description and conservation state.
Fields common to multiple forms
“Identification” Area: Media preview and Captioning in the object form
Numerous classes feature two view-only fields at the top of the tab: Media preview and Captioning. These are not populated independently, but reflect the media (digital assets) linked to the object from the fields in the "Media and documentation" tab.
-
Media preview: displays a thumbnail of images and documents linked to the descriptive form.
-
Captioning: shows the text generated by the "Captioning" feature (see “Ask AI” feature), which suggests a description of the media content.
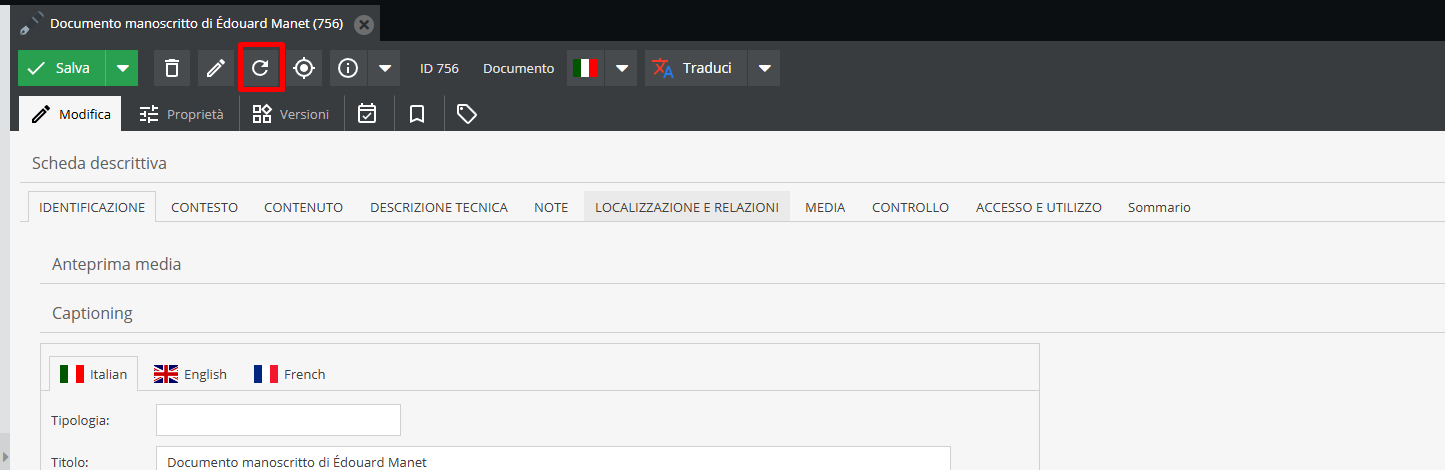
Both fields update only after reloading the form (Reload button in the toolbar): linking a new image in the gallery or generating a new caption on media is not automatically reflected in these fields until the form is reloaded.
“Identification” Area: dating
Specifying chronological boundaries is a common element across all descriptive schemas.
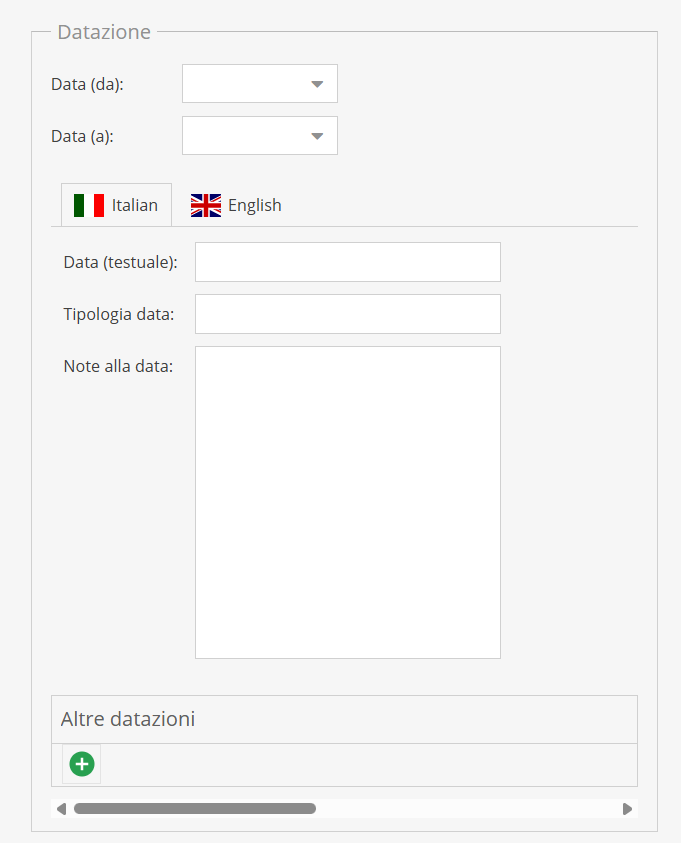
The system allows expressing dates through the following fields:
- Date (from) - Date (to): Fields for entering chronological boundaries in normalized format (DD-MM-YYYY; e.g., 05-06-2013). Dates can be selected via calendar or typed manually using hyphens as separators. Please note: filling in these fields is mandatory, as the entered data powers front-end chronological search features.
- Textual date: field intended for rendering the date in natural language; using the example above, the date 05-06-2013 will be rendered as: June 5, 2013.
- Date type: text field specifying the nature of the entered date. Common examples include: “certain date”, “inferred date”, “event date”, “copy date”.
- Date notes: field dedicated to methodological clarifications on dating. Reasons why a date was attributed should be recorded here (e.g., “date inferred from paper watermark”) or anomalies noted, such as documentation pre-dating or post-dating the main chronological boundaries.
- Other dates: repeatable field allowing additional time references if the descriptive unit has multiple significant dates for research or historical context.
“Media and links” Area
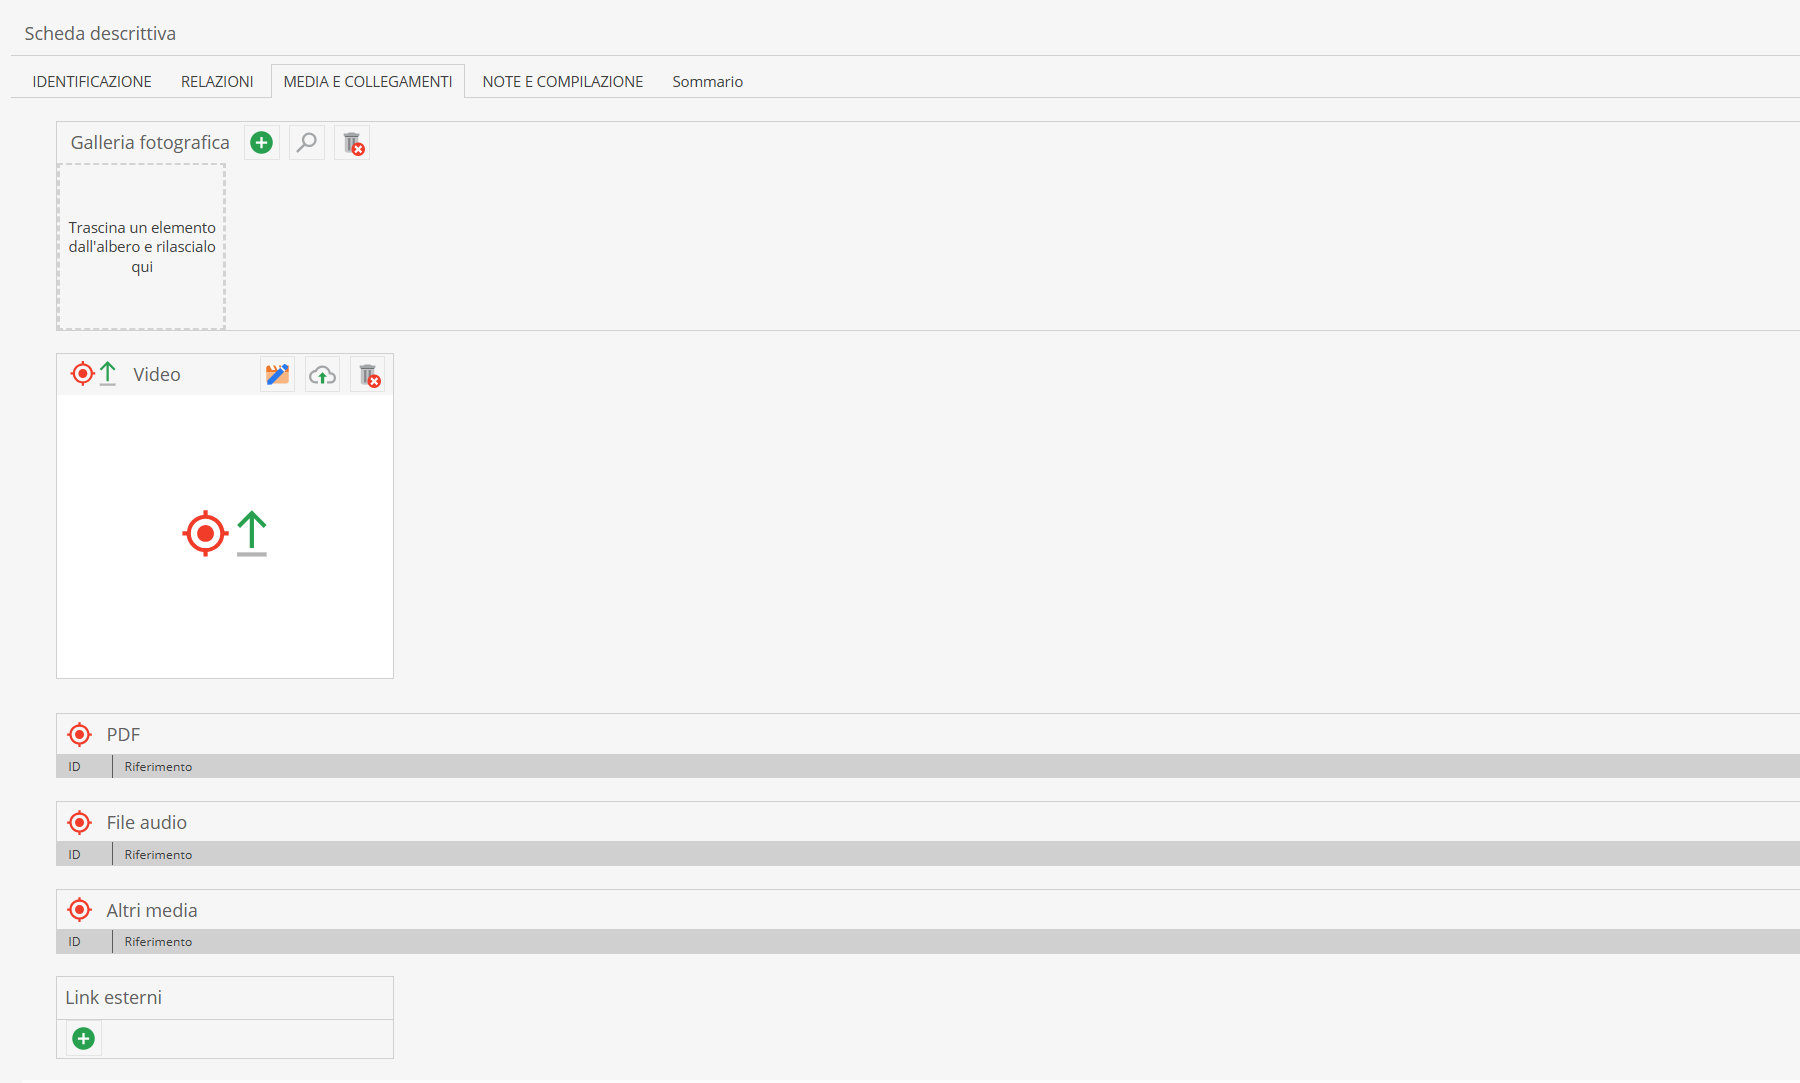
Digital assets are not uploaded/imported directly onto the object form; they are linked/dragged via drag & drop from the Media (or Assets) section directly into the relevant section.
To link files within descriptive forms, assets must first be imported into the "Media" section (see section File management and the entire chapter on Media).
Each asset type has its own extension; they can be images (in .tiff or .jpeg formats), videos, audio, or PDF documents.
In the media section, each extension can be placed in its designated area.
The main fields present are briefly illustrated below.
- Photo gallery: here you can directly link photo formats using drag & drop. Assets should be dragged into the area of interest.
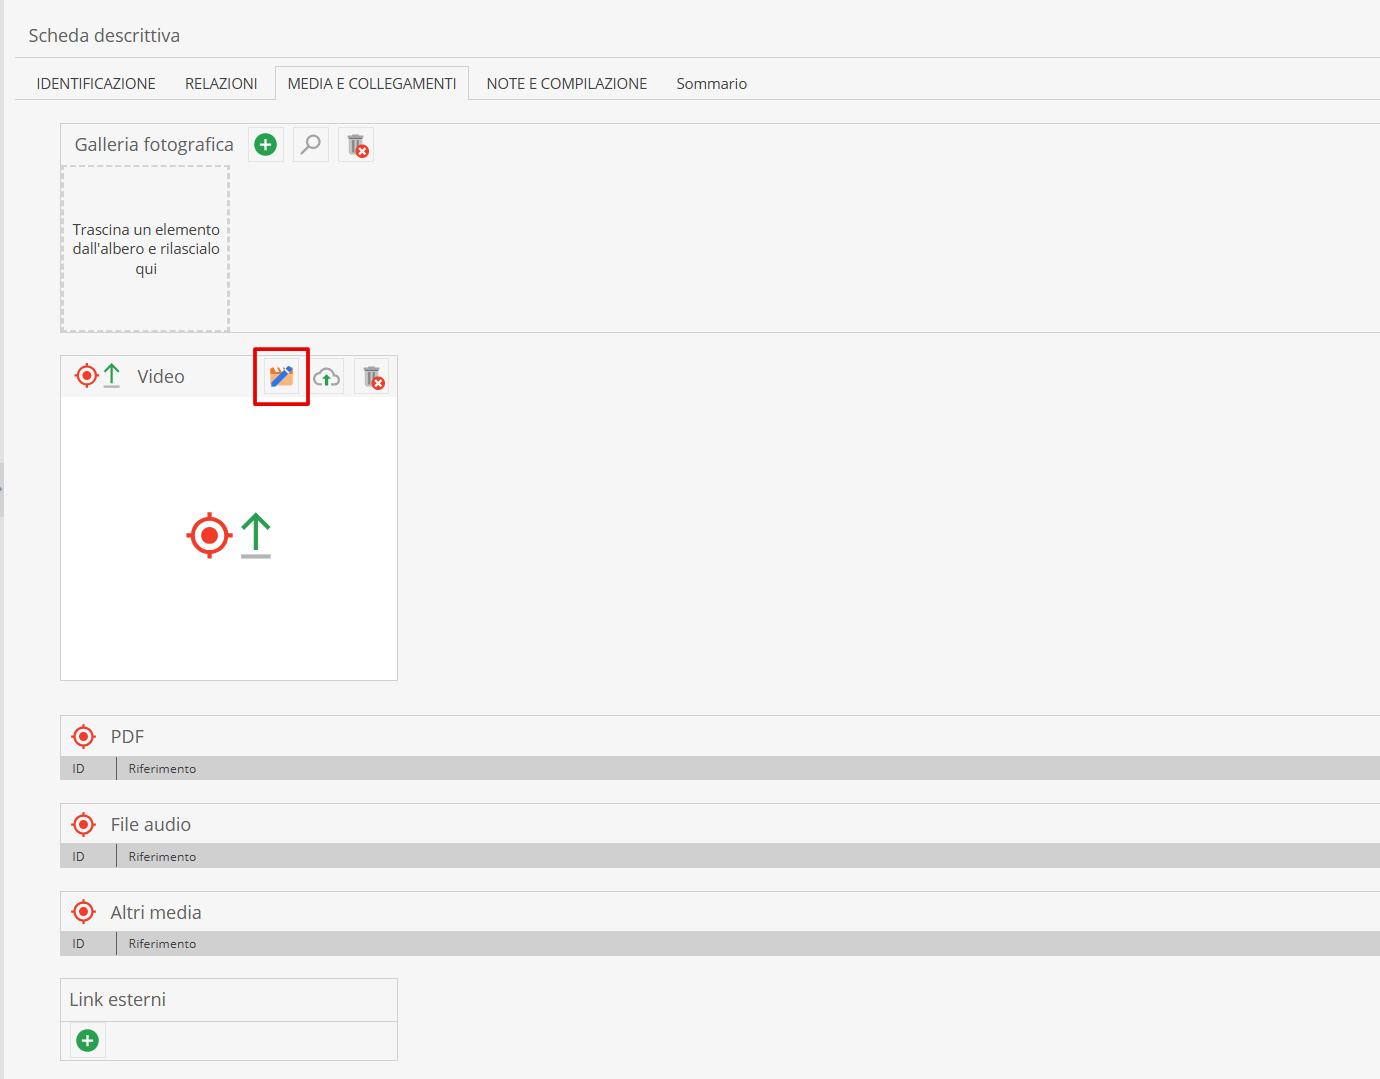
- Video: click on the “edit” symbol and drag videos from the Media section directly into the highlighted field.
-
Other media: various formats can be placed in this field. It is typically used when multiple videos or images need to be inserted, facilitating bulk linking operations.
-
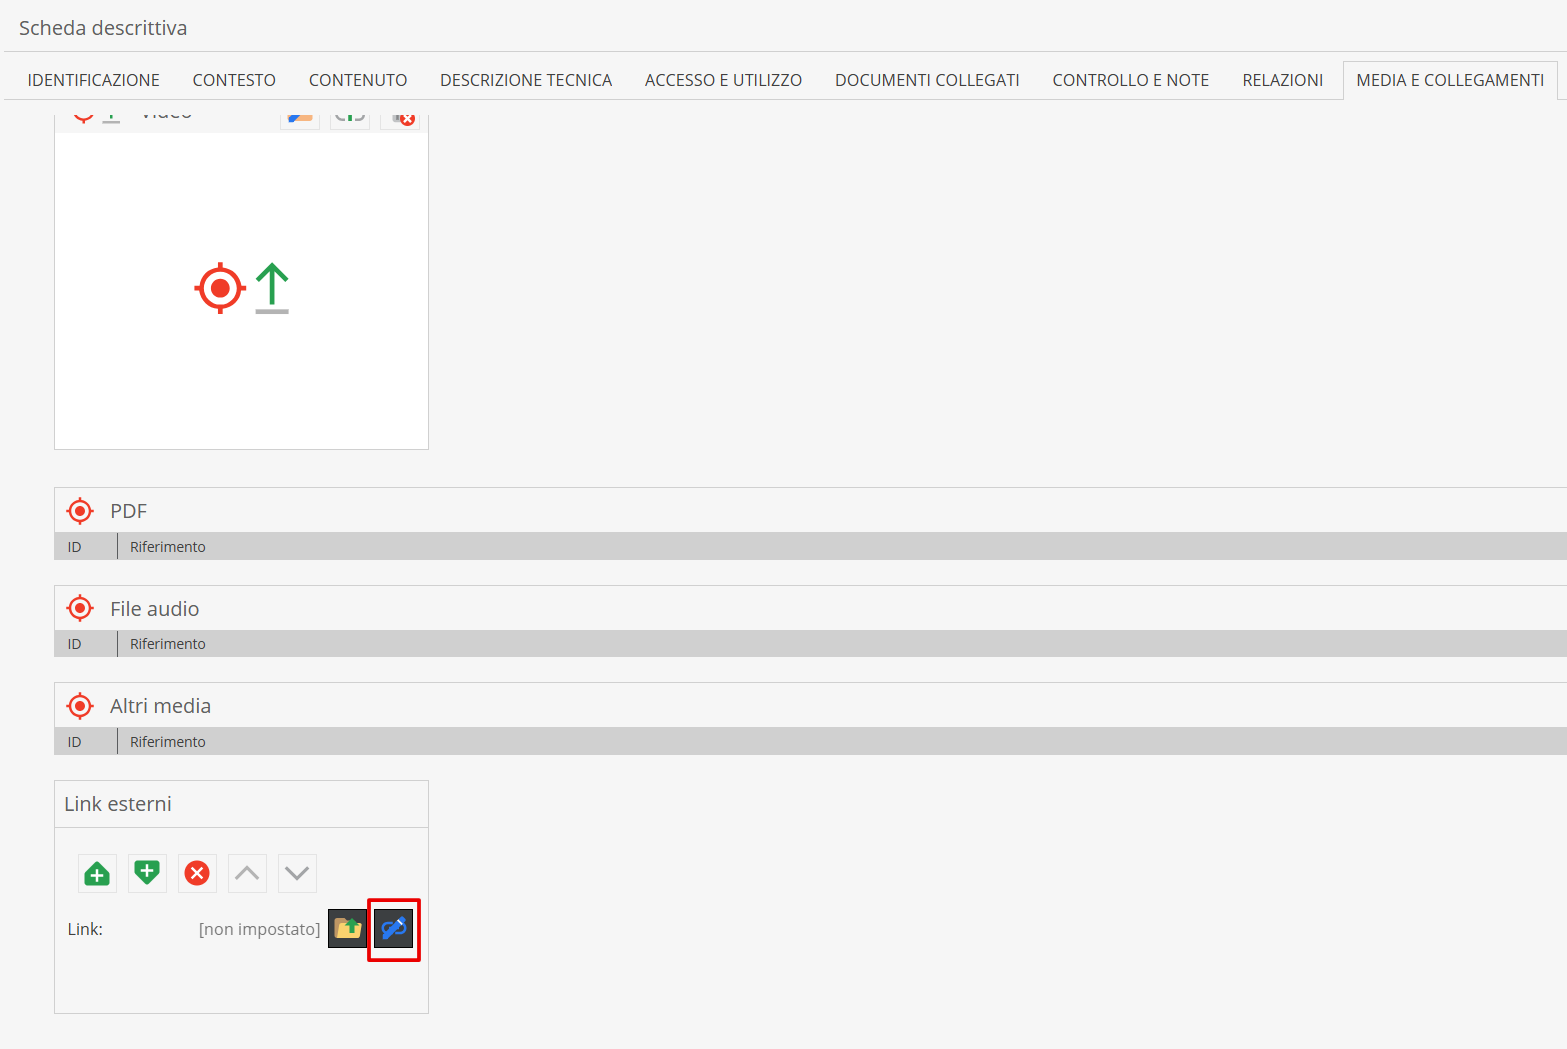
External links: you can also insert links to external sites (e.g., YouTube, Wikipedia, etc.). Click on the "Add" symbol in the specific field.
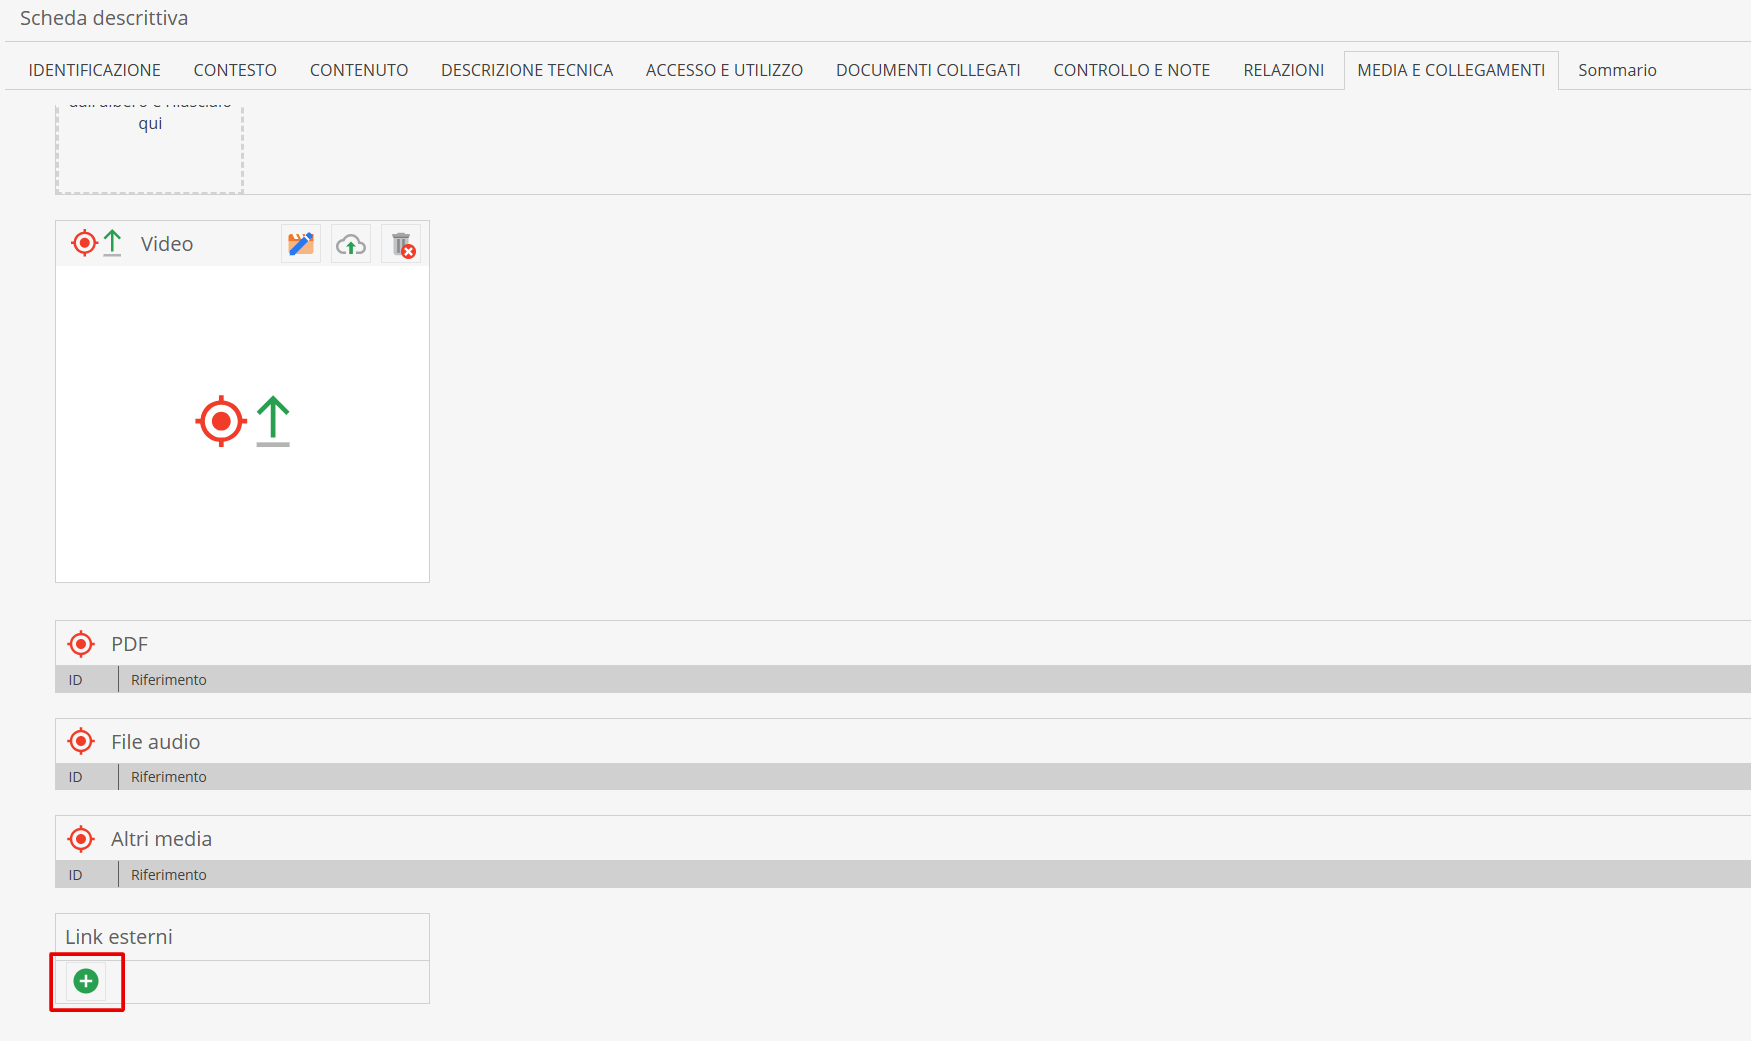
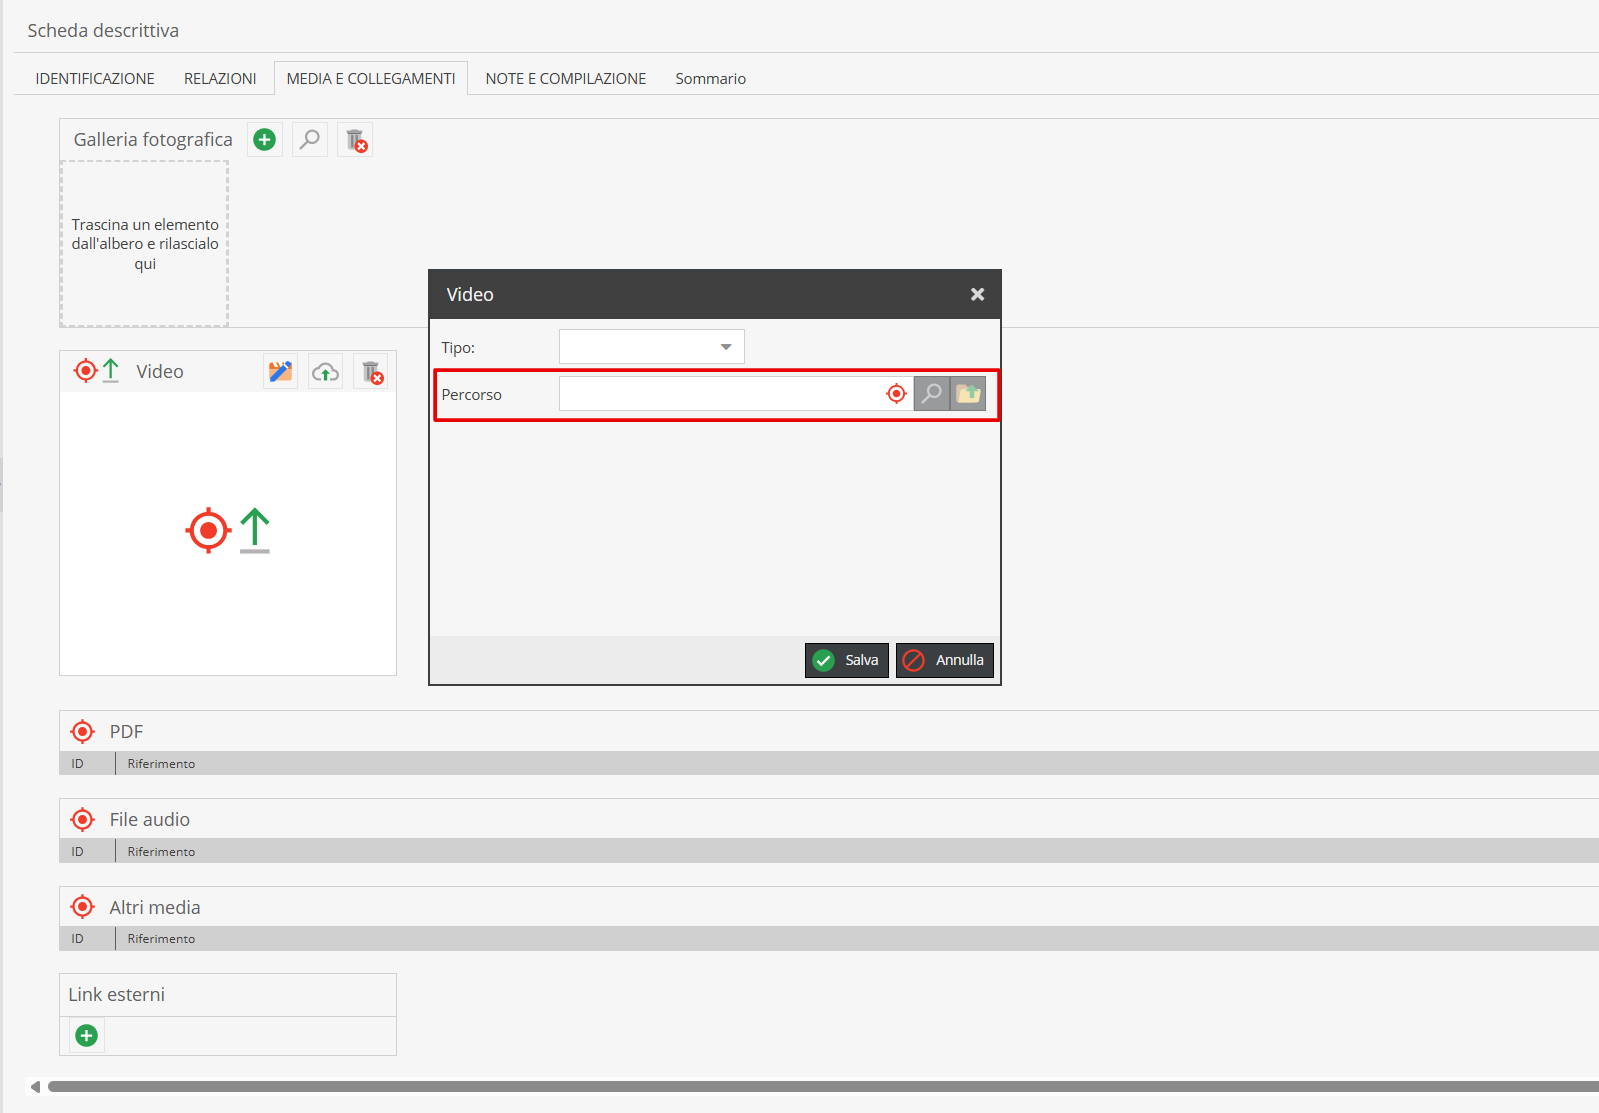
Proceed by clicking on the “Edit” symbol.
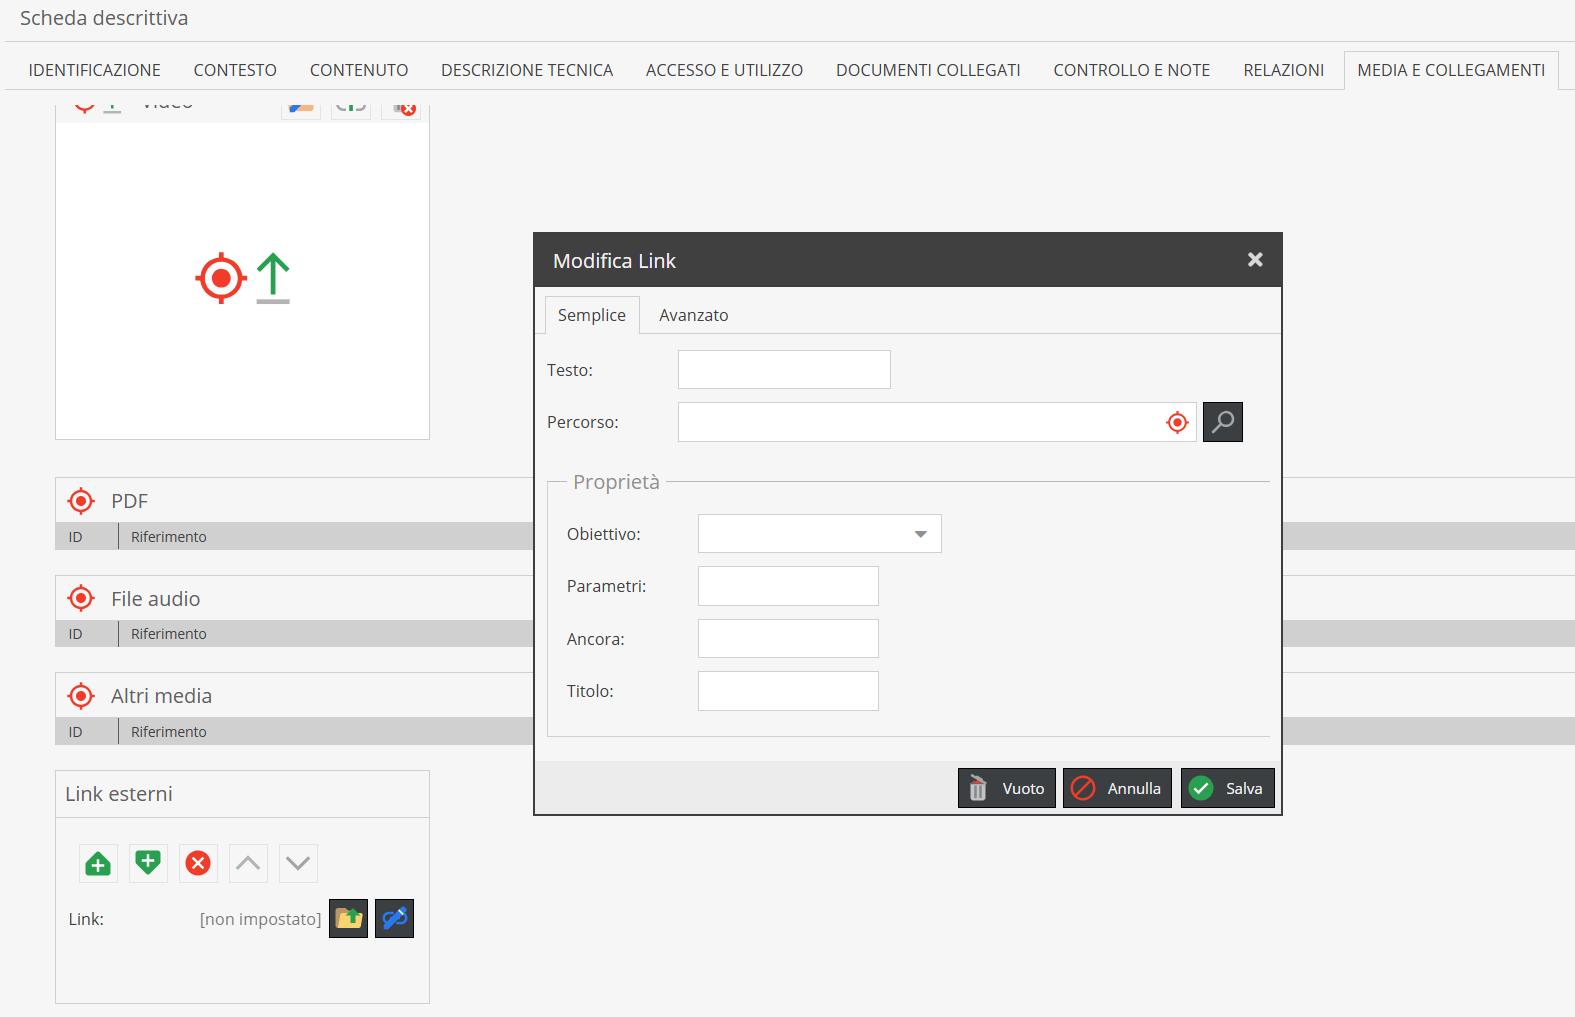
A modal will open. Enter the complete URL into the "Path" field via simple copy/paste from the website. If you wish to assign a title or description for the linked address, fill in the “Text” field.
“Control and notes” Area
This section was created with reference to the notes area (6) and control area (7) under ISAD(G) standards and includes:
- Cataloging level: controlled vocabulary (dropdown menu) indicating the progress status of the form, allowing workflow tracking.
- Responsibility: repeatable section for historical tracking of edits made to the form. For each intervention, Action (controlled vocabulary indicating the operation type), Date, and Compiler (text field) are recorded.
- Notes: free text field intended for relevant information that does not fit into structured fields of other information areas.
- Archivist's notes: technical field intended to document methodological choices made while creating the form, sources used, or interpretative doubts. Unlike general "Notes", these are typically aimed at internal or scientific use to explain how the description was constructed.
“Relationships” Area
The Relationships area allows establishing logical and scientific connections between different descriptive units in the system. To establish a relationship, at least one of the two units (the “host” or the one being linked) must already be saved in the system.
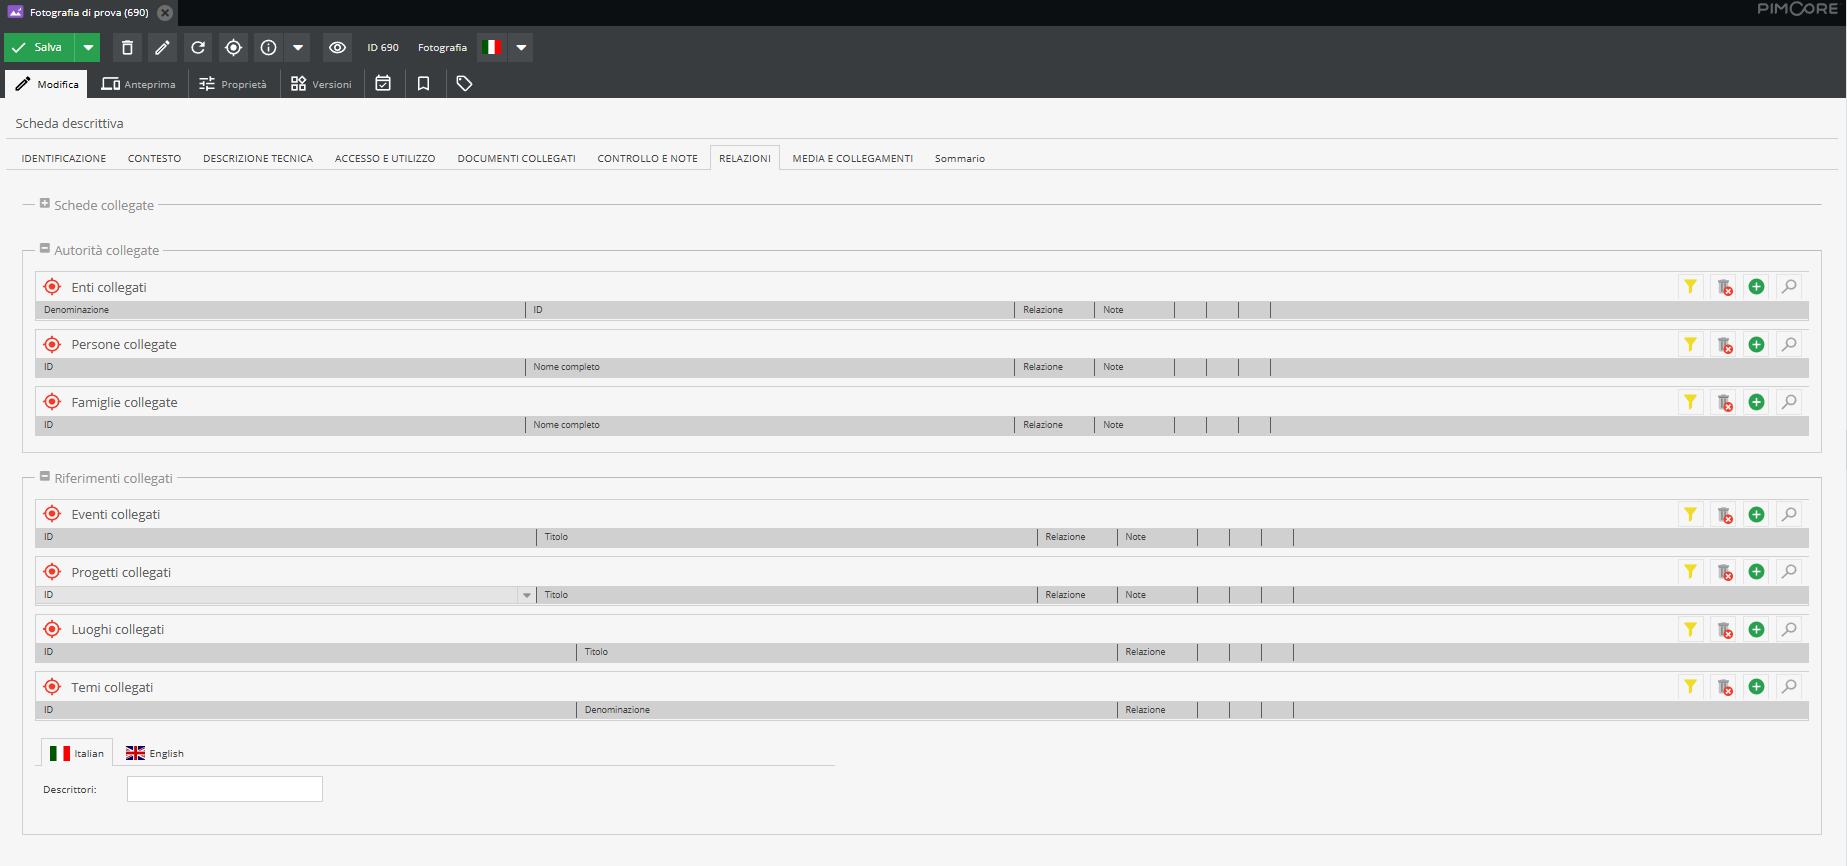
If the units to be linked are already present in the tree structure, the system offers two operational modes.
Mode 1. Click on the “Search” icon (magnifying glass). A search interface pre-filtered for the relevant object class will open.
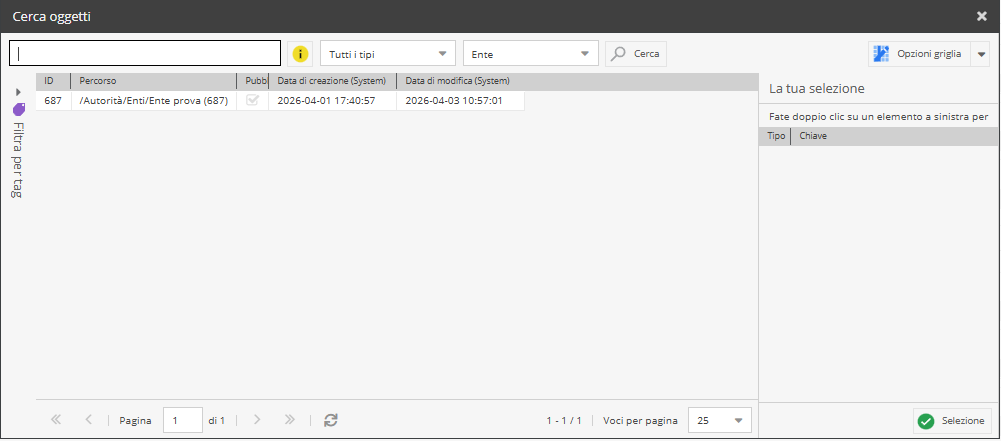
Locate the desired records and select them.
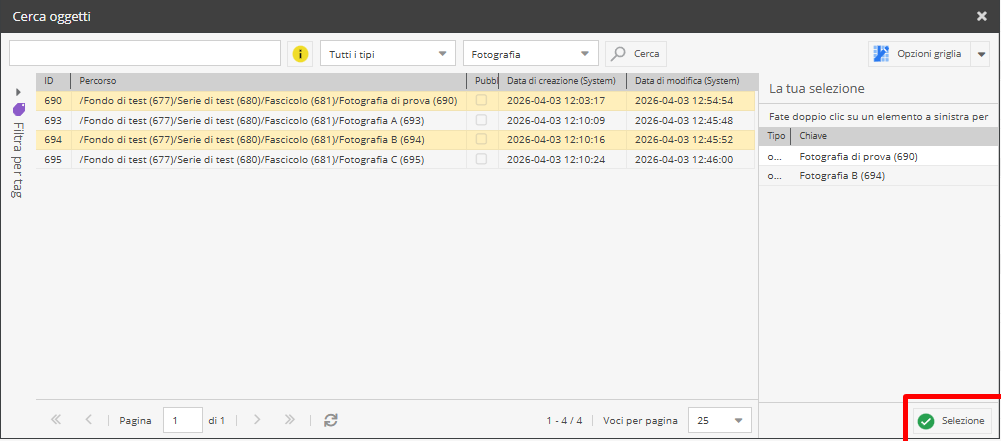
Double-click on an individual item or right-click on a multiple selection and click “Add” to transfer the records to the side panel “Your selection”.
Multiple selection can be performed by holding down the Shift key (or Command/Ctrl depending on contiguous/non-contiguous items). Once completed, right-click and choose “Add” to bring the entire selection into the dedicated area.
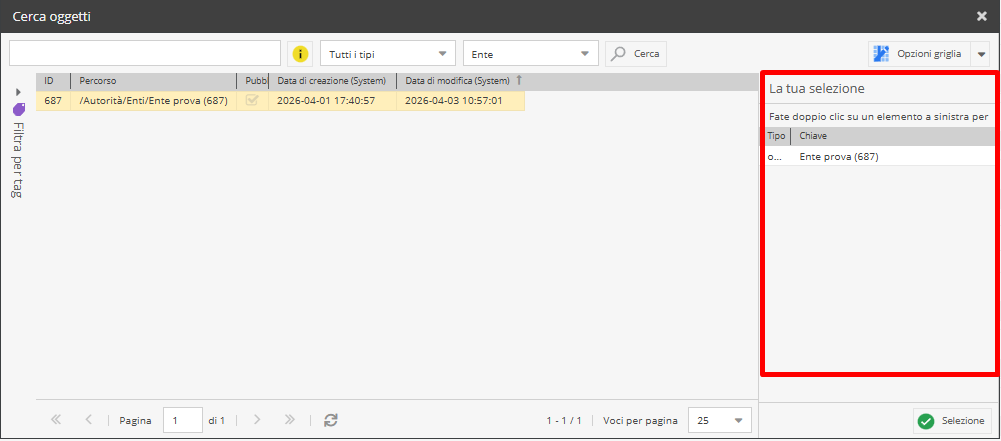
Once finished, click “Selection”. Afterwards, the linked item will be visible in the reference bar.

Mode 2. You can link two or more items together simply by dragging the item of interest onto the corresponding bar (drag & drop mode).
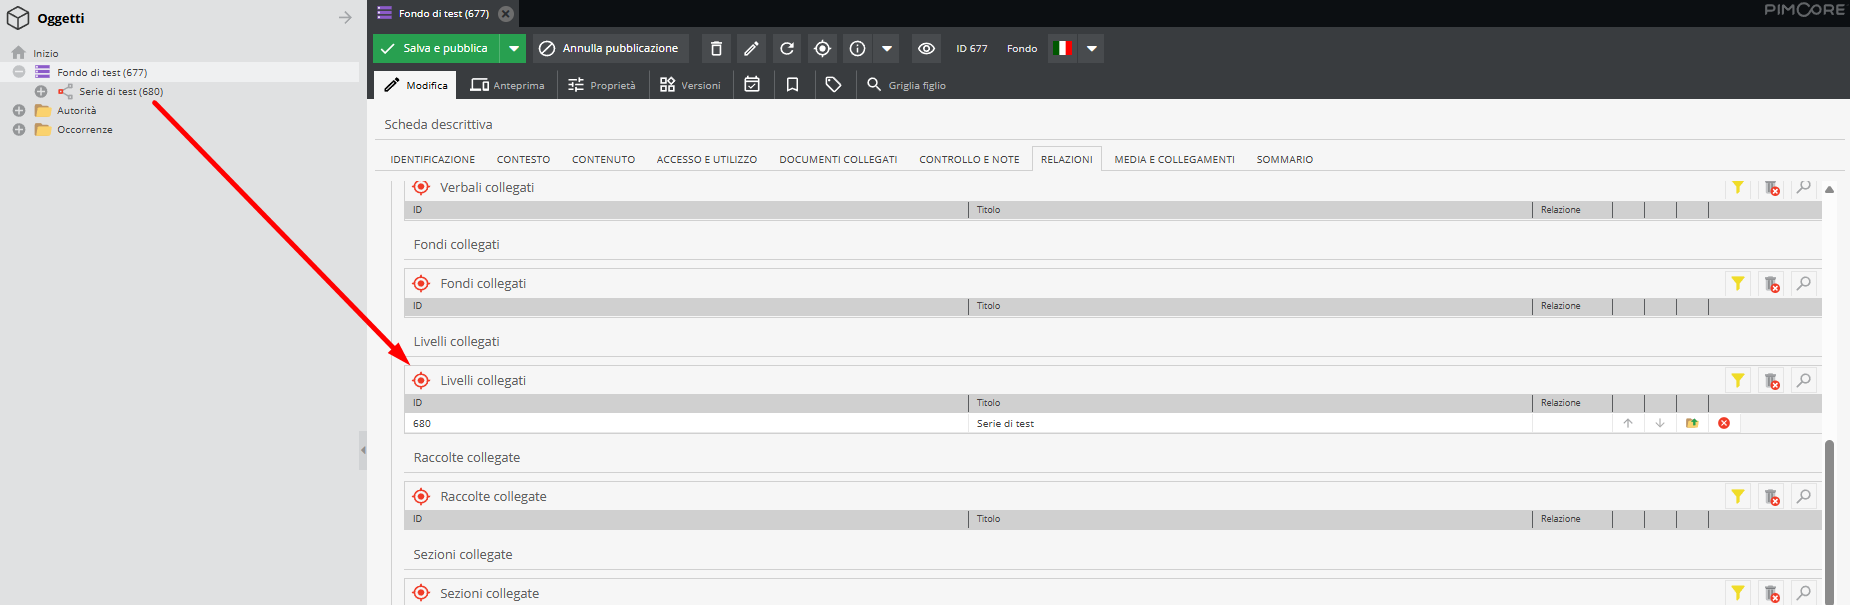
When dragged correctly, the item can be released when a green ✓ symbol appears.
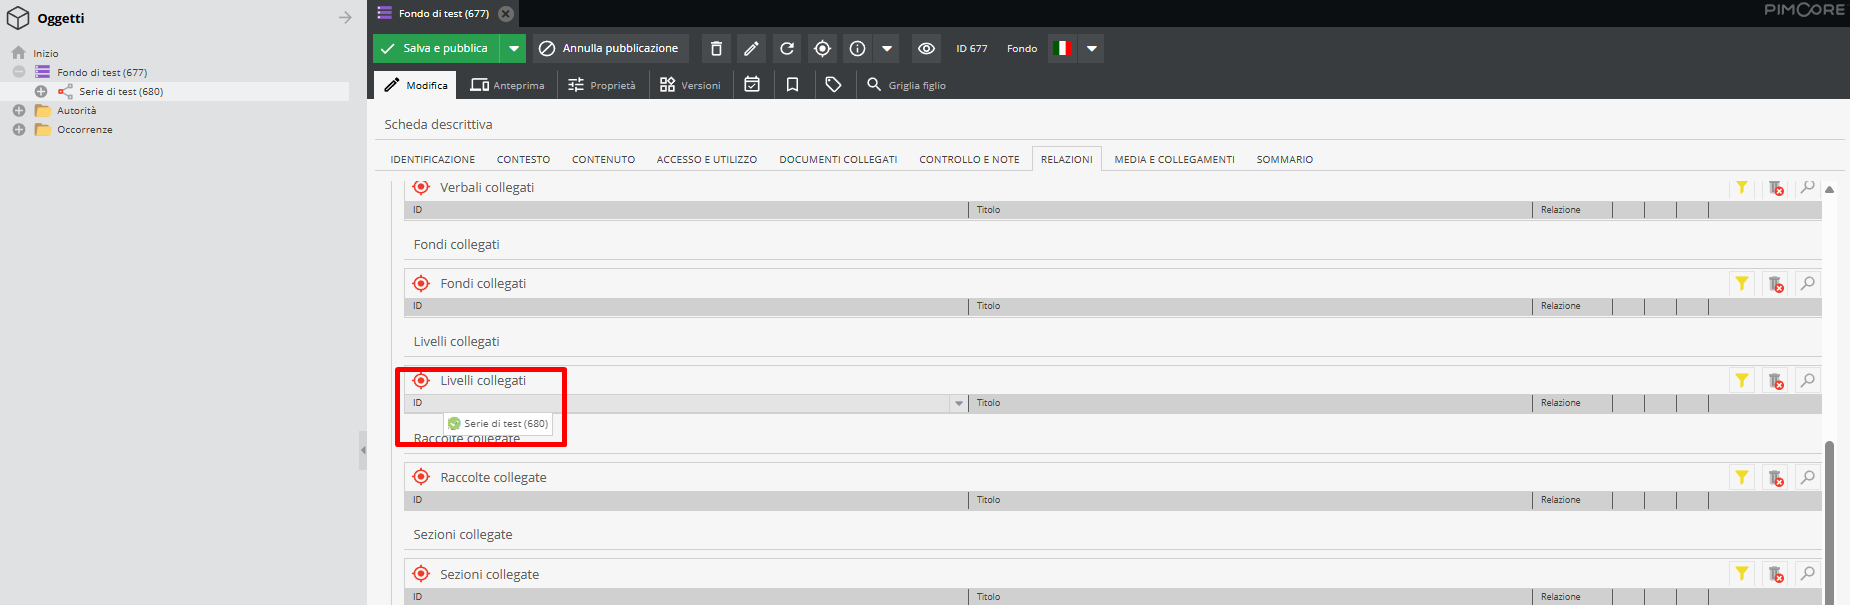
If the item is dragged onto an incorrect document type field or an area not suitable for dragging, a red ✕ symbol will appear next to the unit's name.
If the descriptive form you want to link has not yet been created, in certain specific cases you can create it directly starting from the “Add” (+) symbol next to the relational field.
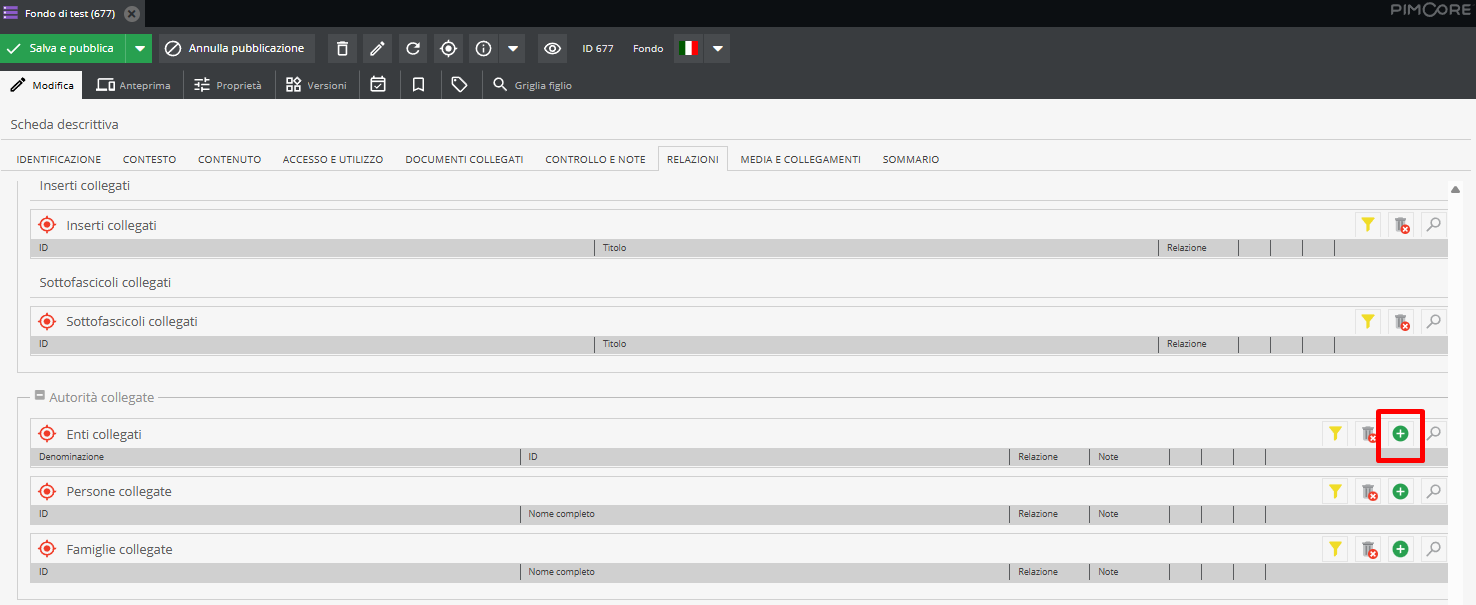
As soon as you click it, an “Add object” window will open.

The “Name” section is a text field and should contain the name (definitive or provisional) of the descriptive unit to be created. The “Parent” section is a search field; clicking on the magnifying glass opens the search interface, allowing you to define under which hierarchical aggregation the new form should be placed.
As an example, if we want to add a person as a creating entity and link them to the Fonds form, the new descriptive form can be created directly from the relationship, placing the form in the Authorities > Persons folder. You can then proceed to select the desired “parent” form: to search for it within the tree, you can either use the search bar by entering the ID (identification code) assigned by Pimcore or keywords, or narrow the search field by selecting the unit's class from the dropdown menu. Once selected, the item will be automatically created and positioned under the specified node.
If a “Parent” is not defined when creating the form, an error message will appear prompting you to fill in all mandatory fields.
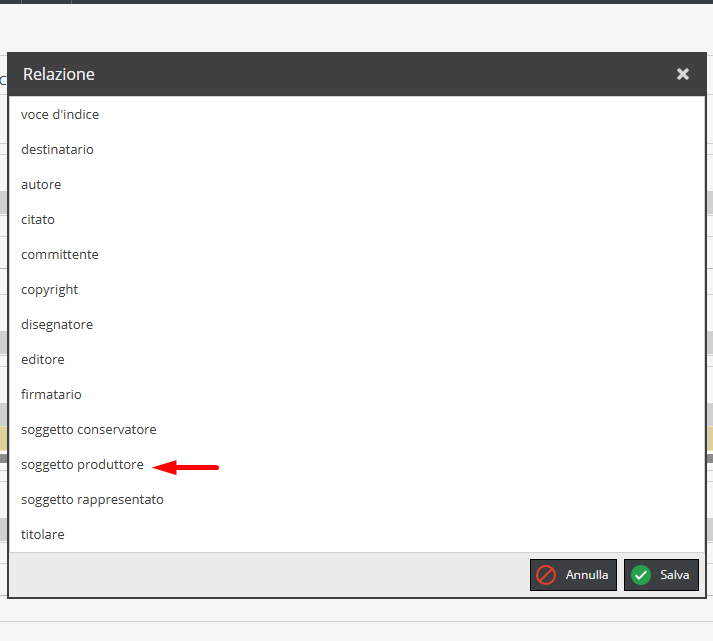
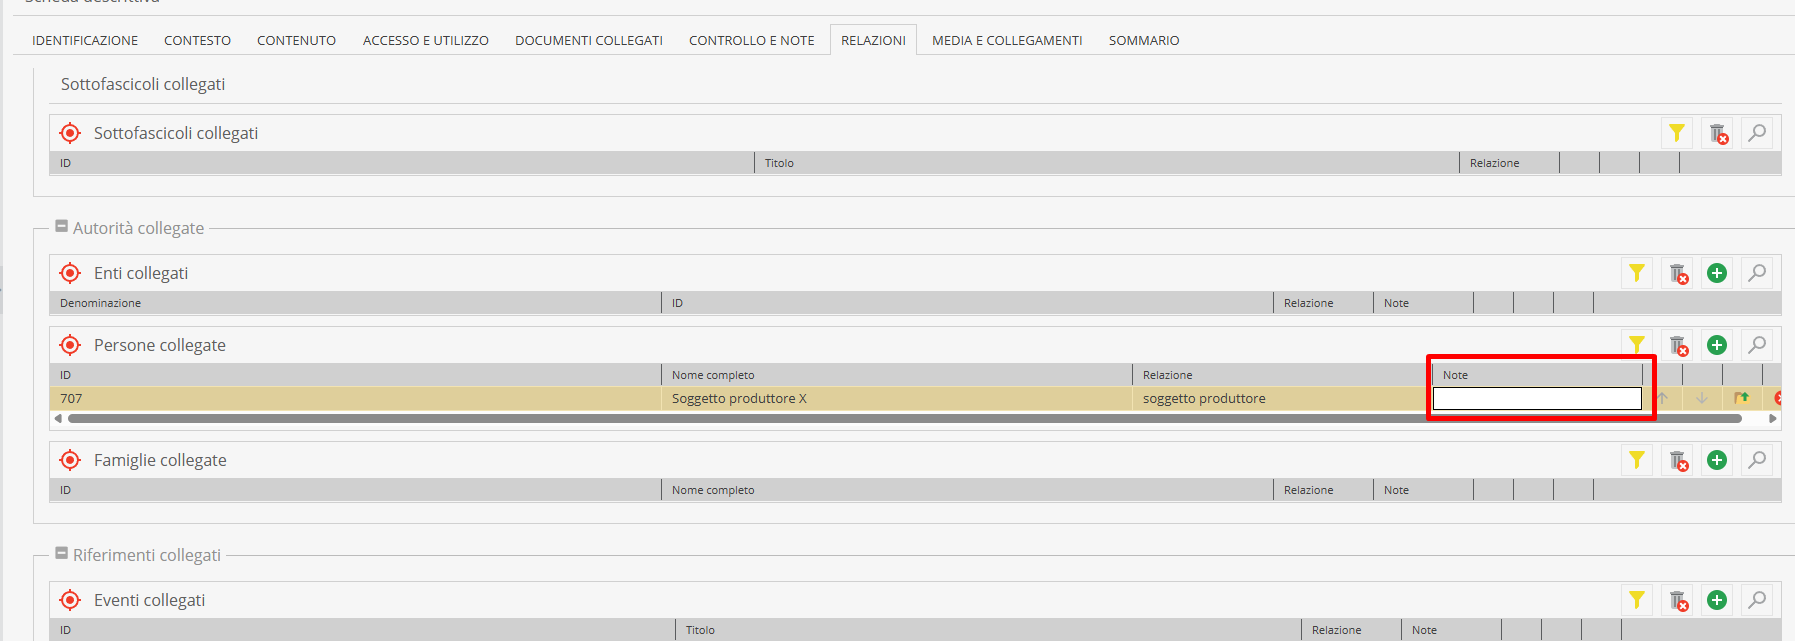
Once the link is established, especially in the case of Authority Records, you can qualify the relationship. For example, if a Corporate Body is linked to a Fonds, you can specify its role (e.g., Creating Entity, Custodial Entity, Mentioned Subject) by selecting the corresponding item from the “Relationship” dropdown menu.
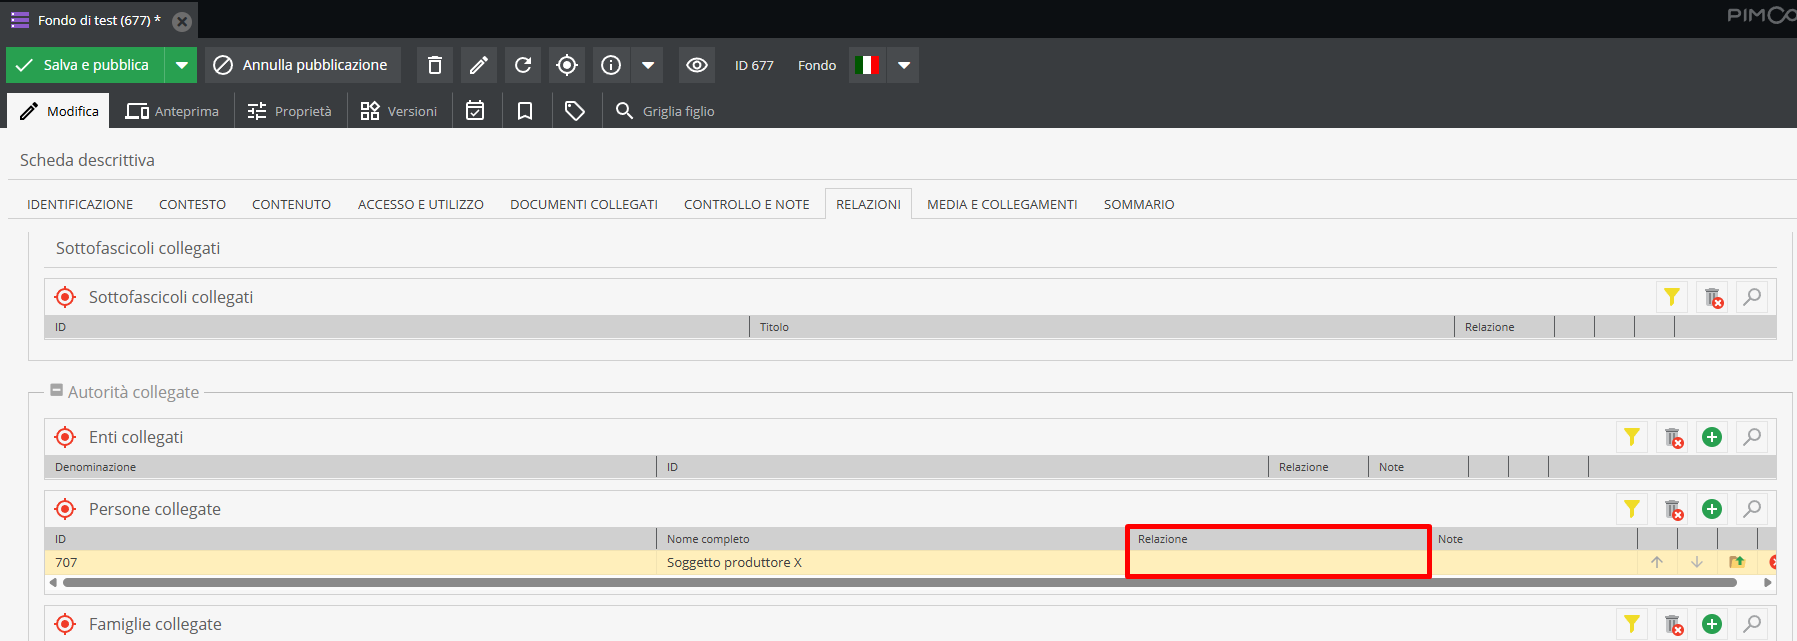
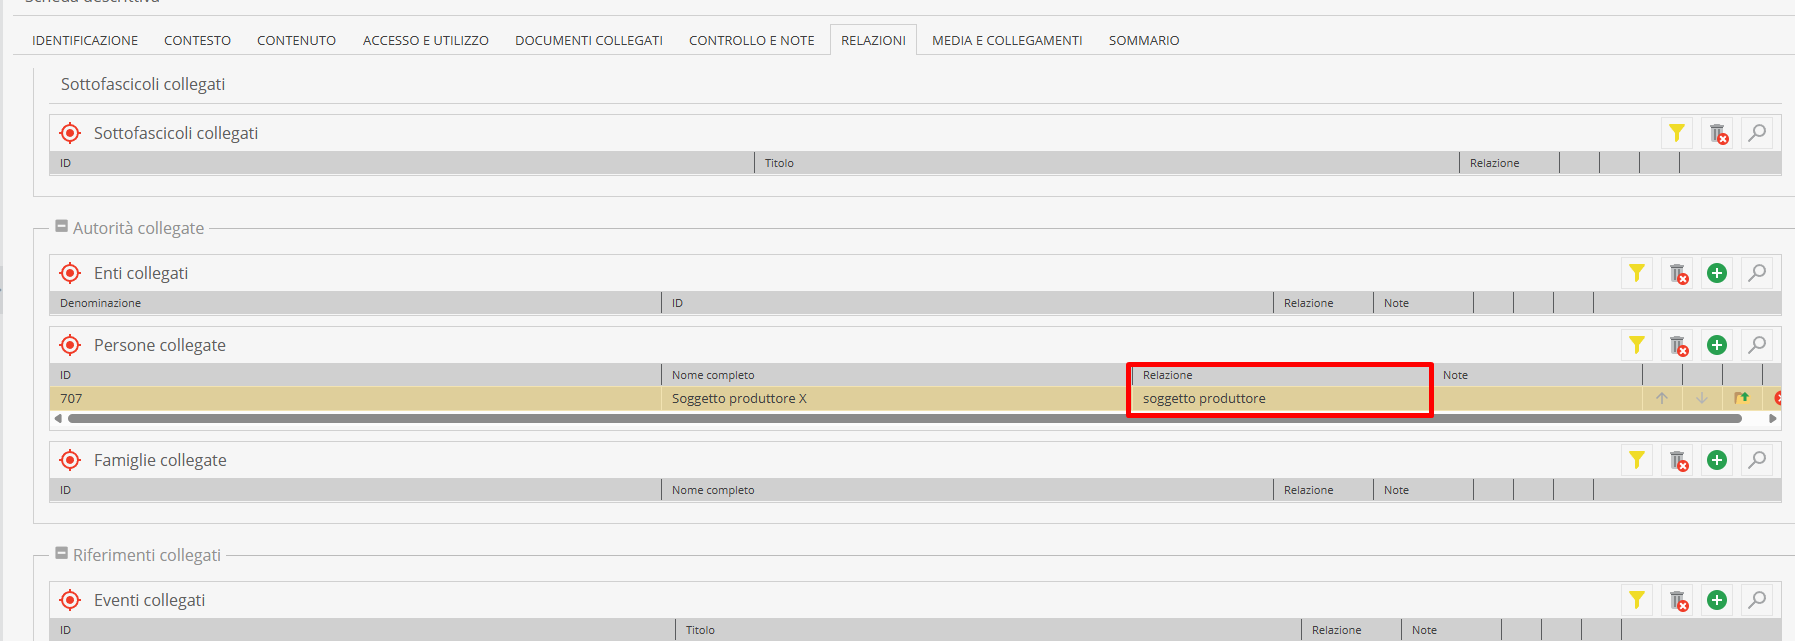
A Notes field is also available for entering methodological clarifications or specific comments on the nature of the established link.
“Summary” Area
This section serves as a summary overview of the entire descriptive unit. It aggregates in a single synthesis view the most relevant metadata extracted from the various information areas.
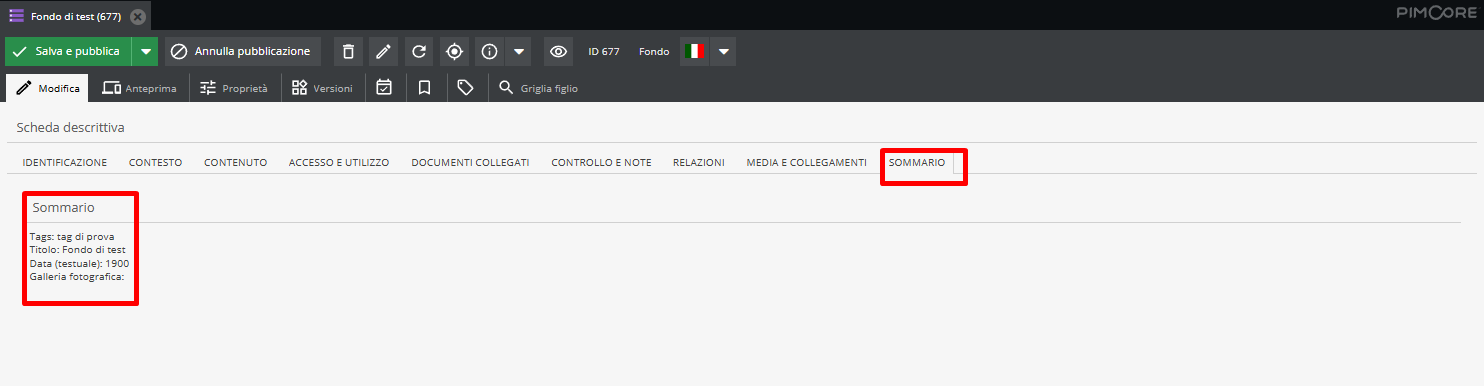
The "Summary" tab is designed to facilitate quick consultation and immediate verification of the consistency of entered data, allowing the cataloger to have an overview of the record without needing to navigate through individual detail forms.
Localized fields
Localized fields represent an advanced feature of Pimcore enabling multilingual management of descriptive metadata, an essential option for ensuring accessibility of archival heritage to a global audience.
These fields are immediately recognizable thanks to Language selectors (tabs featuring flag icons and Italian/English labels) positioned alongside text areas. Standard system configuration typically includes support for Italian and English.
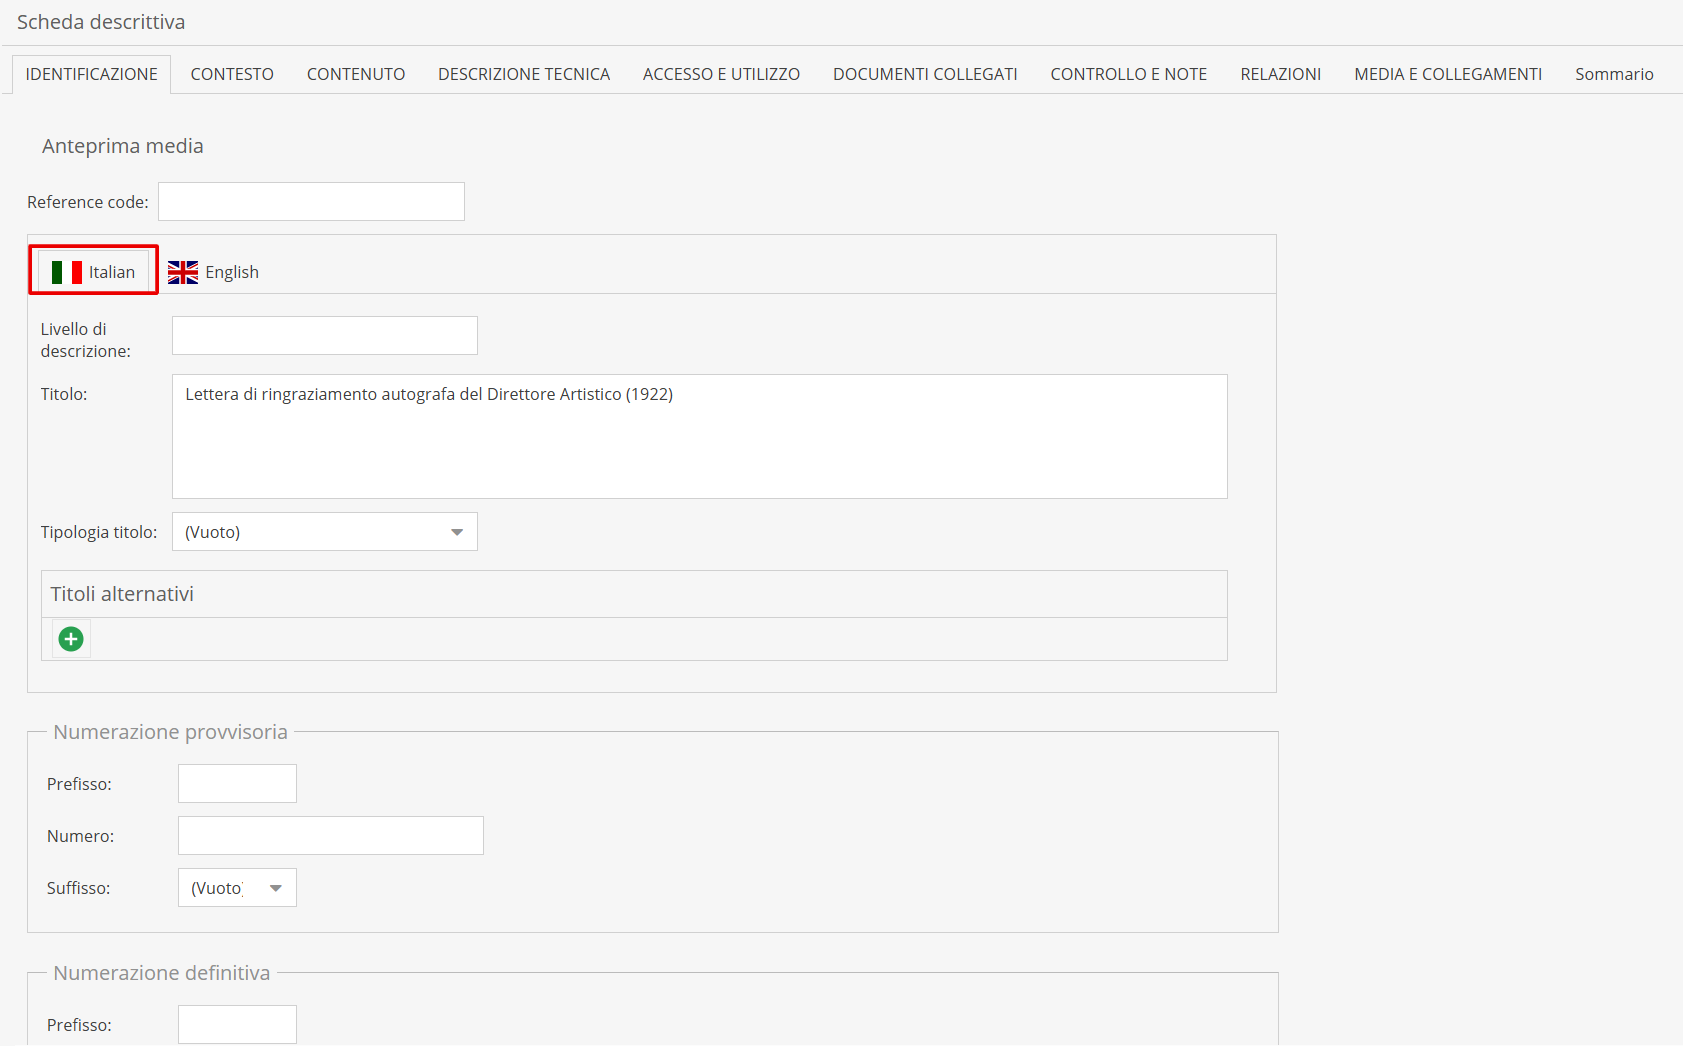
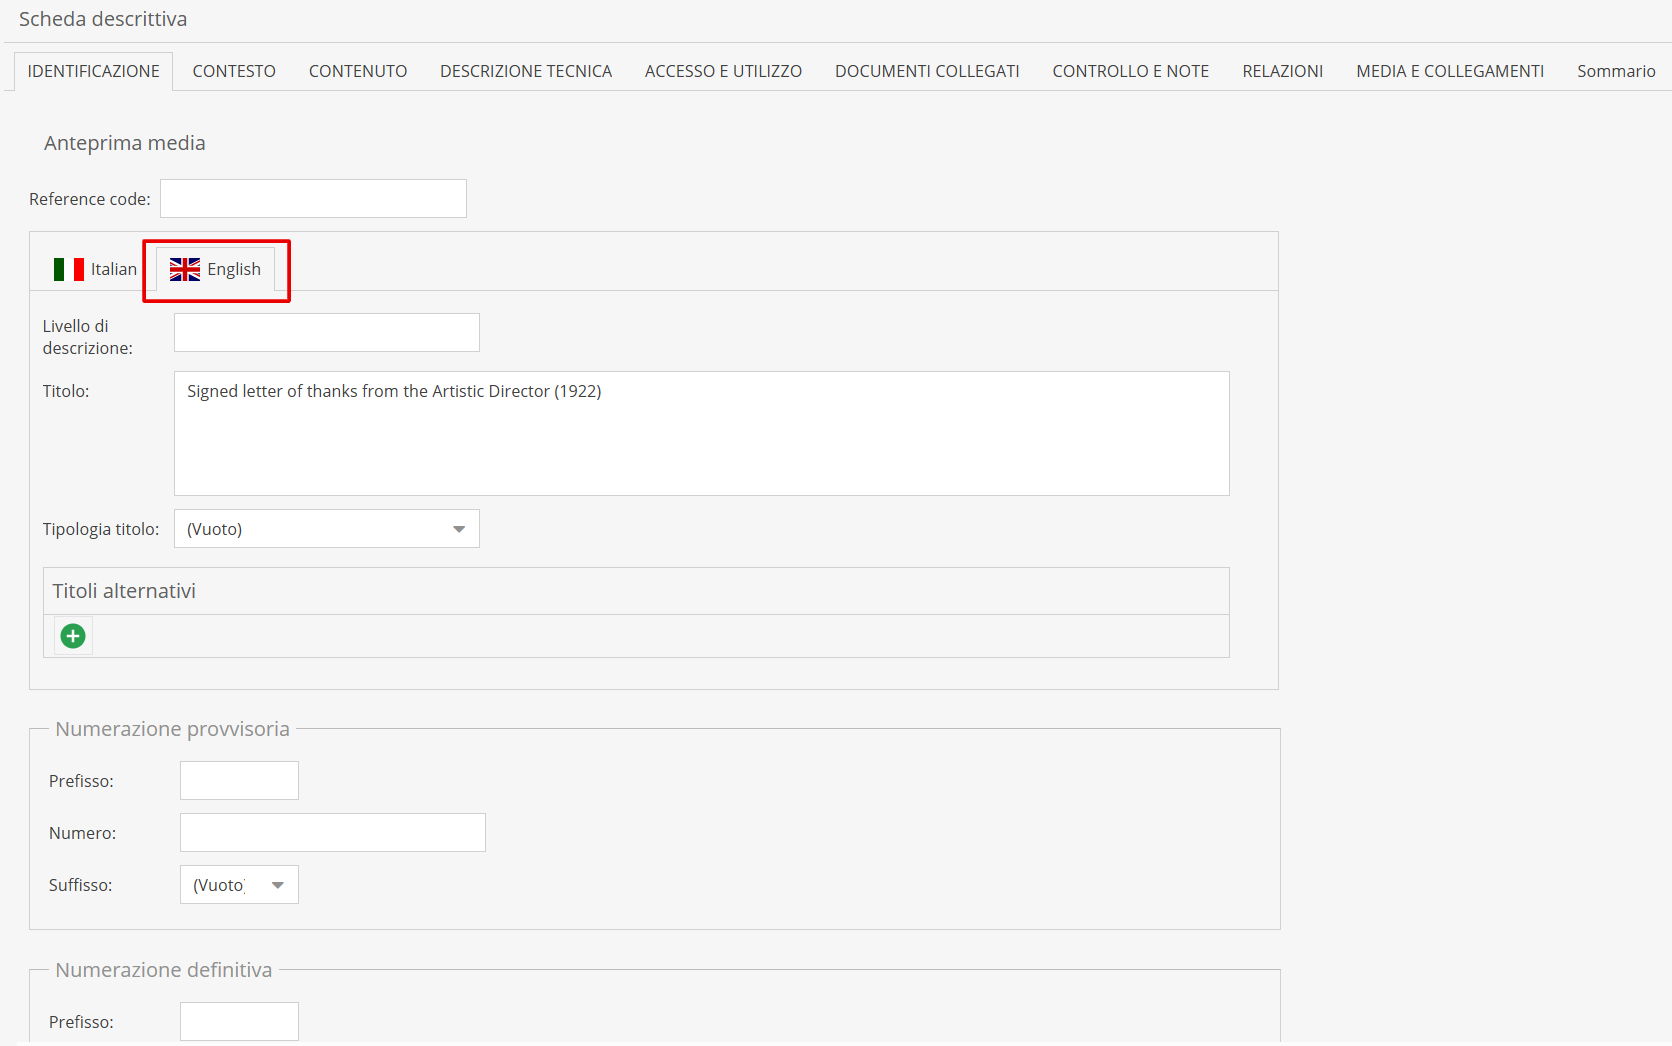
Fields commonly configured for multilingual translation are textual and descriptive ones requiring narrative rendering in each language. Excluded from localization are purely alphanumeric or structured fields (such as physical dimensions, identification codes, call numbers, or normalized dates), which maintain a unique value regardless of the selected language.
Translation of fields does not happen automatically; catalogers must manually complete text areas in the supported languages. Clients can request activation of the bulk description translation service.
Correctly filling in localized fields enables the “Multilingual” feature on the consultation portal (front-end), making the Archivio Digitale accessible in multiple languages with a simple selection command.
Integrated automatic translation system Located in the toolbar next to the active language selector, the "Translate" button operates exclusively on specific text fields designated as translatable per language.
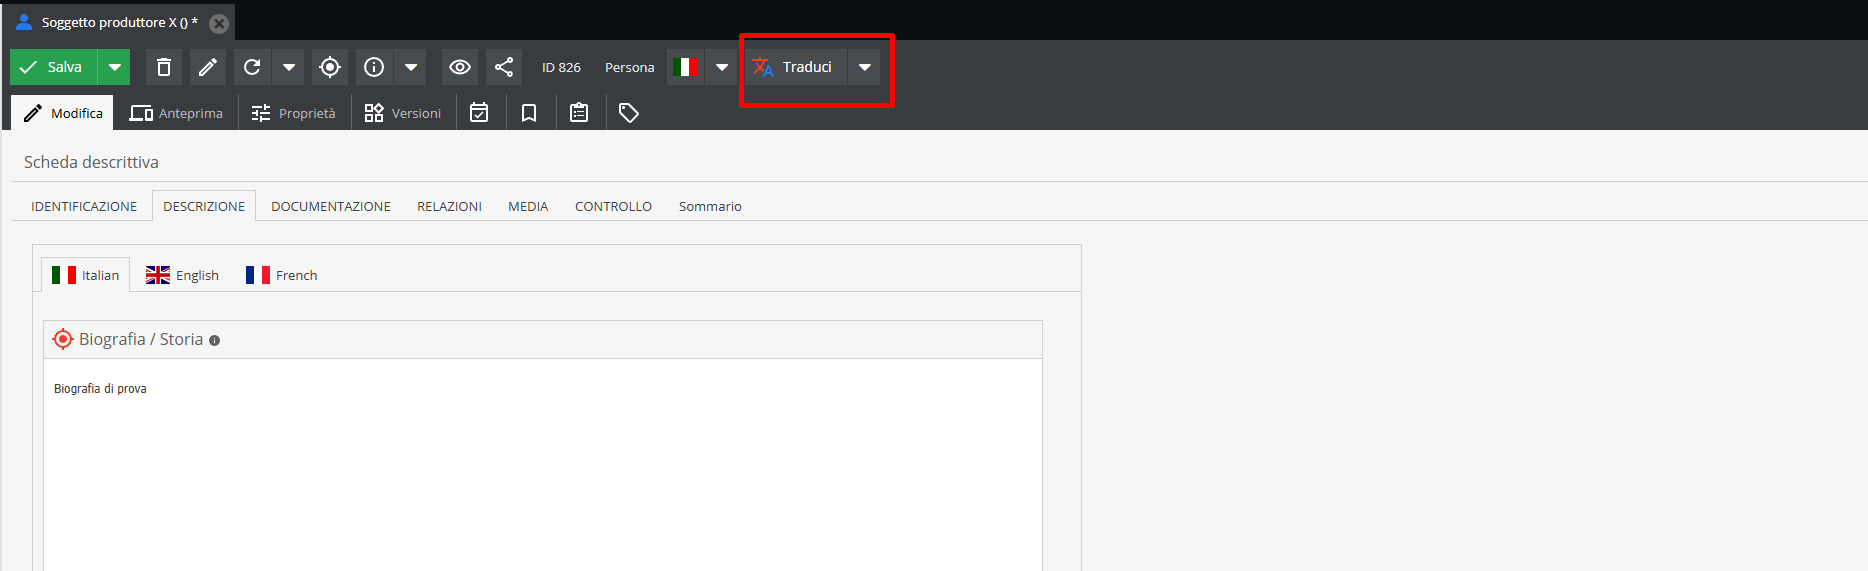
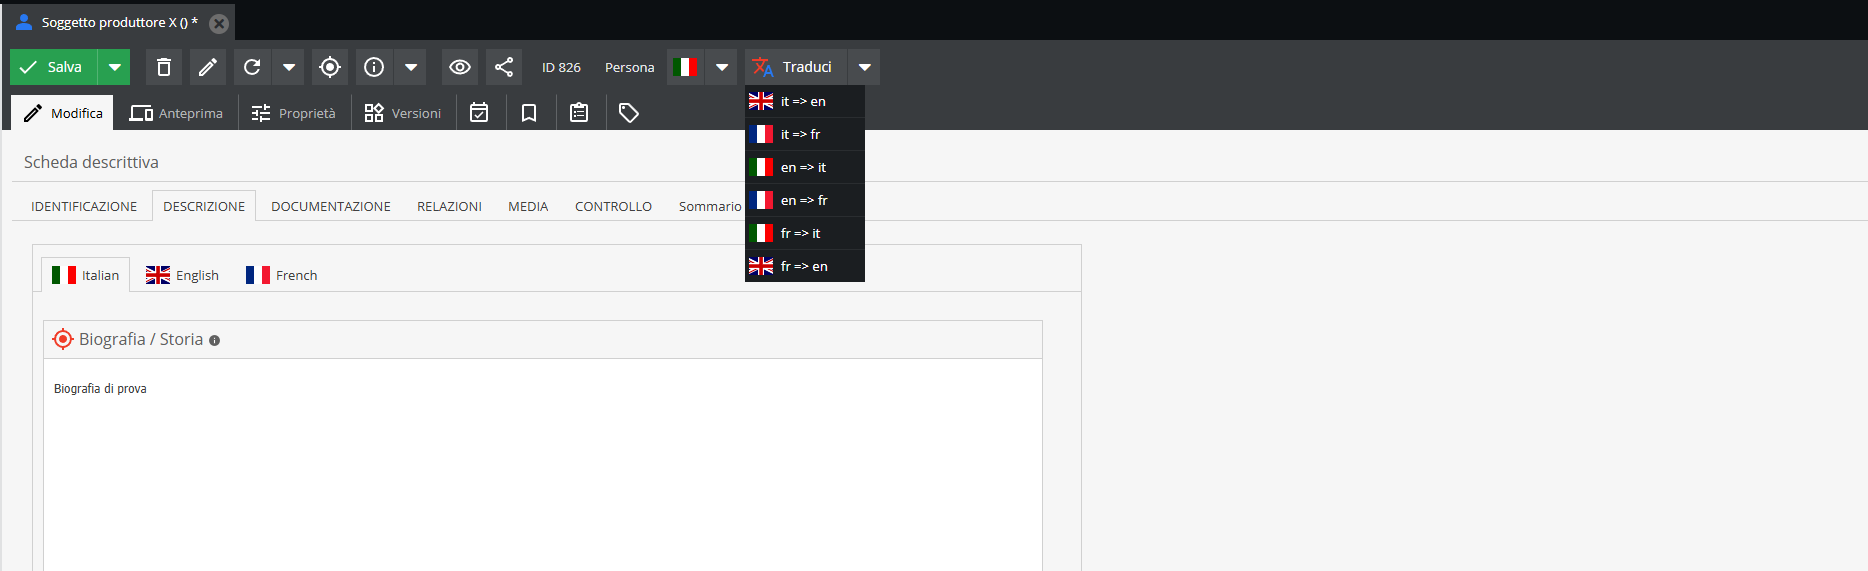
From the dropdown menu, choose the source and target languages (for example, from Italian to English): the system calls the automatic translation service and directly populates the target language tab.
The "Translate" button works only on a selection of fields: it cannot be used, for instance, on select and multi-select fields.
For further details, see also Localized fields
Managing Objects
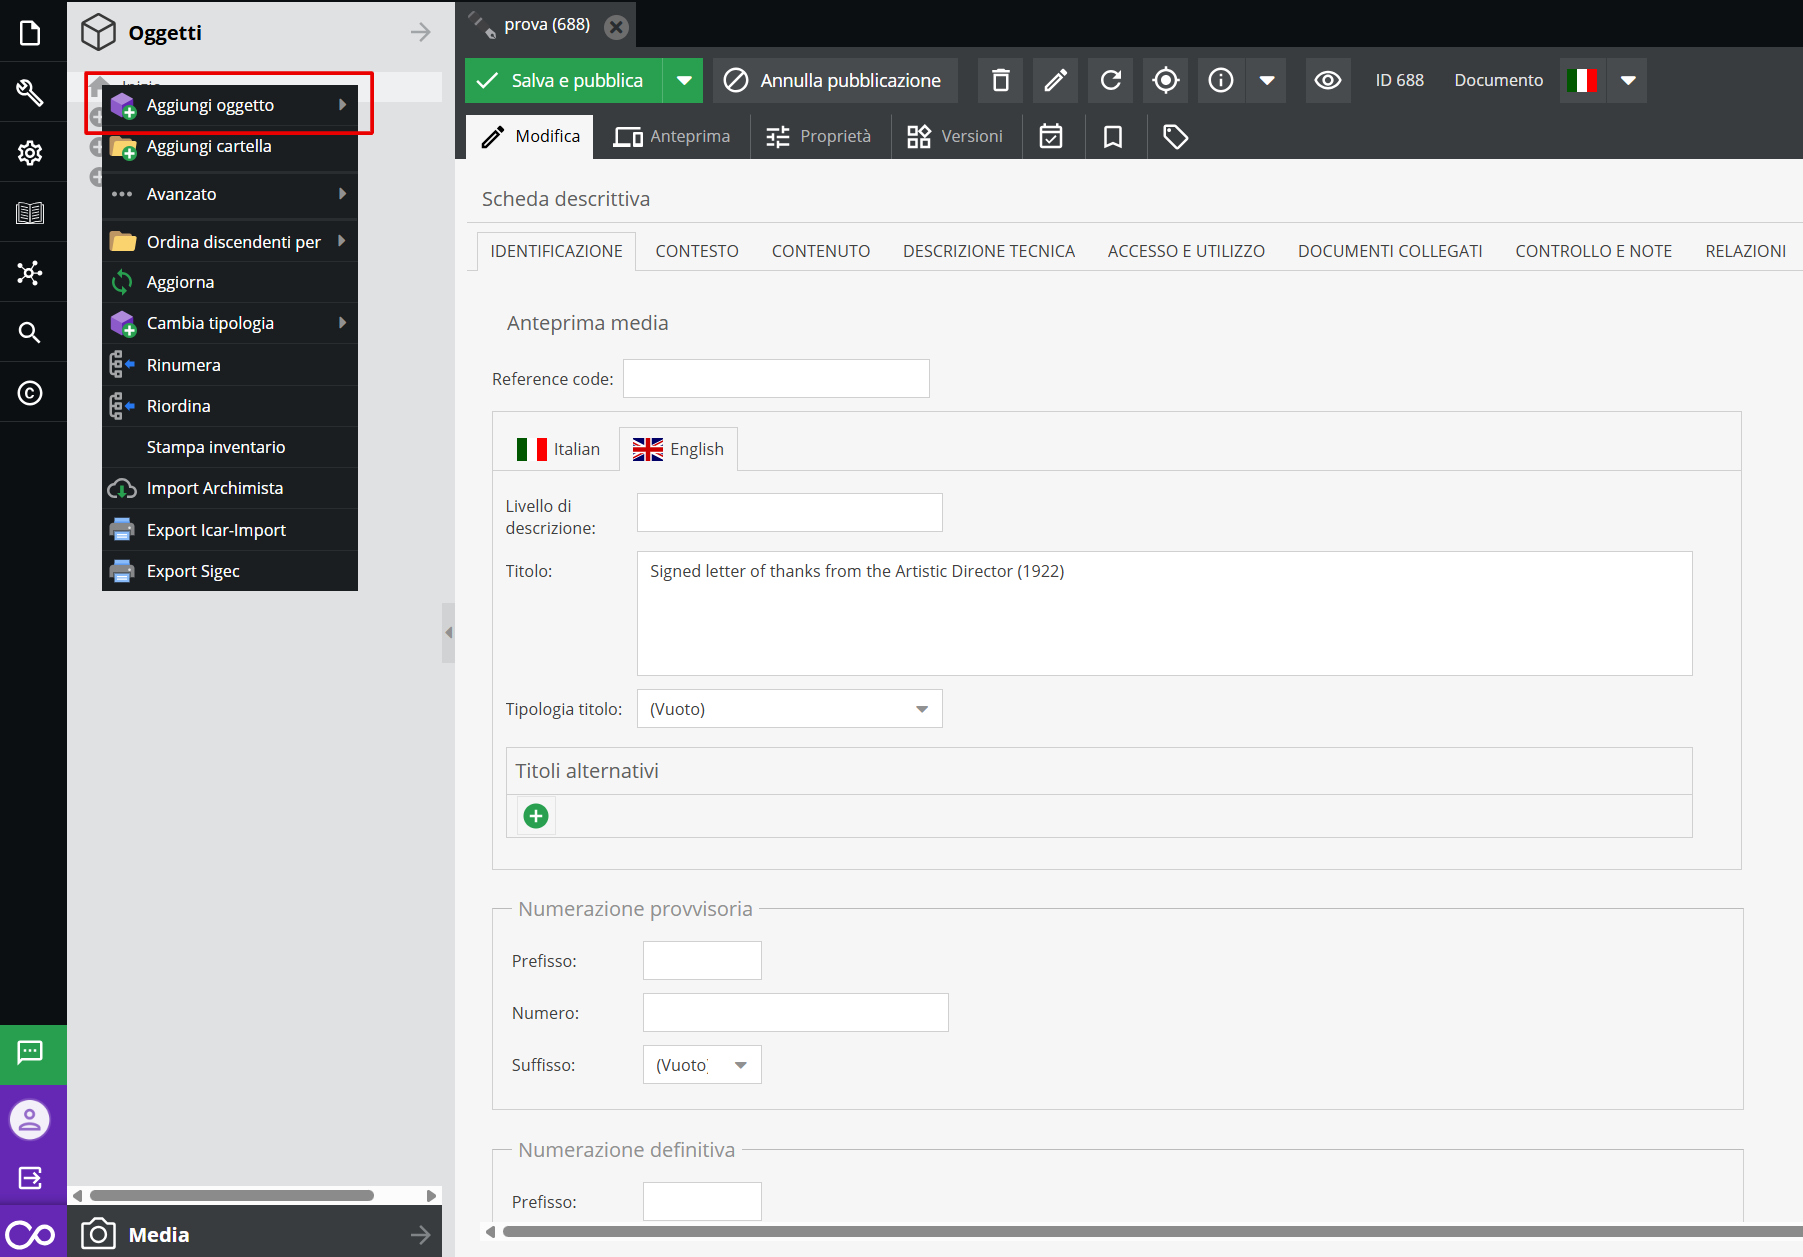
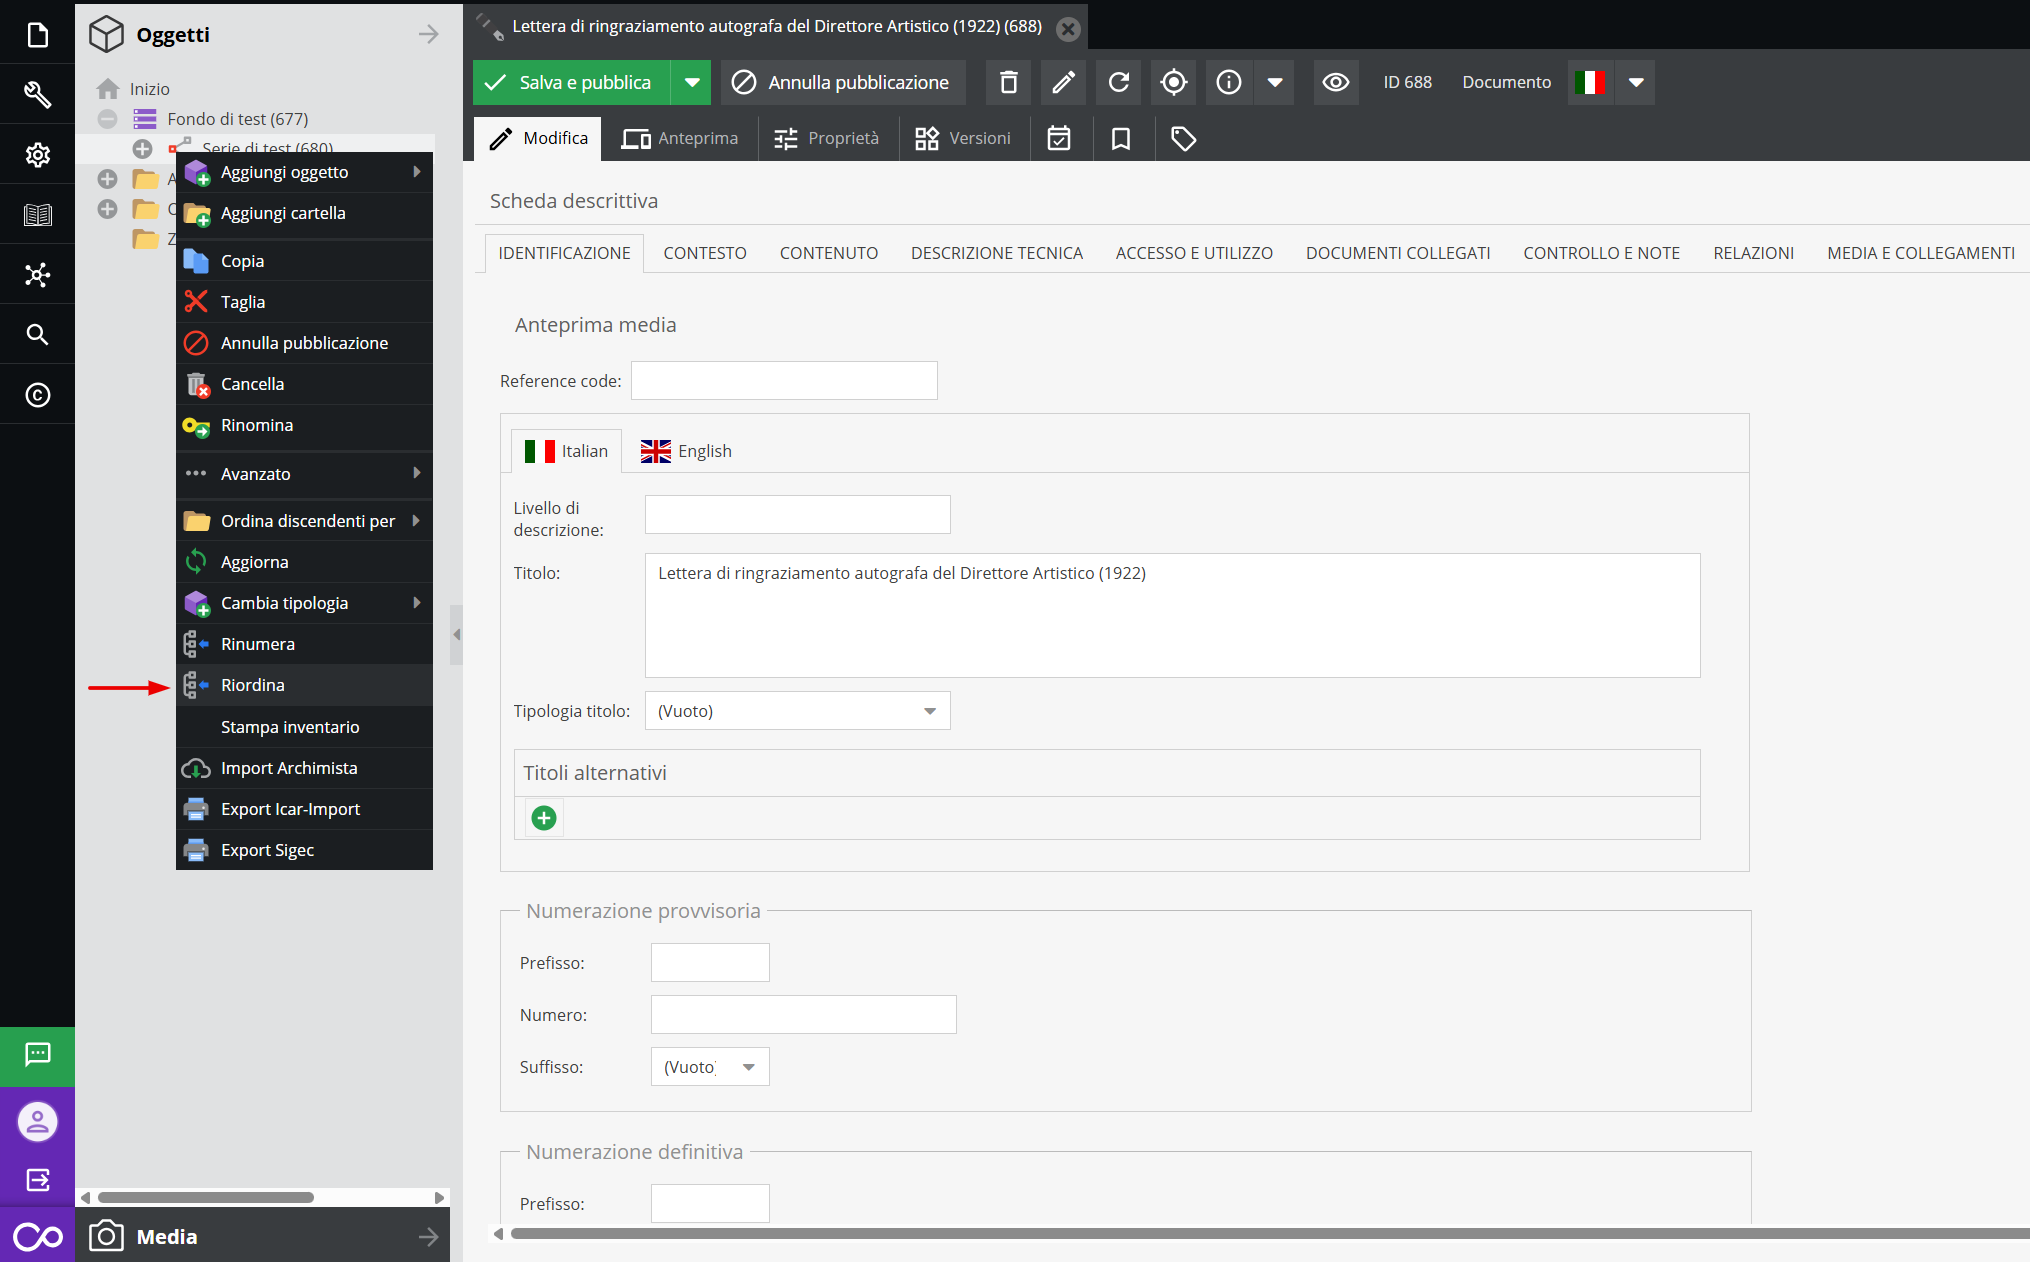
The object types described here can be created, edited, and structured starting from the “Objects” (or Data Objects) area. Right-clicking opens the menu allowing you to perform various operations.
Adding a new element to the structure
To create a new form, right-click on the area corresponding to the archival complex or entity/reference you wish to add, then click “Add object”.
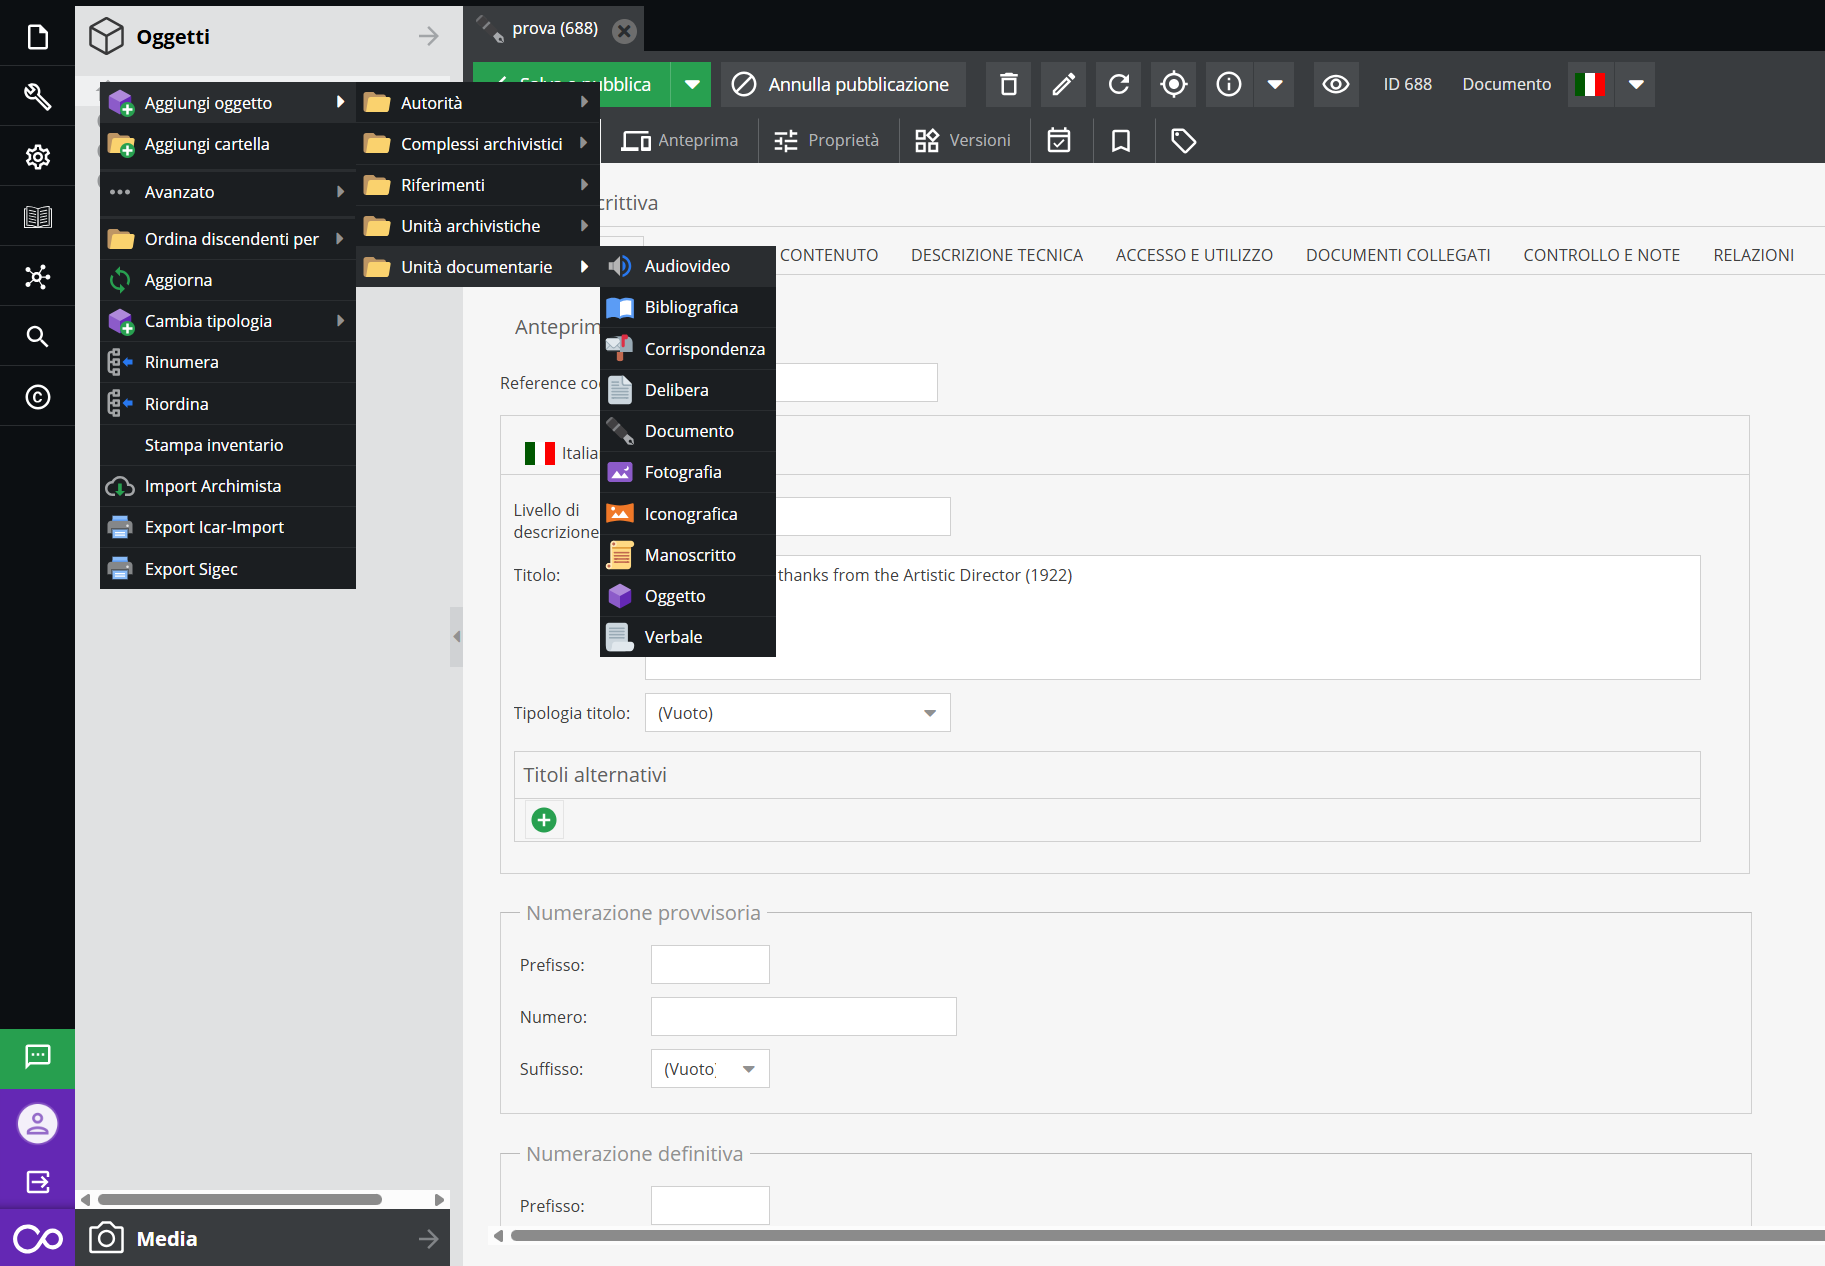
Select the group containing the objects of interest — as described in previous paragraphs — and proceed with selecting the chosen descriptive unit type.
After clicking on the desired form, the following form window will open:
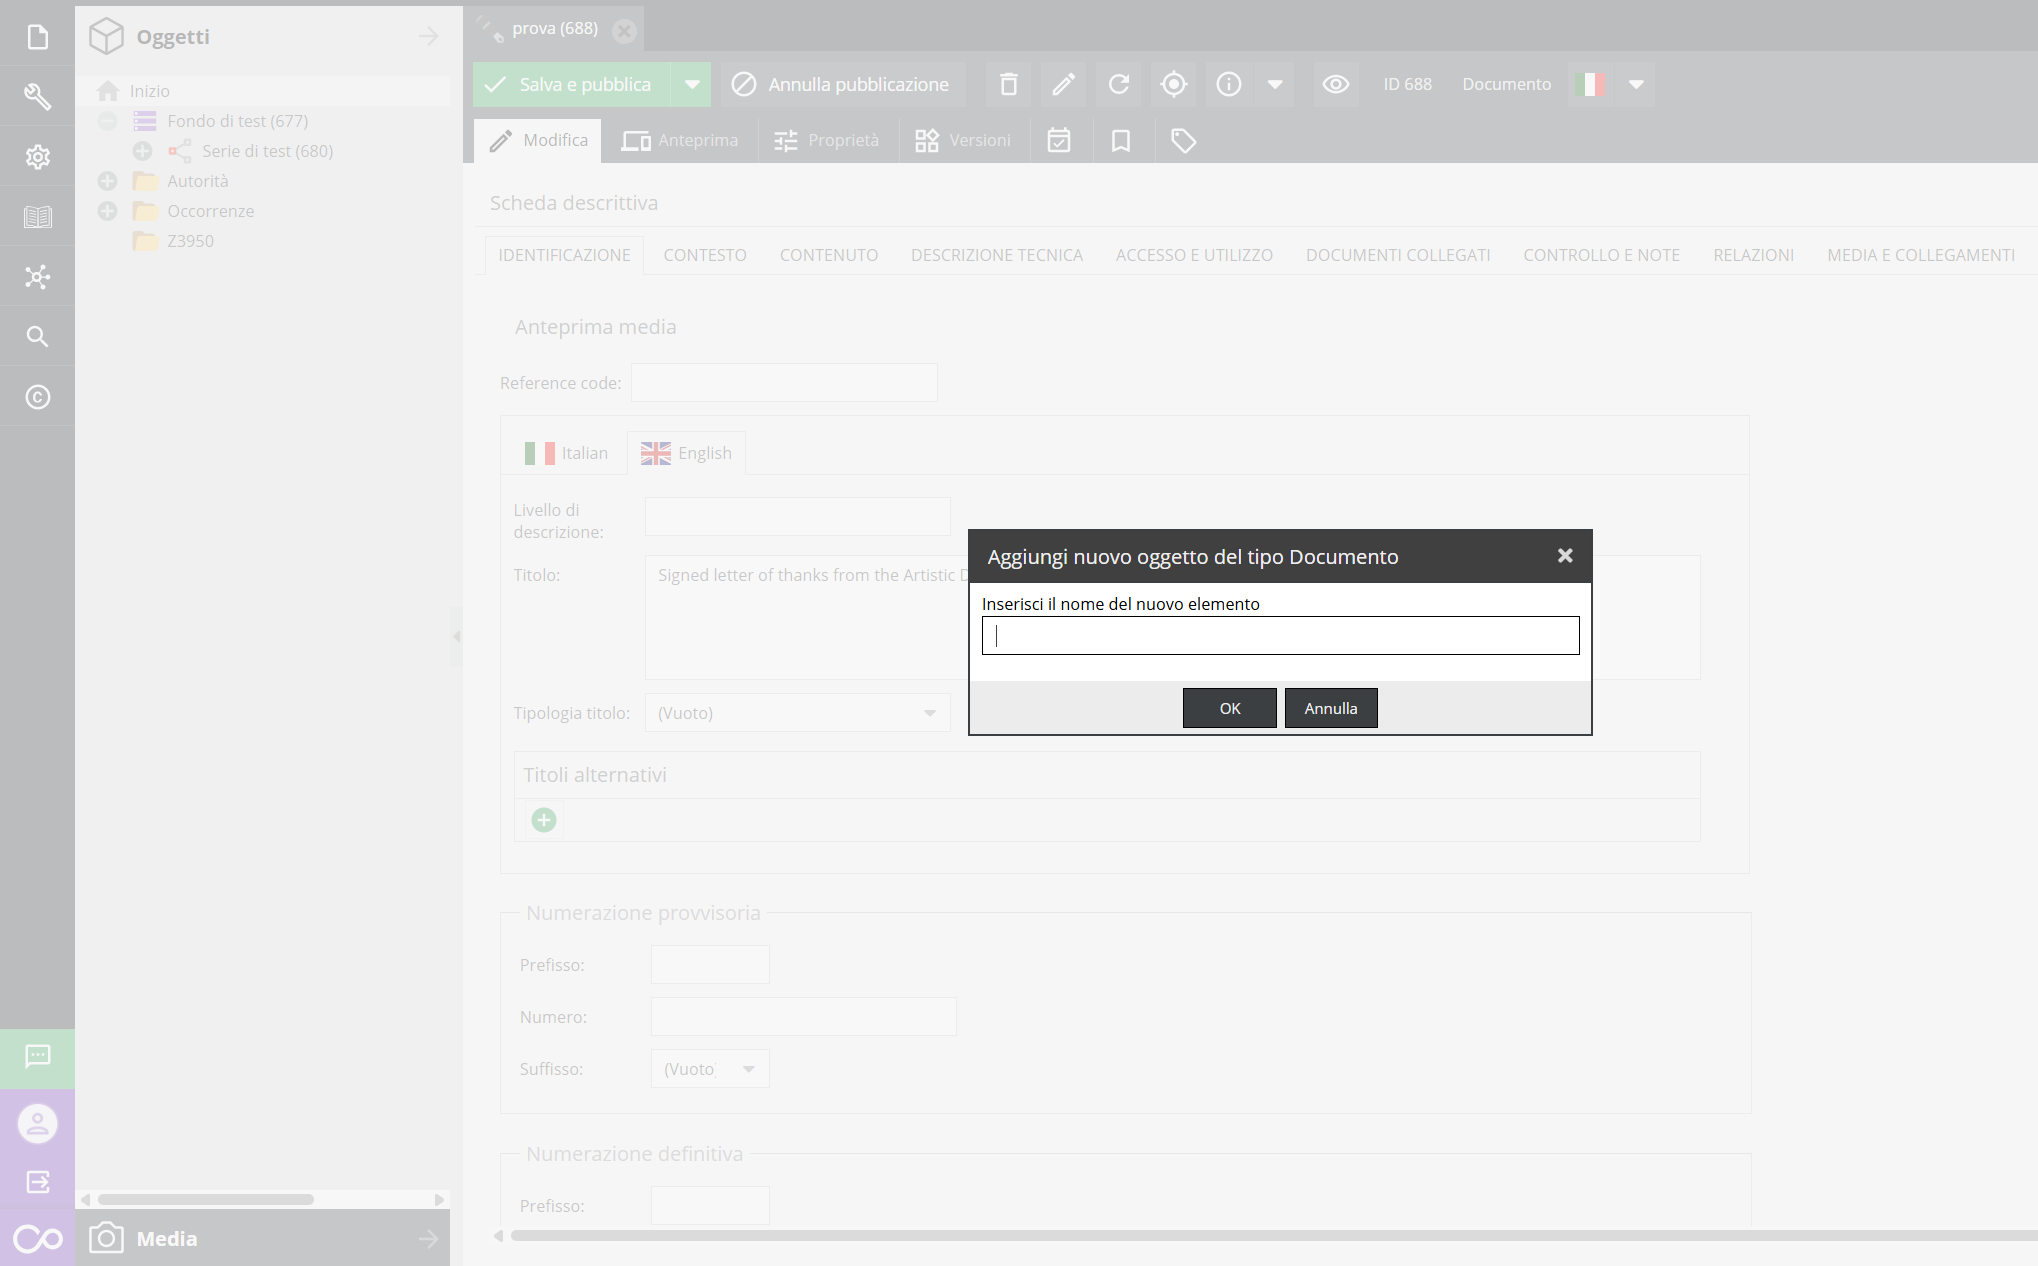
Enter the title (provisional or definitive) of the new record, click “OK”.
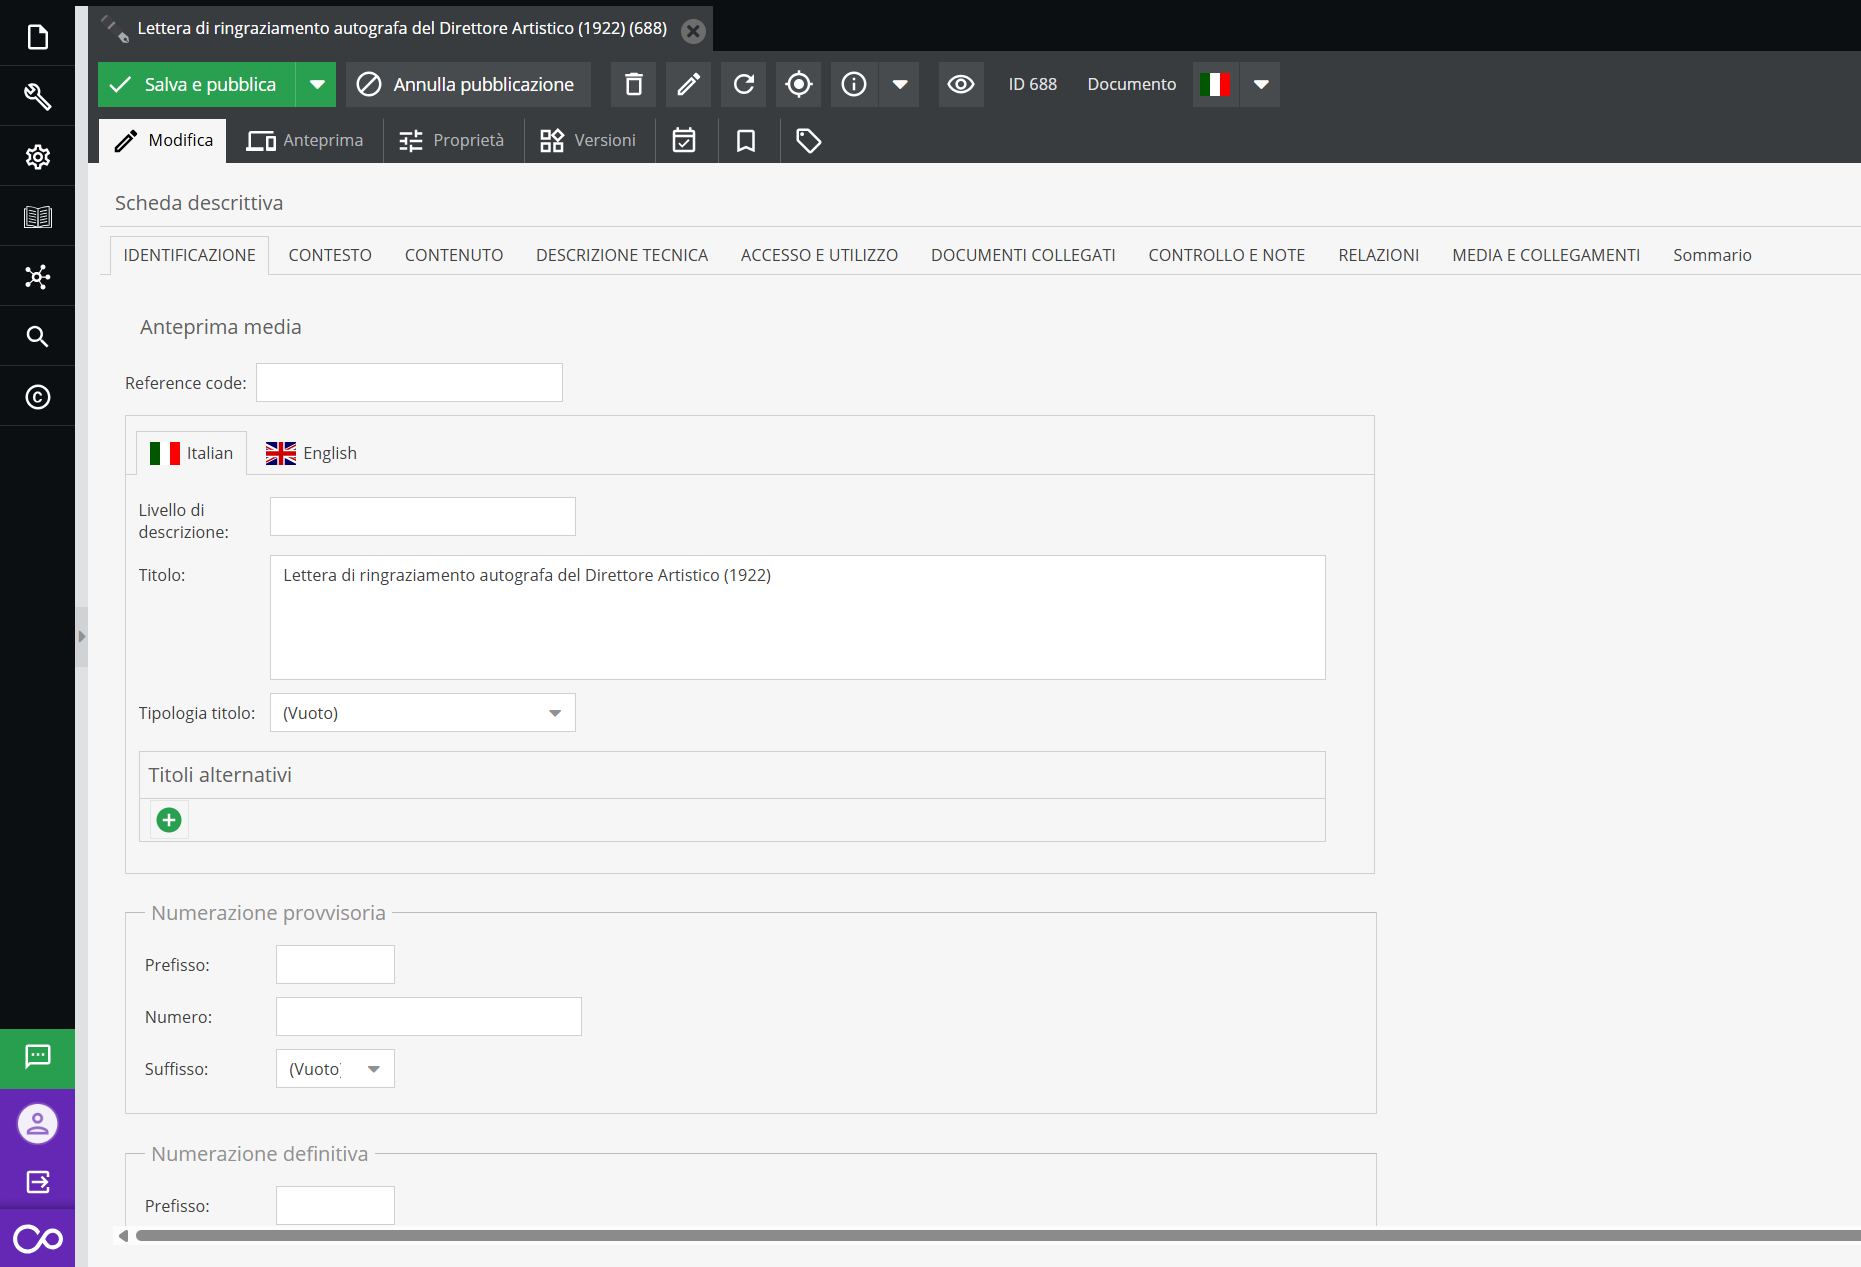
The descriptive form will open, whose information areas and fields were analyzed in the section Information areas of the forms
From the same menu you can also perform actions such as copy, cut, paste, rename, delete.
Reordering objects
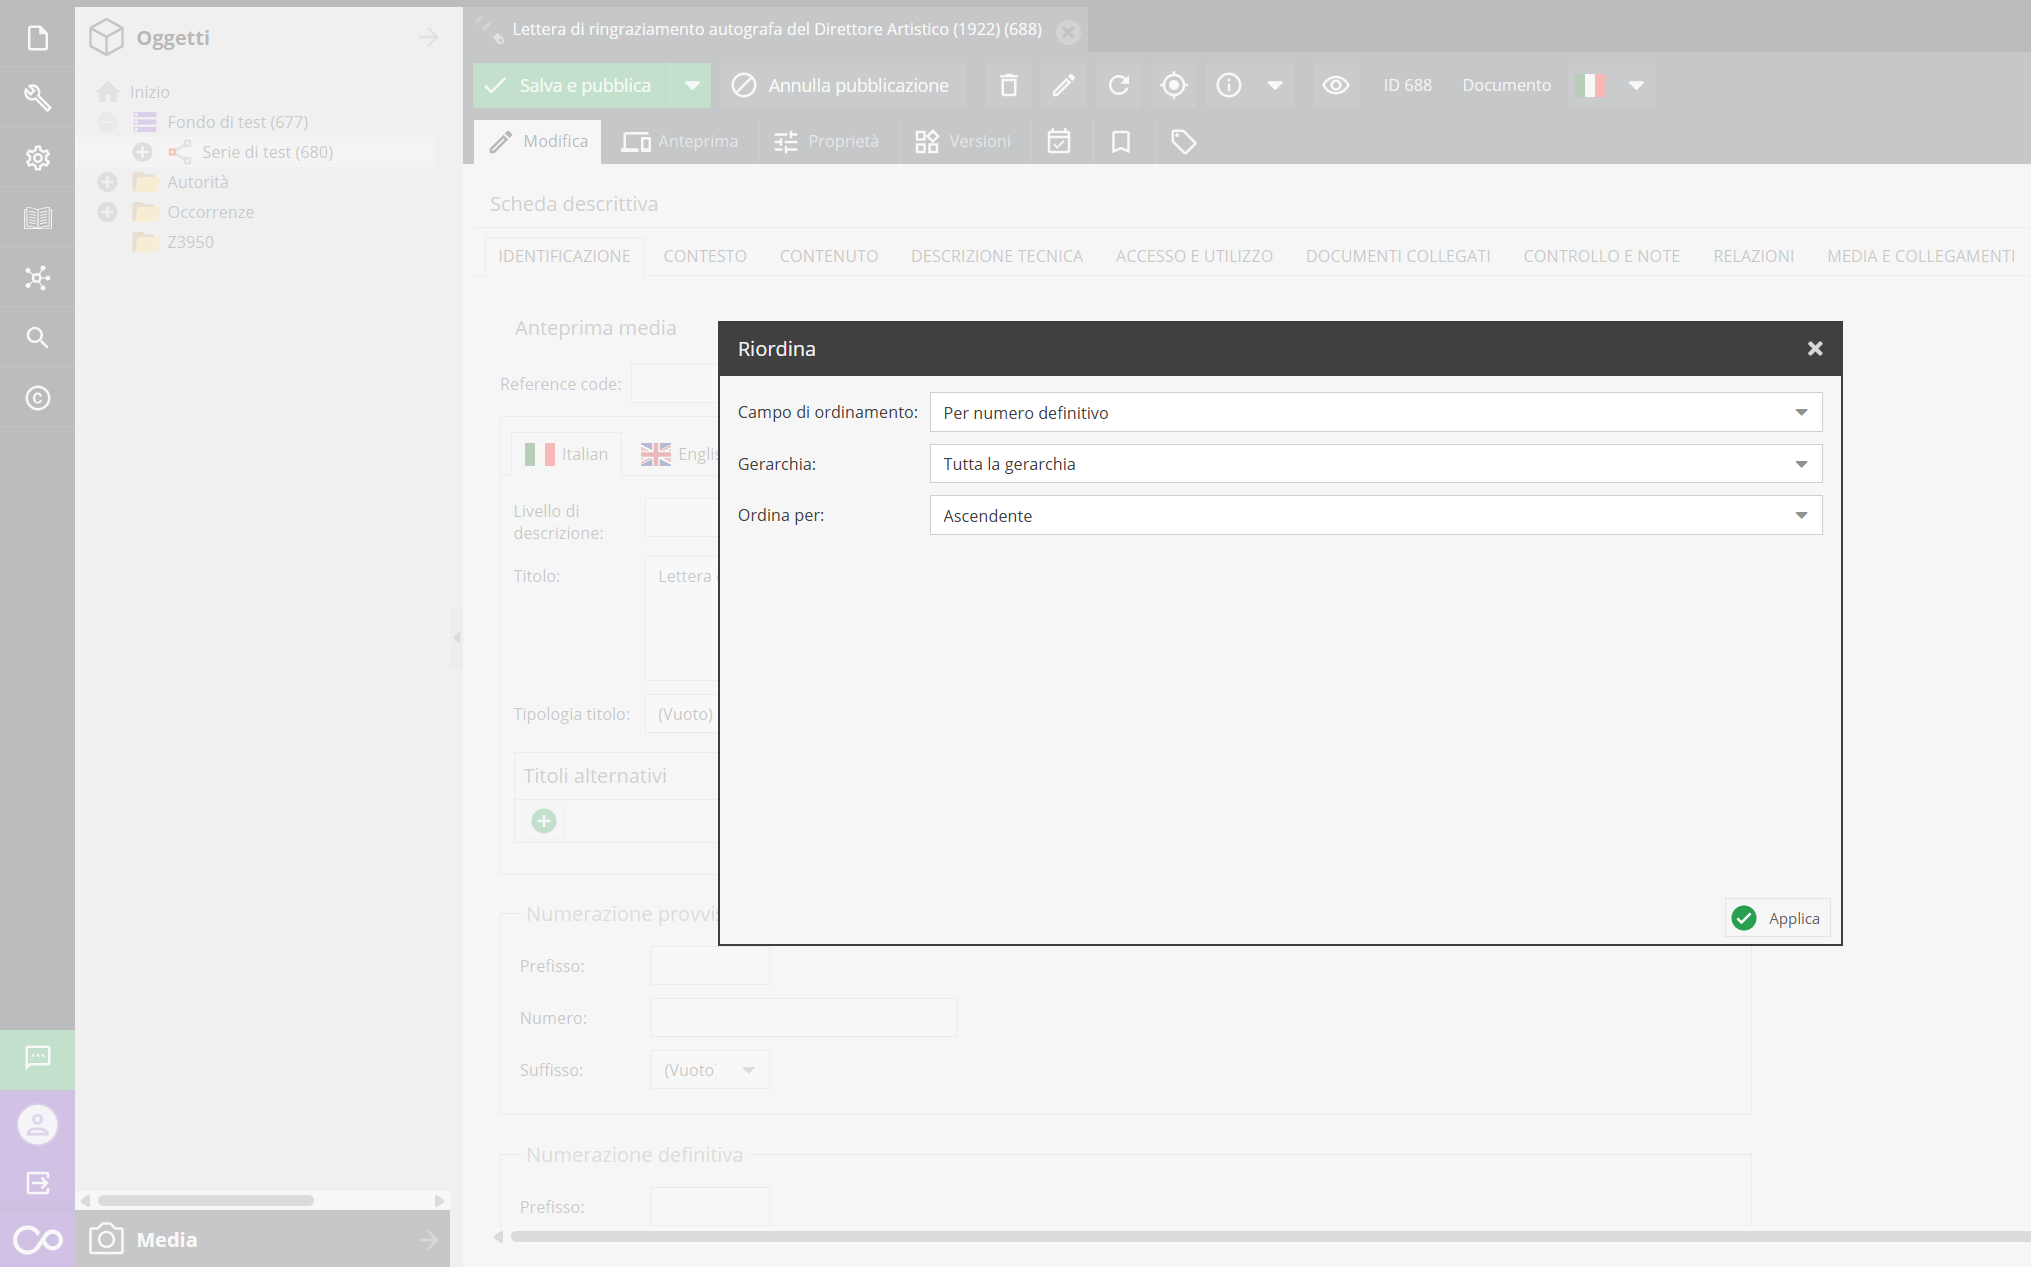
The reordering function allows acting selectively on first-level subordinate units (direct children) or, in recursive mode, on the entire descendant tree of the selected node. Available reorganization criteria are: identification code (ordering based on provisional or definitive numbering), chronological (Date), or alphabetical (Title).
For each criterion, an ascending or descending order can be set. Once parameters are defined in the module's dropdown menus, click the “Apply” button (bottom right) to apply the new order within the hierarchical structure.
Renumbering objects
This feature enables automated assignment of sequential numbering (ref/box numbers), i.e., unique progressive numbering of storage units (boxes, folders, cartons, volumes) or archival units (folders) contained within a complex. To start the procedure, select the reference archival node in the tree structure, right-click, and select “Renumber”.
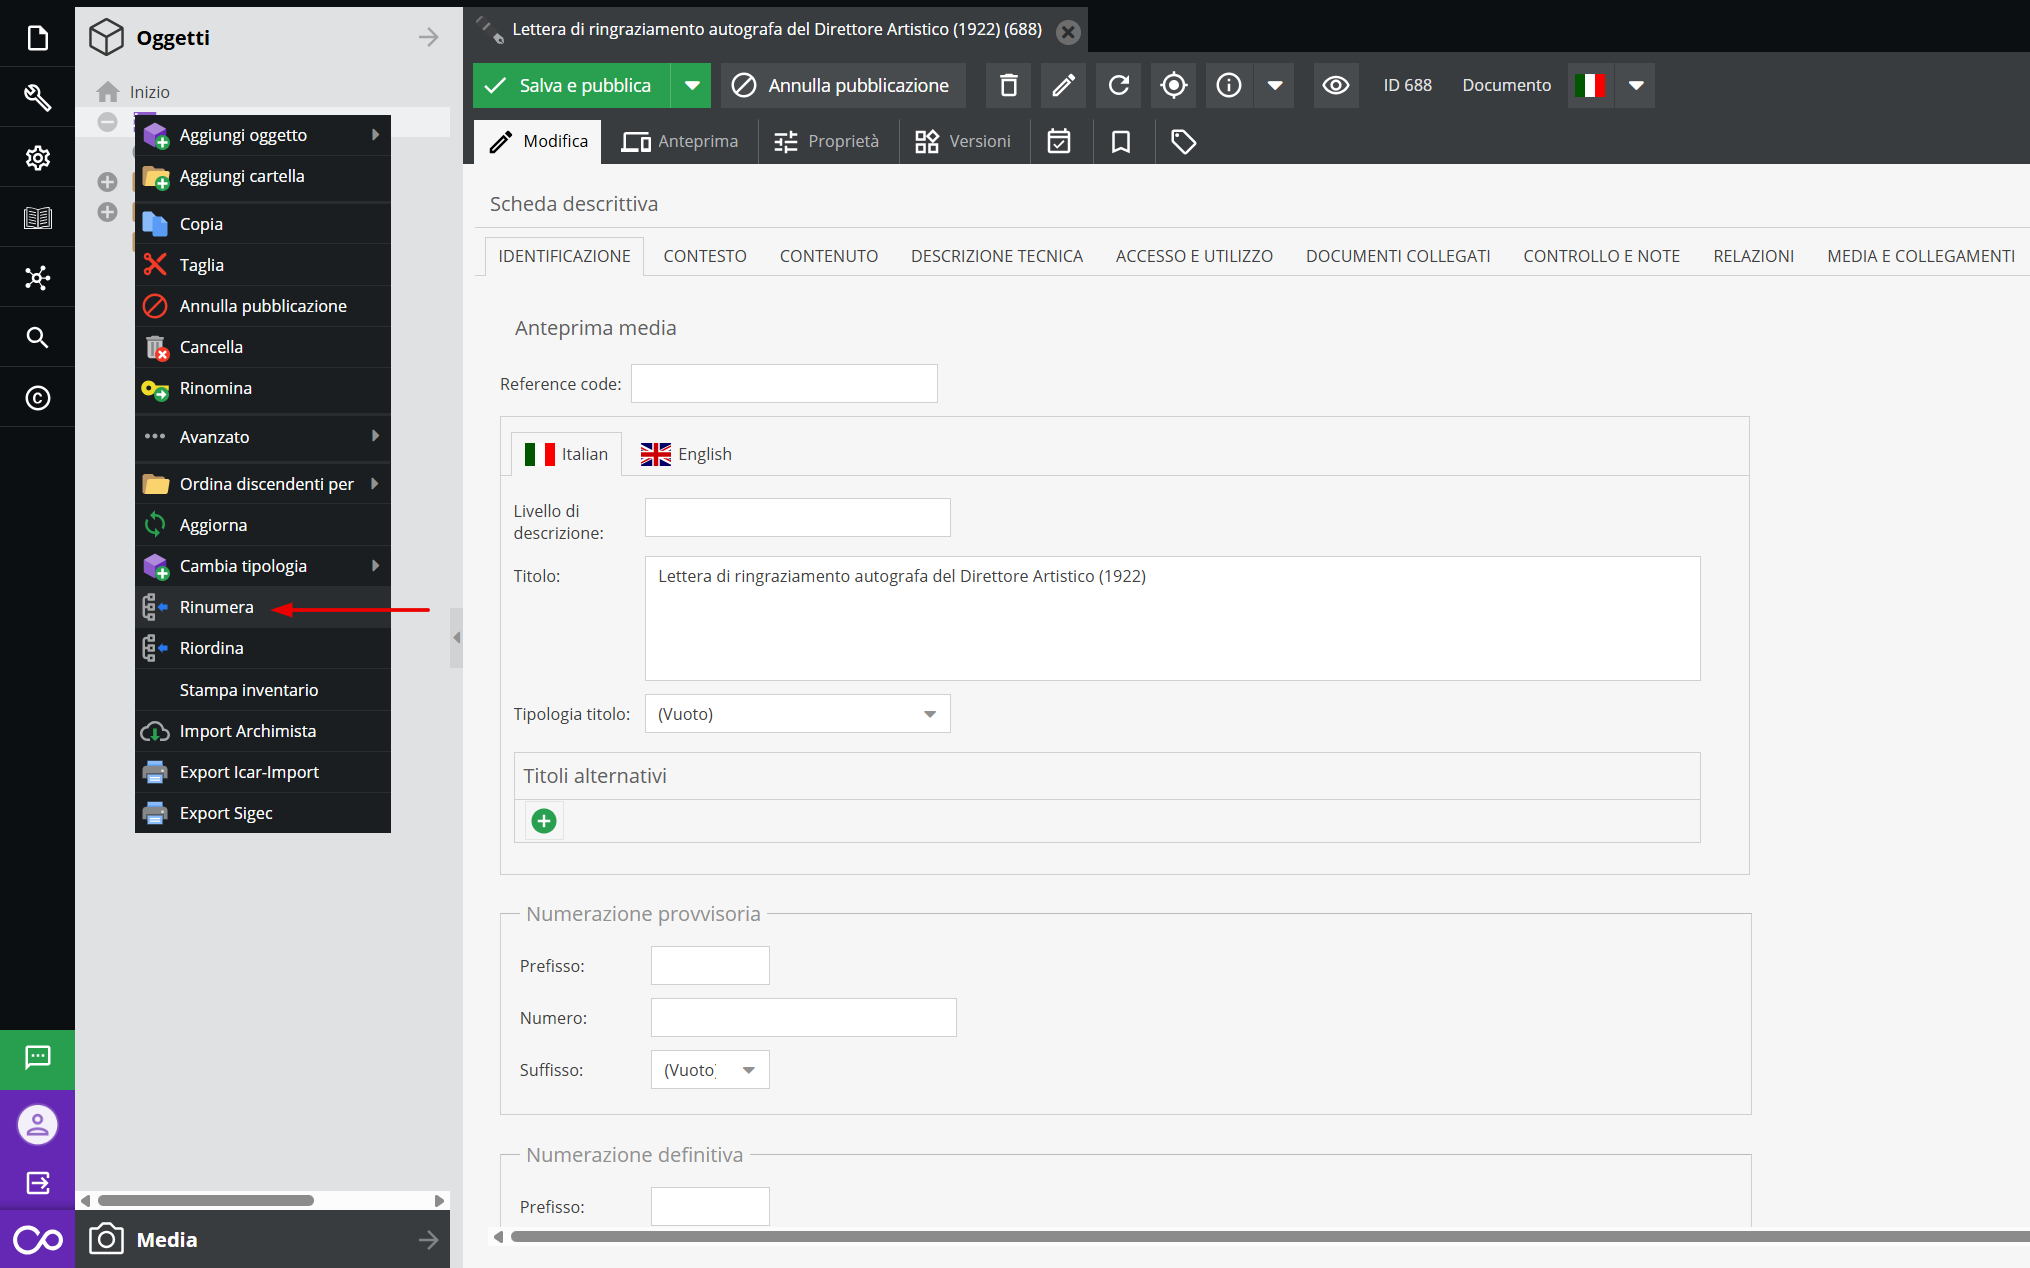
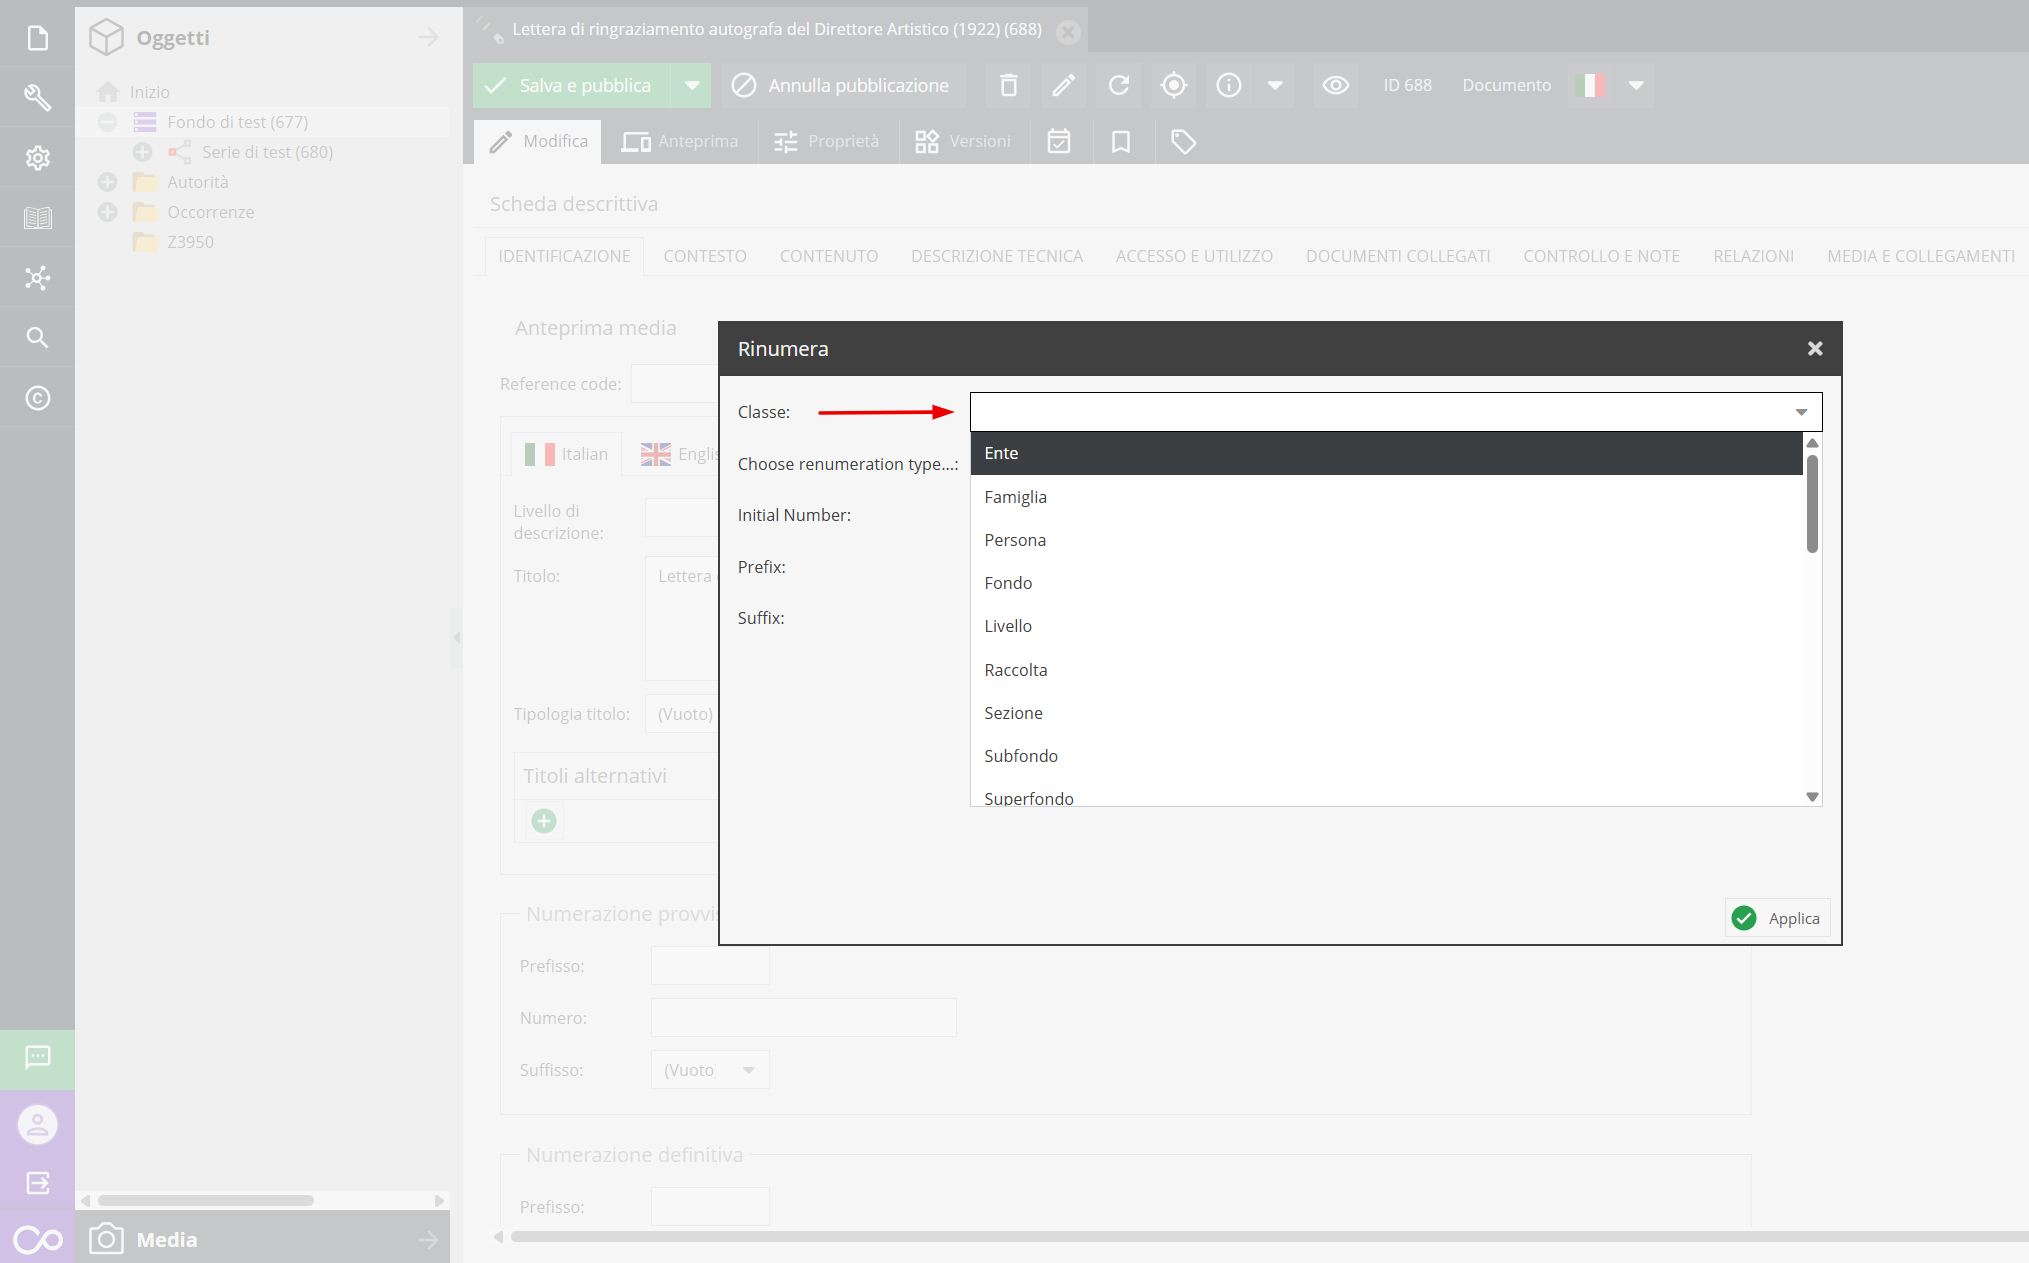
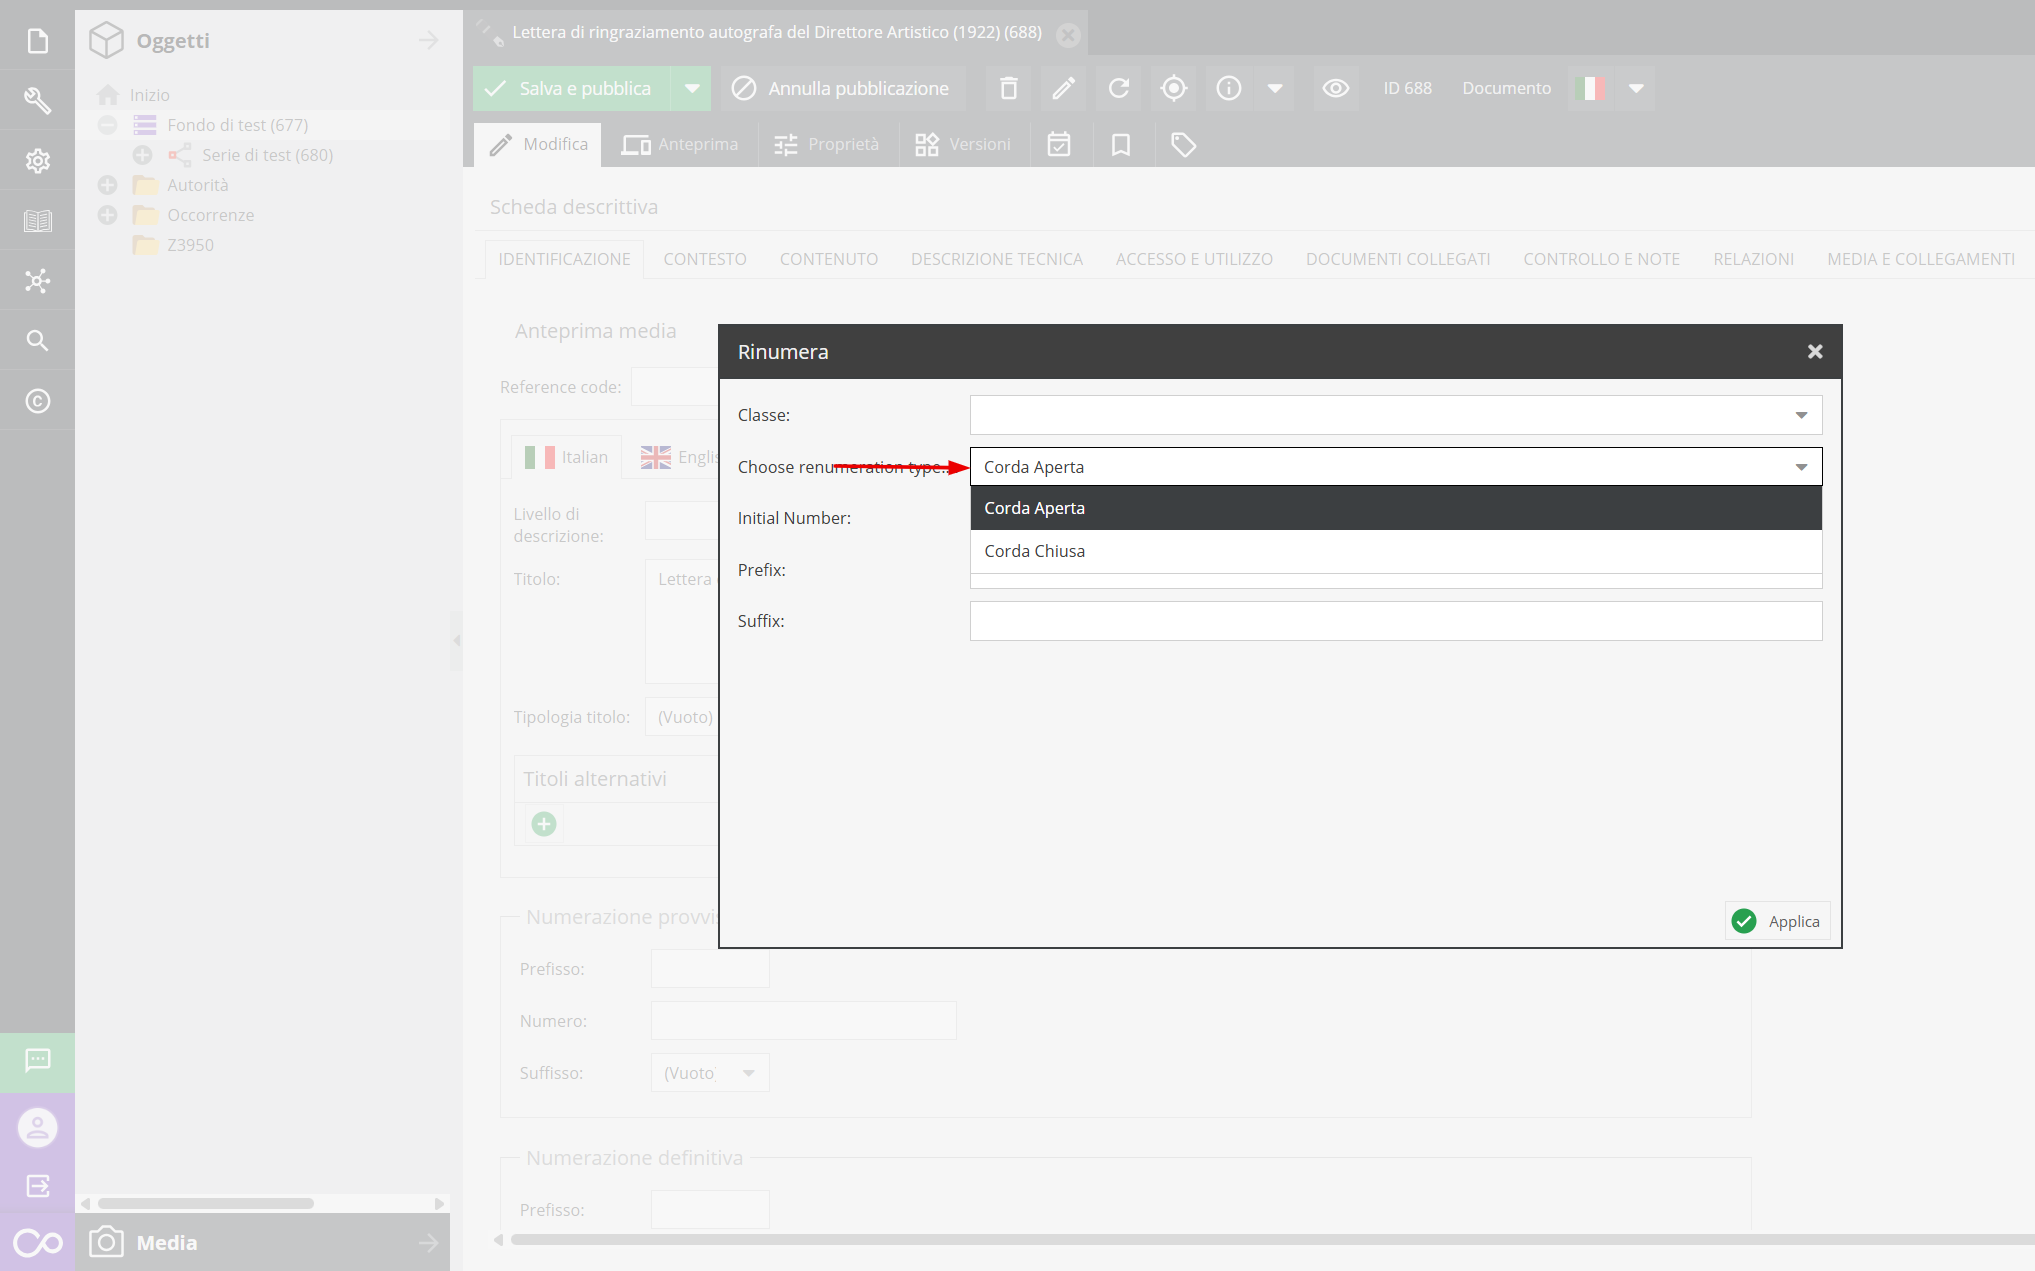
Then proceed to define the classes you wish to number by clicking on the corresponding dropdown menu (fig. 1), then define the numbering assignment mode (fig. 2):
- Closed Sequence: Used for definitive archival complexes, where numbering follows a continuous sequence without gaps.
- Open Sequence: Used for expanding series, allowing more flexible numbering management in anticipation of future additions. Then enter the numerical value from which the progressive count should start (e.g., "1" for a new series or a higher number if continuing an existing numbering).
Print inventory
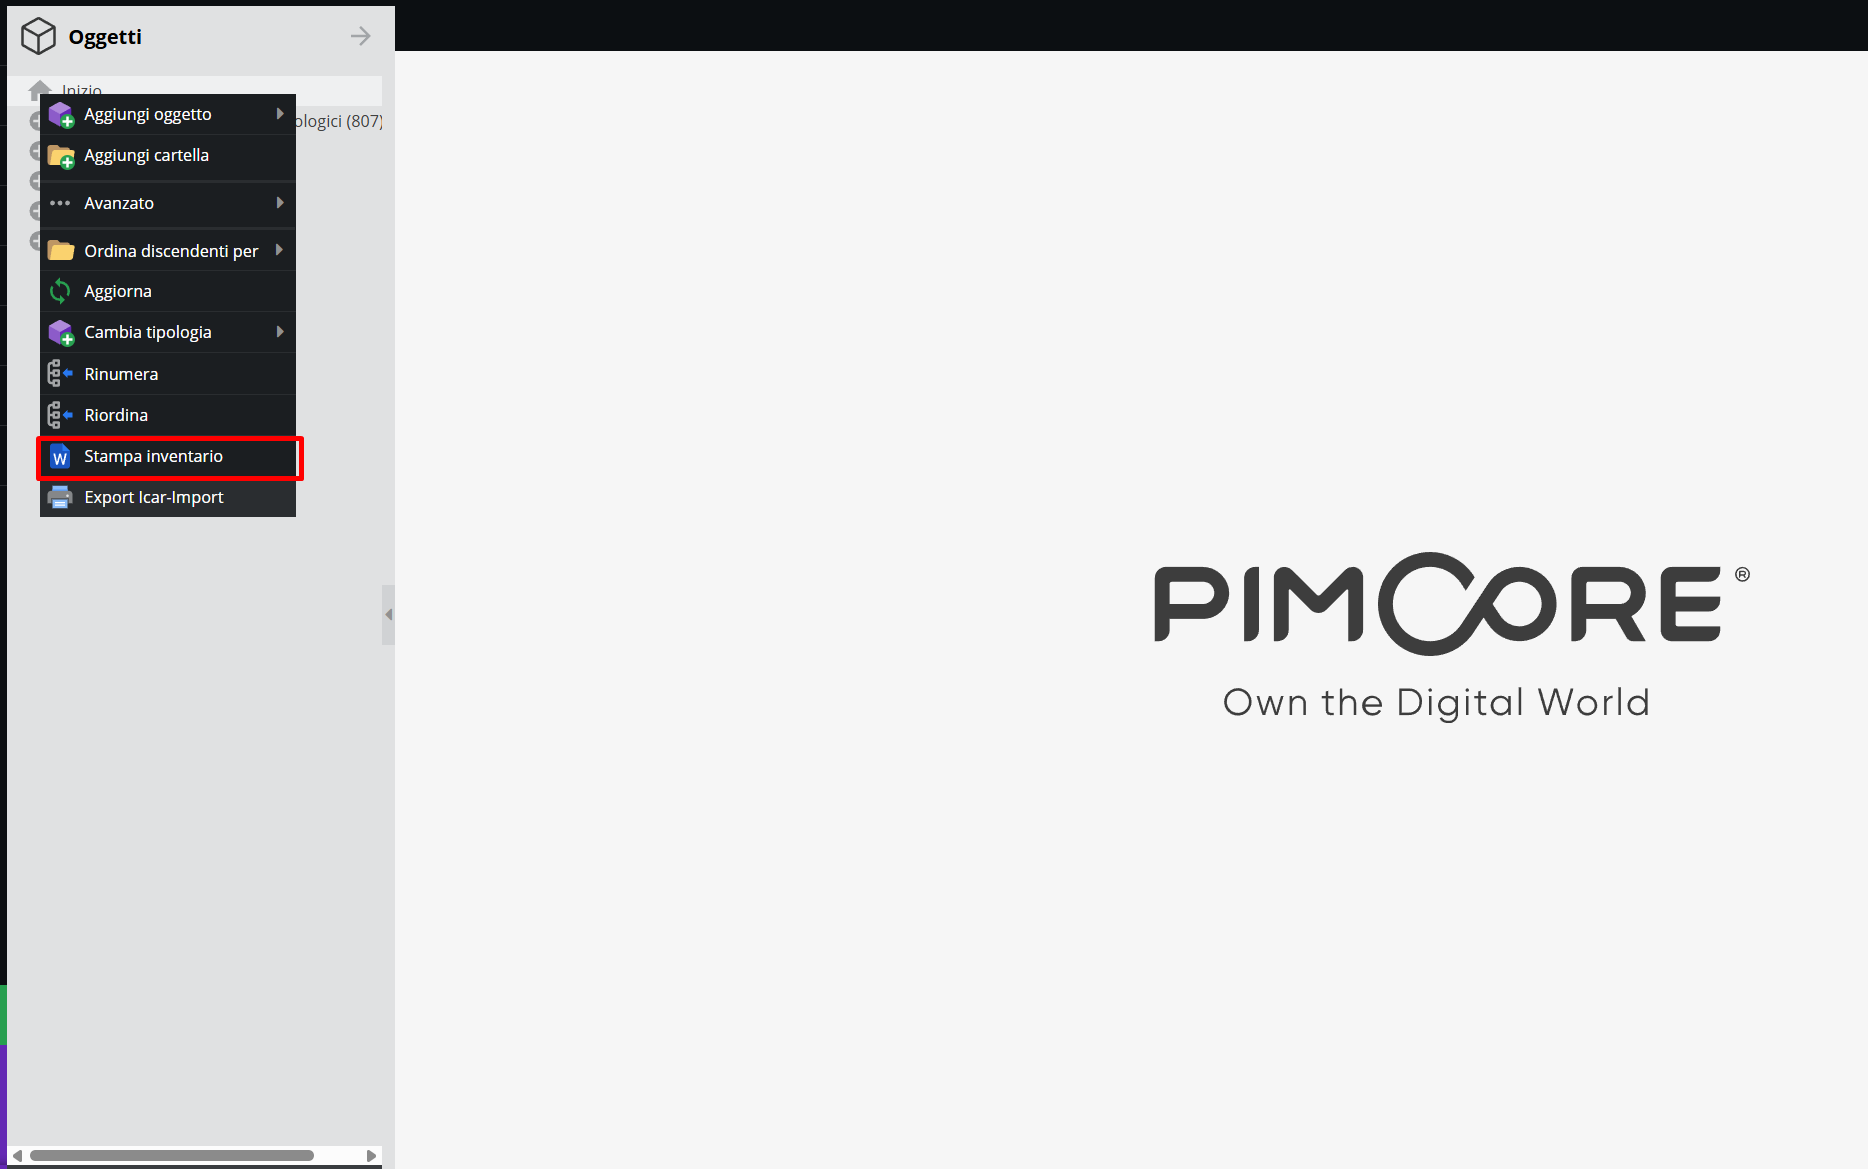
This feature automatically generates a .docx document containing the descriptive inventory of all descendant units from the selected node. Select the reference node, right-click, and choose "Print inventory".
The generated document faithfully reflects the hierarchical structure of the tree from which printing was launched: each partition is rendered as a section header, while belonging descriptive units appear beneath it, each accompanied by its own ID — the numerical identifier automatically assigned to the form upon creation.
The document also includes automatically generated final indexes — for instance, an alphabetical list of Authorities and Places linked to inventoried units — leveraging the relationship mechanism: the reference number beside each entry corresponds to the ID of the units that filled in that relationship.
Printing thus returns a complete inventory with consultation tools, usable even outside the system.
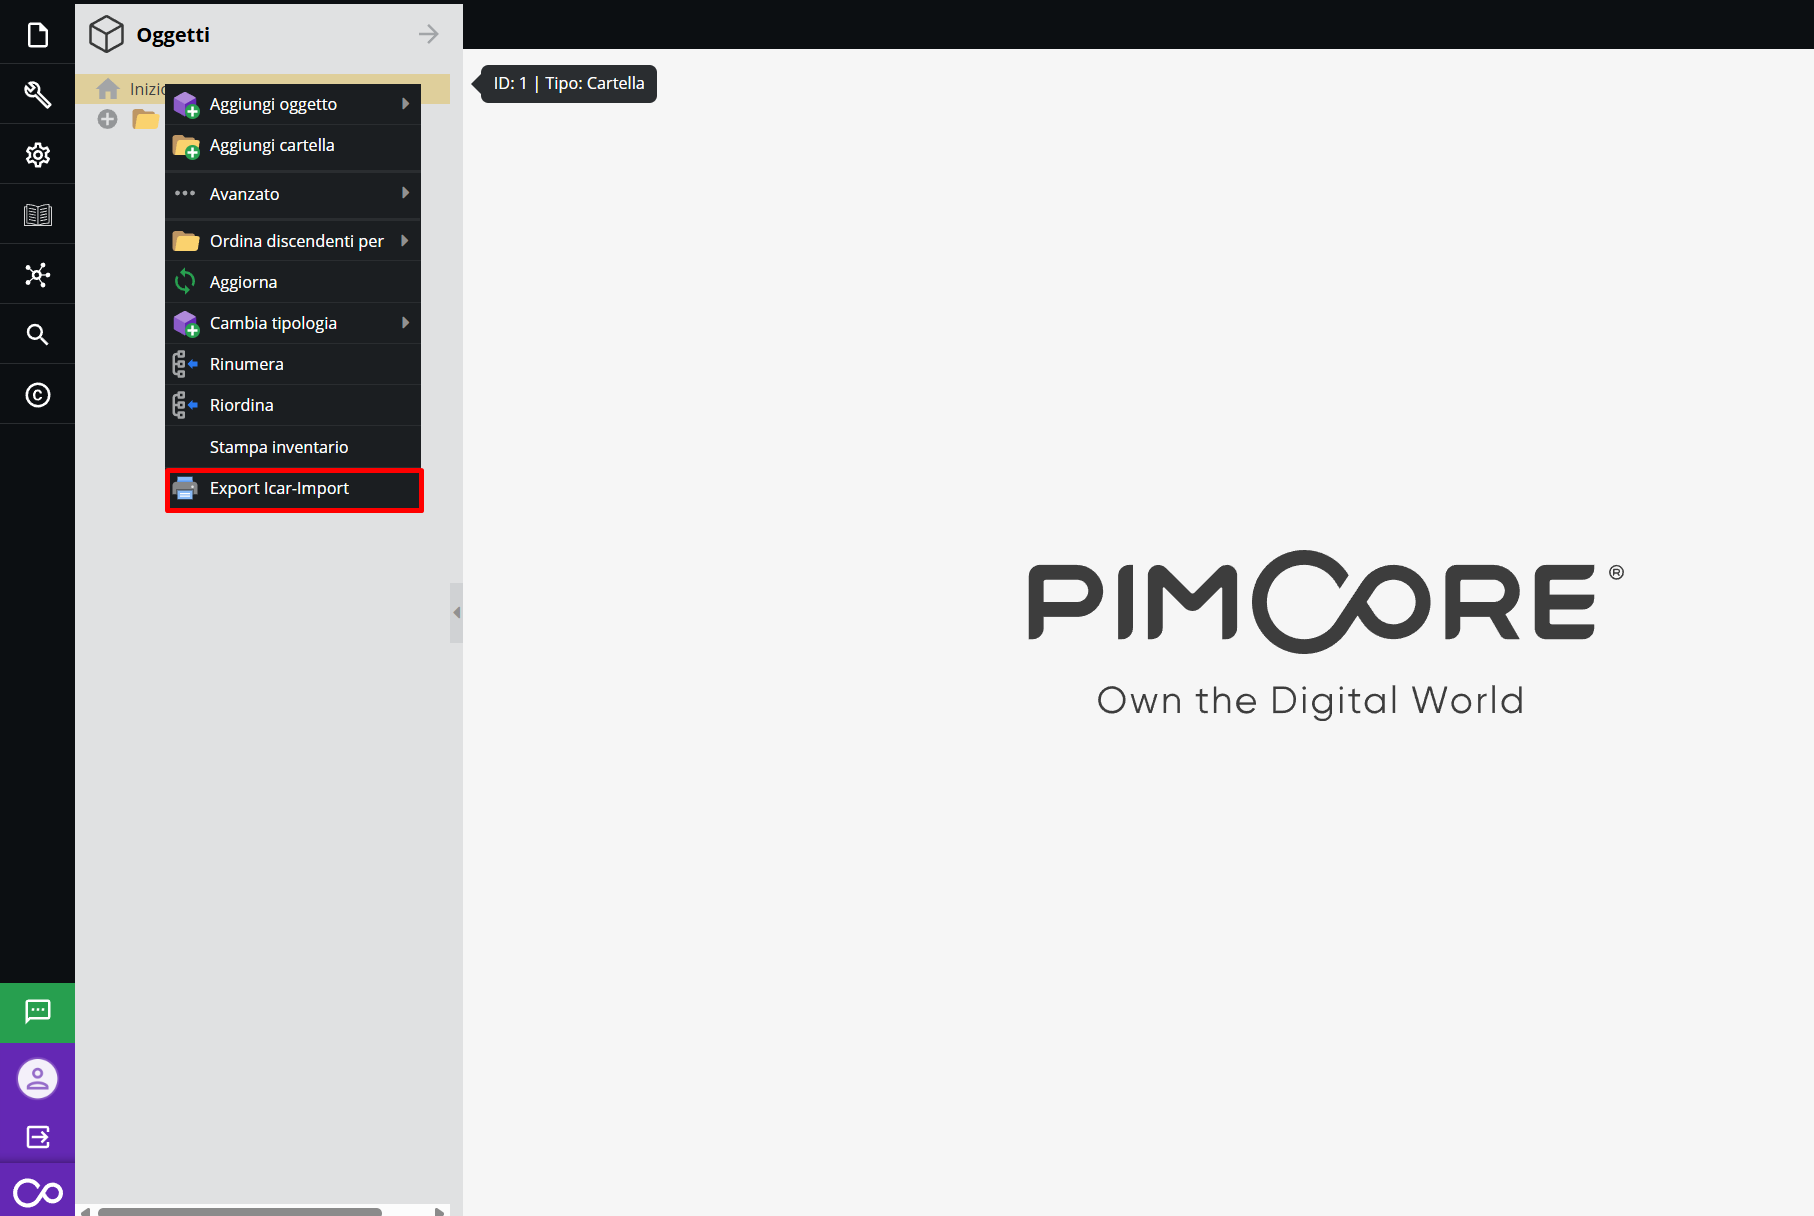
Export ICAR-Import
The “Export ICAR-Import” feature, activated and configured upon Client request, allows exporting archival descriptions loaded in the system in a standardized format compatible with ICAR (Central Institute for Archives) specifications.
Archive Architecture: hierarchical structure and access points
The system architecture was already outlined across previous sections. Therefore, this section aims solely to provide a general overview, referring to relevant chapters for further detail.
The architecture presented here was designed to reflect — if only in small part — the potential complexity of documentary holdings, integrating hierarchical descriptions (fonds/series/folder) with external contextual entities (Authorities and References).
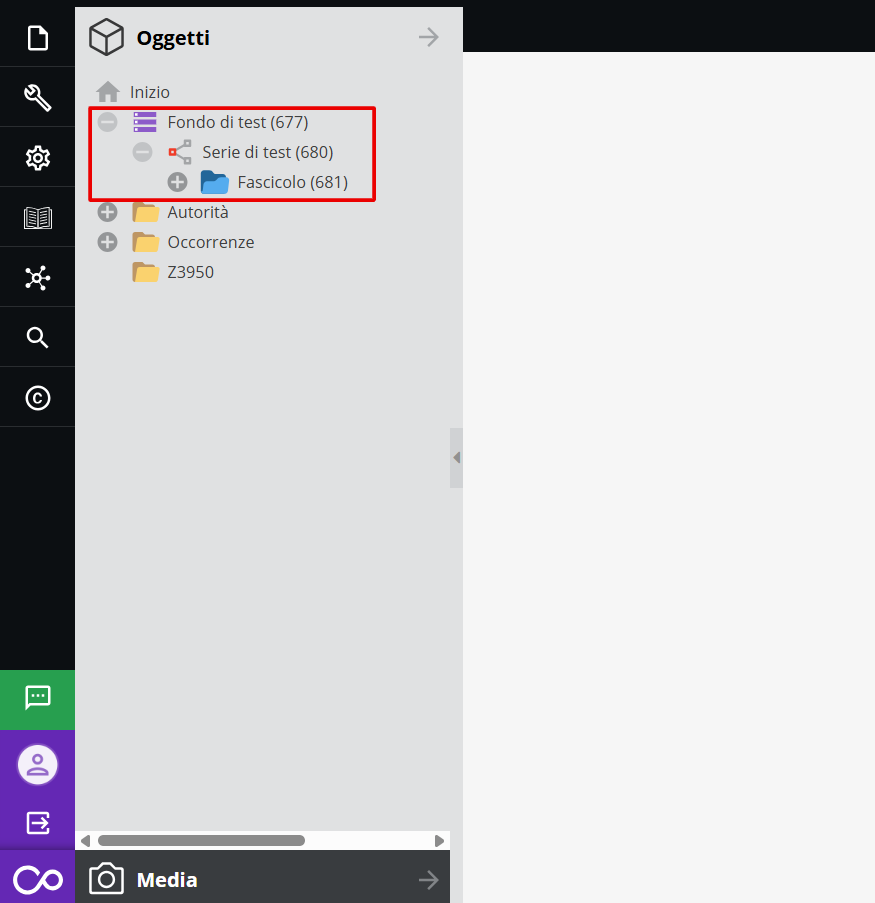
The “Fonds” represents the actual logical structure of an archive, housing a multi-level hierarchy that includes sub-fonds, series, and subseries.
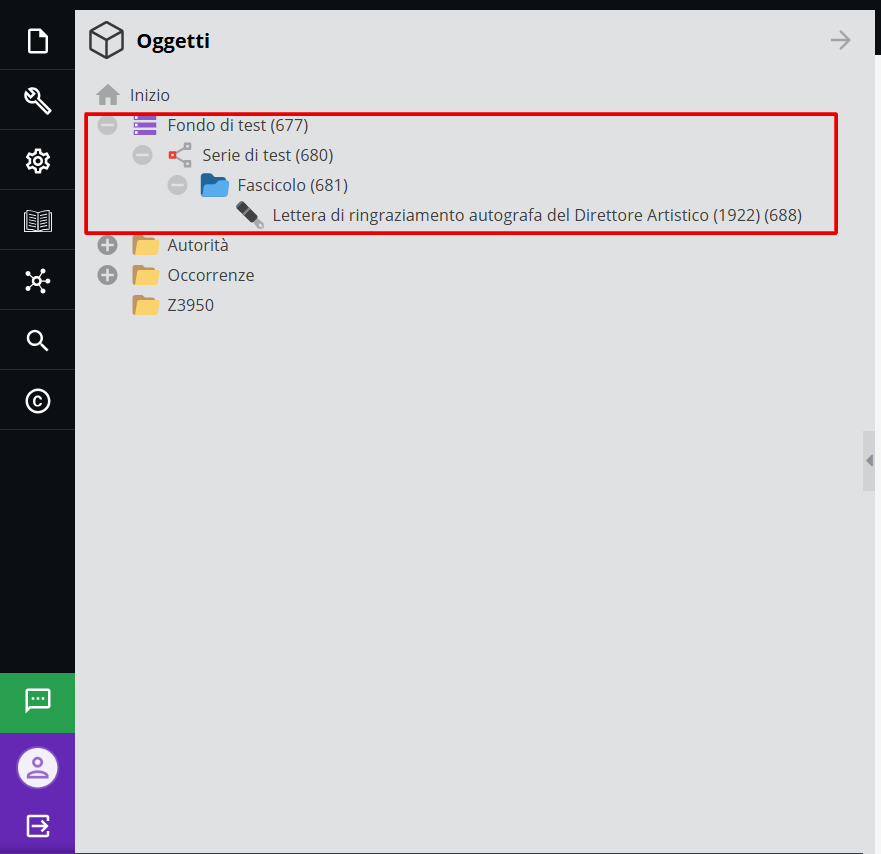
Within this structure, the aggregation termed “Folder” represents the group of documents gathered according to an organic archival link.
Within folders reside individual item units (digitized or born-digital). These are analytically described according to the typological classes analyzed in the section Object classes.
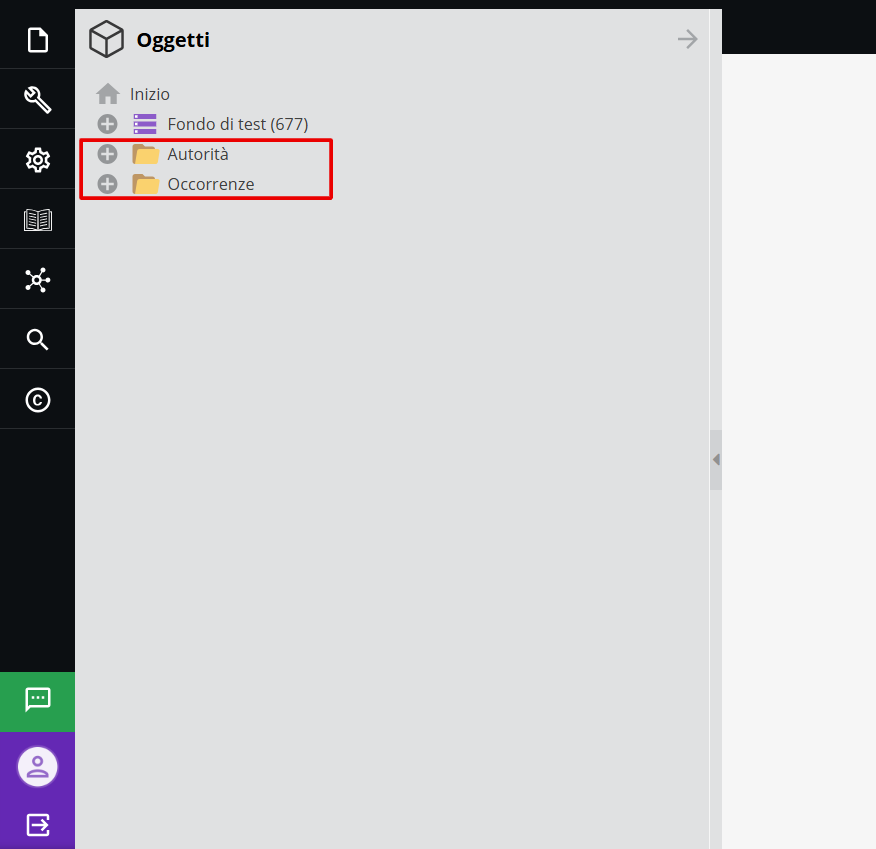
Parallel to the hierarchical tree, the system manages external object classes that are closely related to documents: Authorities and References records (see sections Authorities and References). These entities enjoy descriptive autonomy and act as cross-cutting access points, contextualizing relationships between documents and the outside world.
Authorities
The section is designed to host master records of subjects that interacted with the documentary heritage. To ensure orderly management and efficient searching, the structure is organized into folders and subfolders based on the legal and biographical nature of the entities:
- Corporate Bodies, Institutions/Companies
- Persons, folder intended for individual biographical profiles
- Families, specific section for describing family groups See also sections Object classes and Information areas.
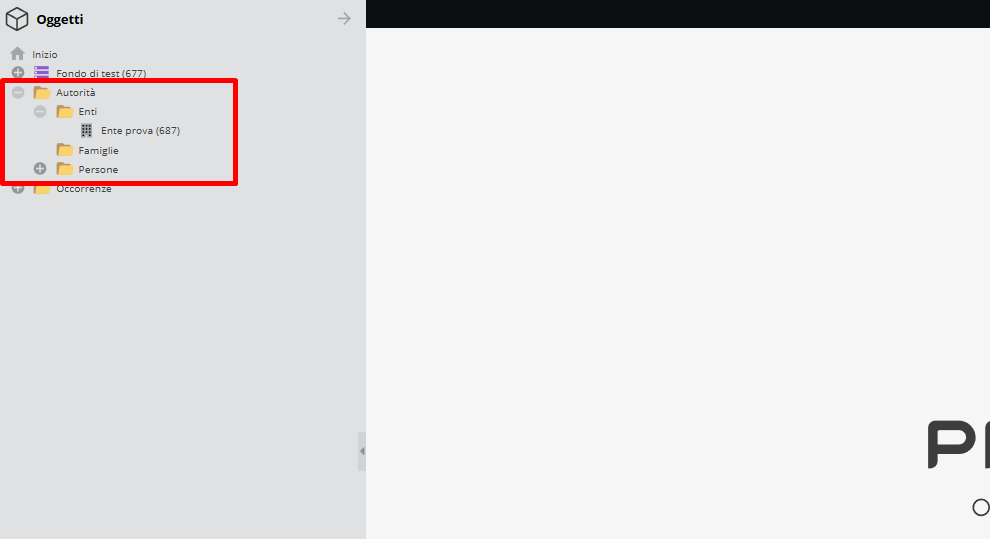
References
Similarly, the References section hosts cross-cutting access points necessary for geographic and thematic contextualization of documents. It can be organized according to specific project requirements or by class.
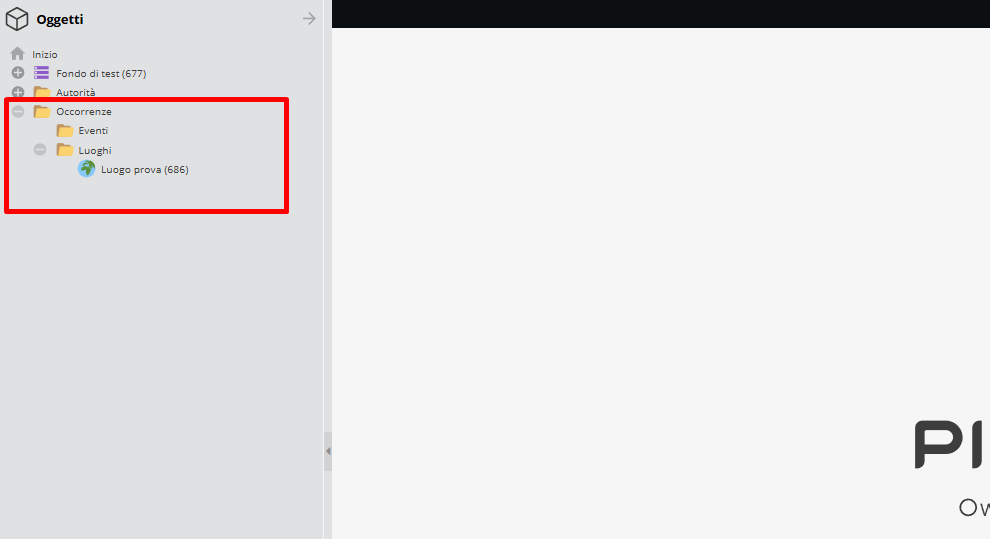
See also sections Object classes and Information areas.
Descriptive Form: options and features
As seen previously, clicking on any created object will open its descriptive form.
“Edit” Tab
The form opens on the Edit tab, which allows filling in information area fields.
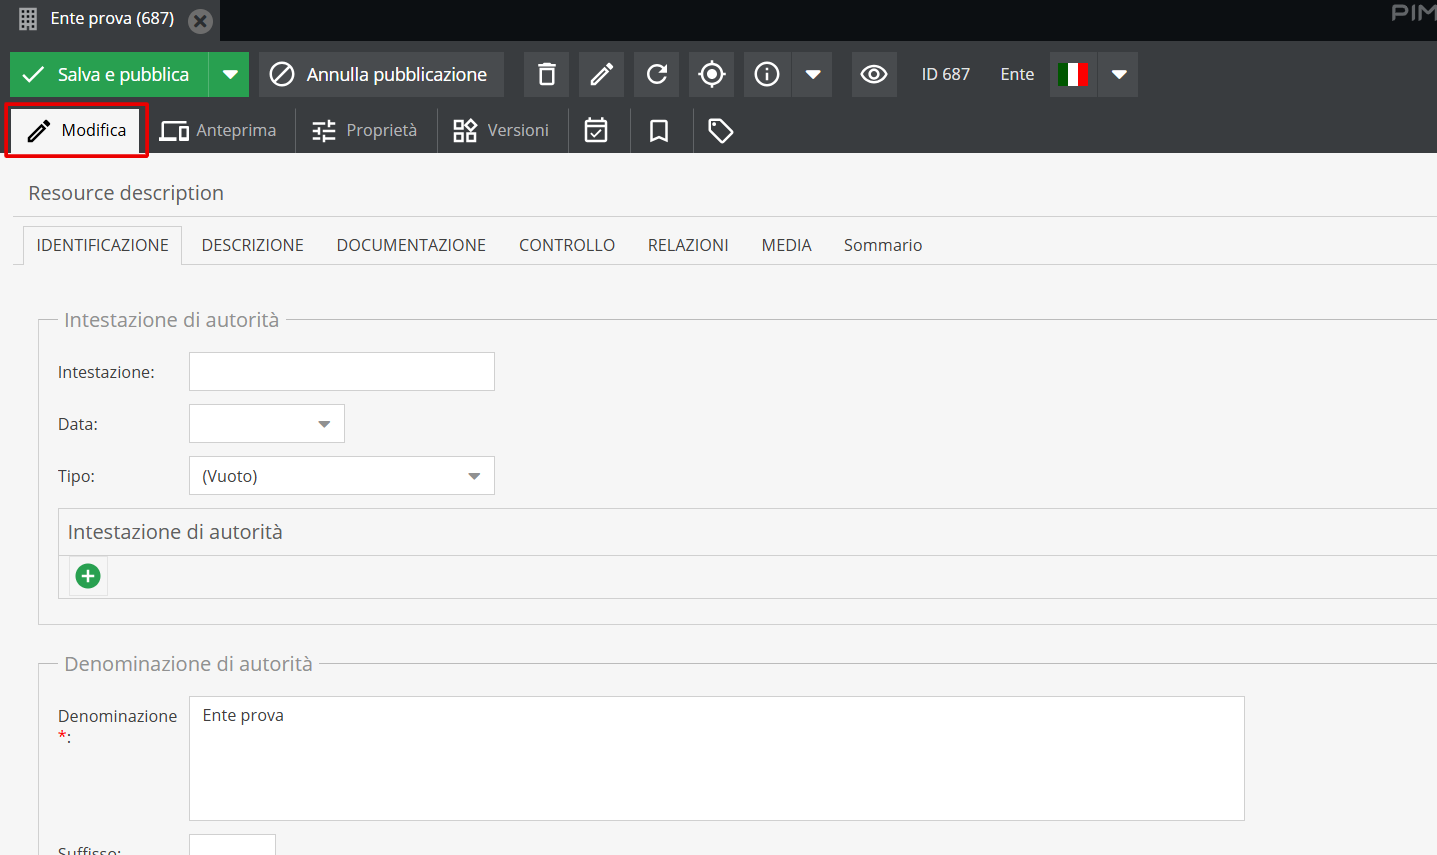
“Versions” Tab
The Versions tab allows viewing all modifications made to that particular descriptive form, indicating the user and timestamp.
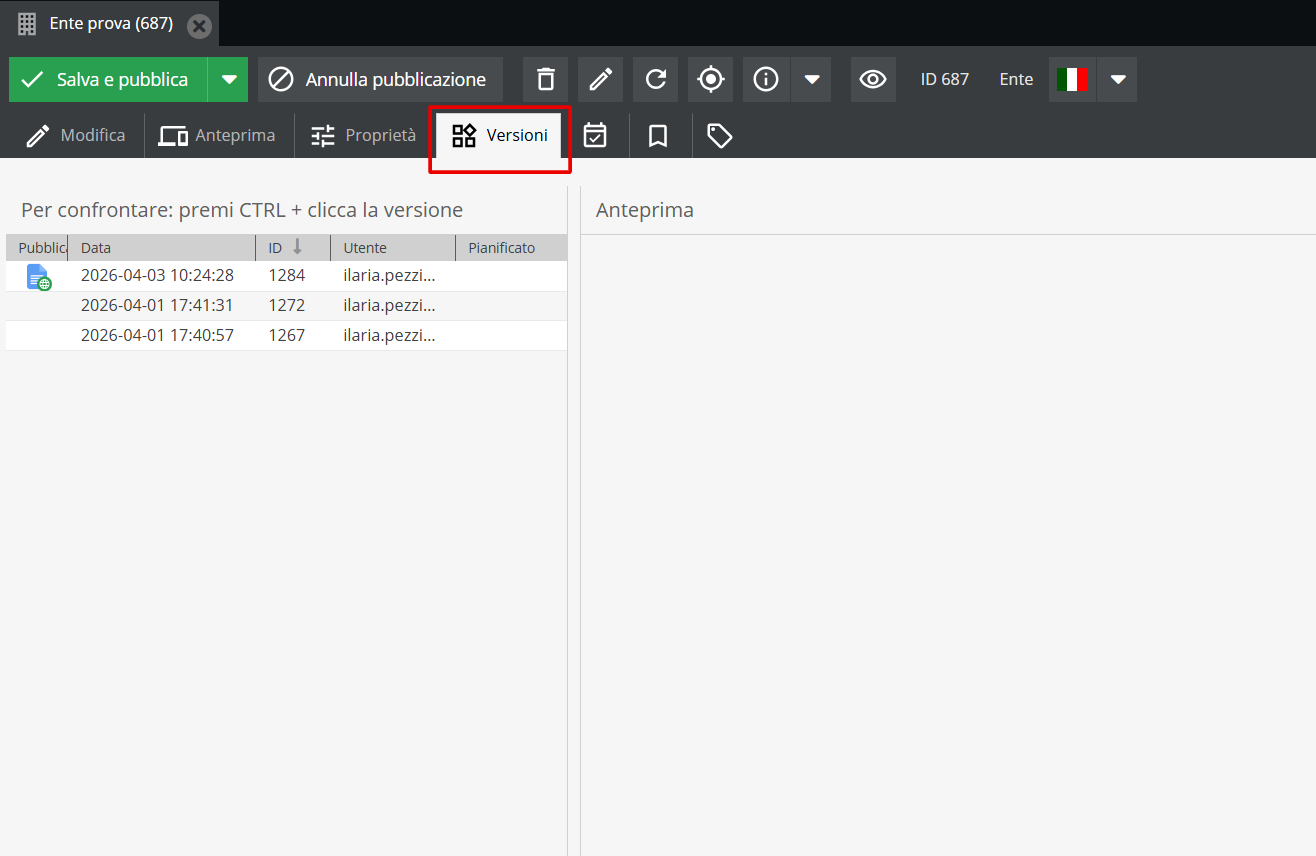
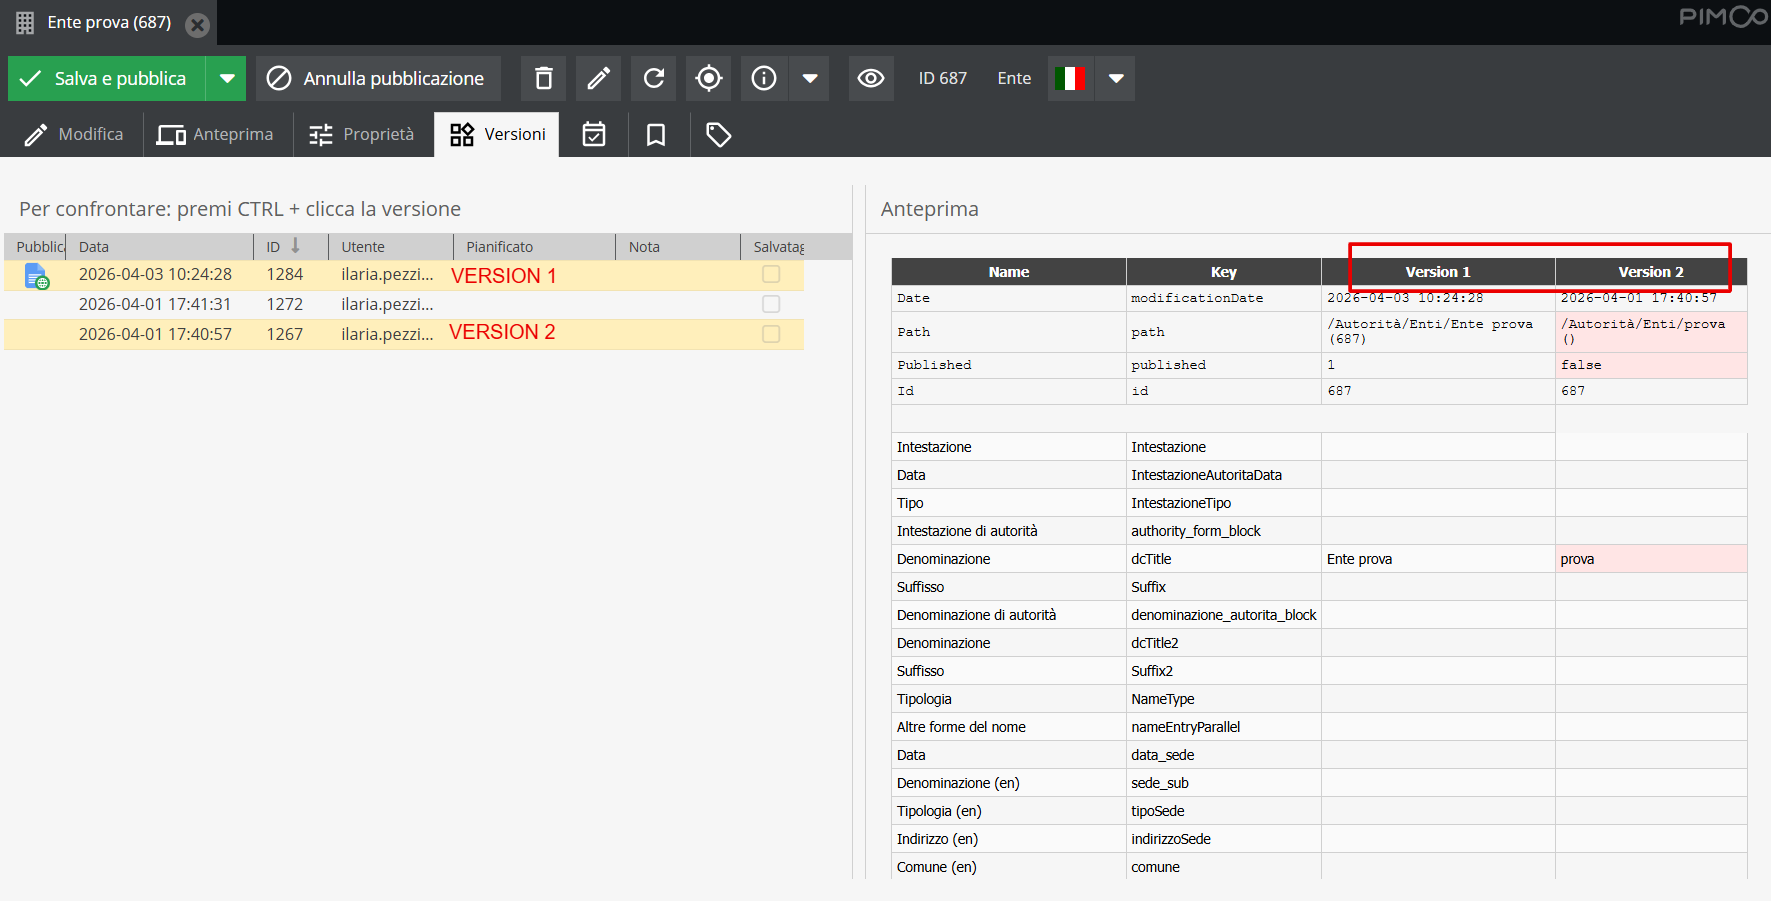
You can compare two or more form versions by pressing CTRL + the relevant versions.
Once this operation is performed, a preview of the compared versions will be presented with modified fields highlighted.
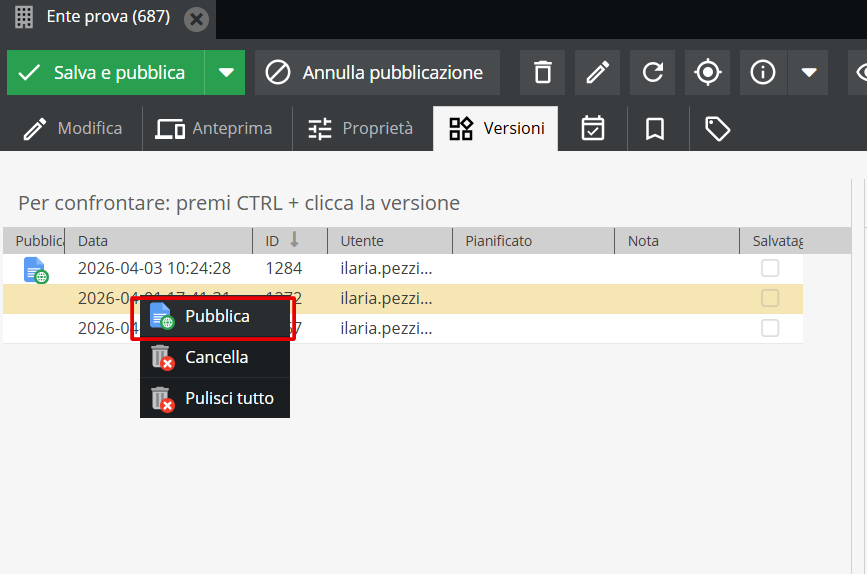
Additionally, you can revert to a previous version (and make it the current version) by right-clicking on it and selecting the “publish” option.
With the same functionality, you can delete a previous version or clear the version history altogether.
As a best practice, avoiding deleting version history is recommended.
“Dependencies” Tab
The Dependencies tab records all dependencies for the object form in question, indicating any relationships with Media and Object records.
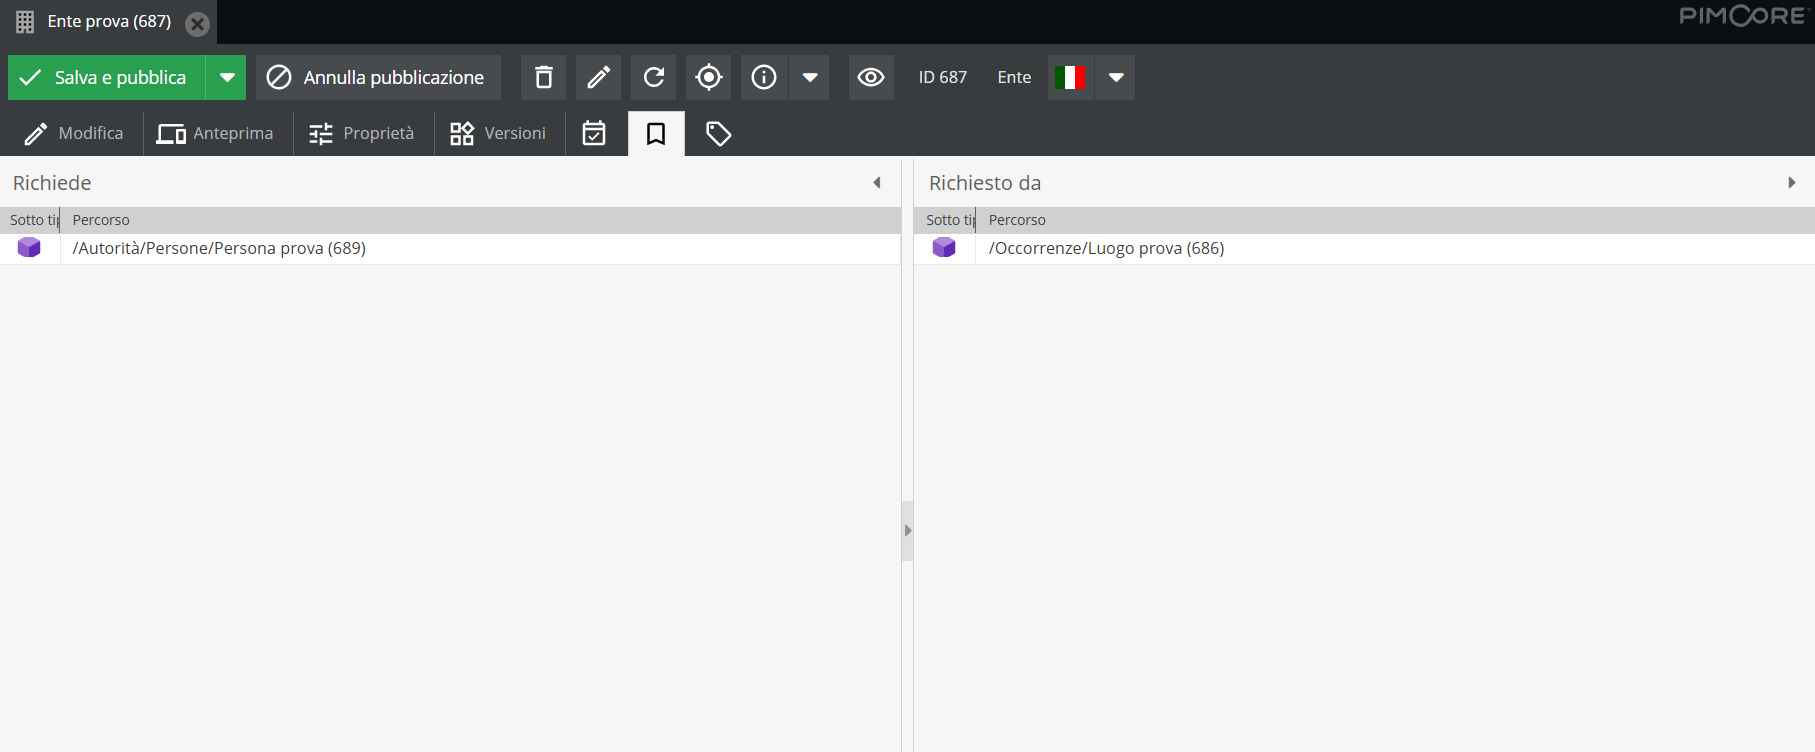
The “Requires” section displays direct relationships of the object form, i.e., a summary of all external references of the descriptive form, whether other Objects or related Media.
Similarly, the “Required by” section displays any inverse relationships, i.e., other object forms to which the descriptive form is linked.
“Tags” Tab
The Tags tab is dedicated to tagging the descriptive unit: from here you can select one or more tags and assign them to the form in question.
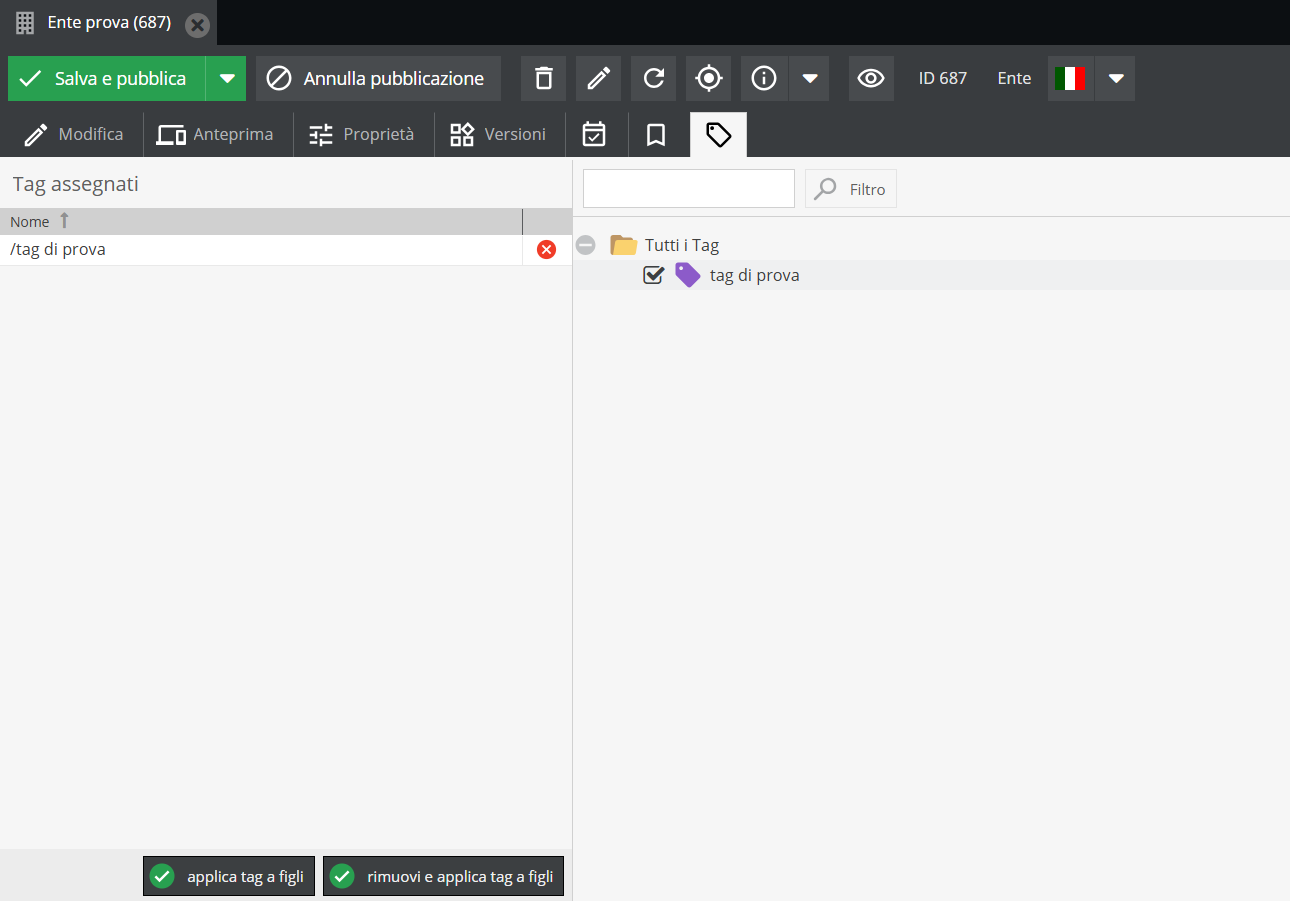
You can perform bulk tagging if the object form has descriptive units positioned at a lower hierarchical level, i.e., can be considered a “parent form”.
To perform this operation, navigate to a node that has “child” forms. Once inside the form on the “Tags” tab, select the desired tags, then click the Apply tags to children button.
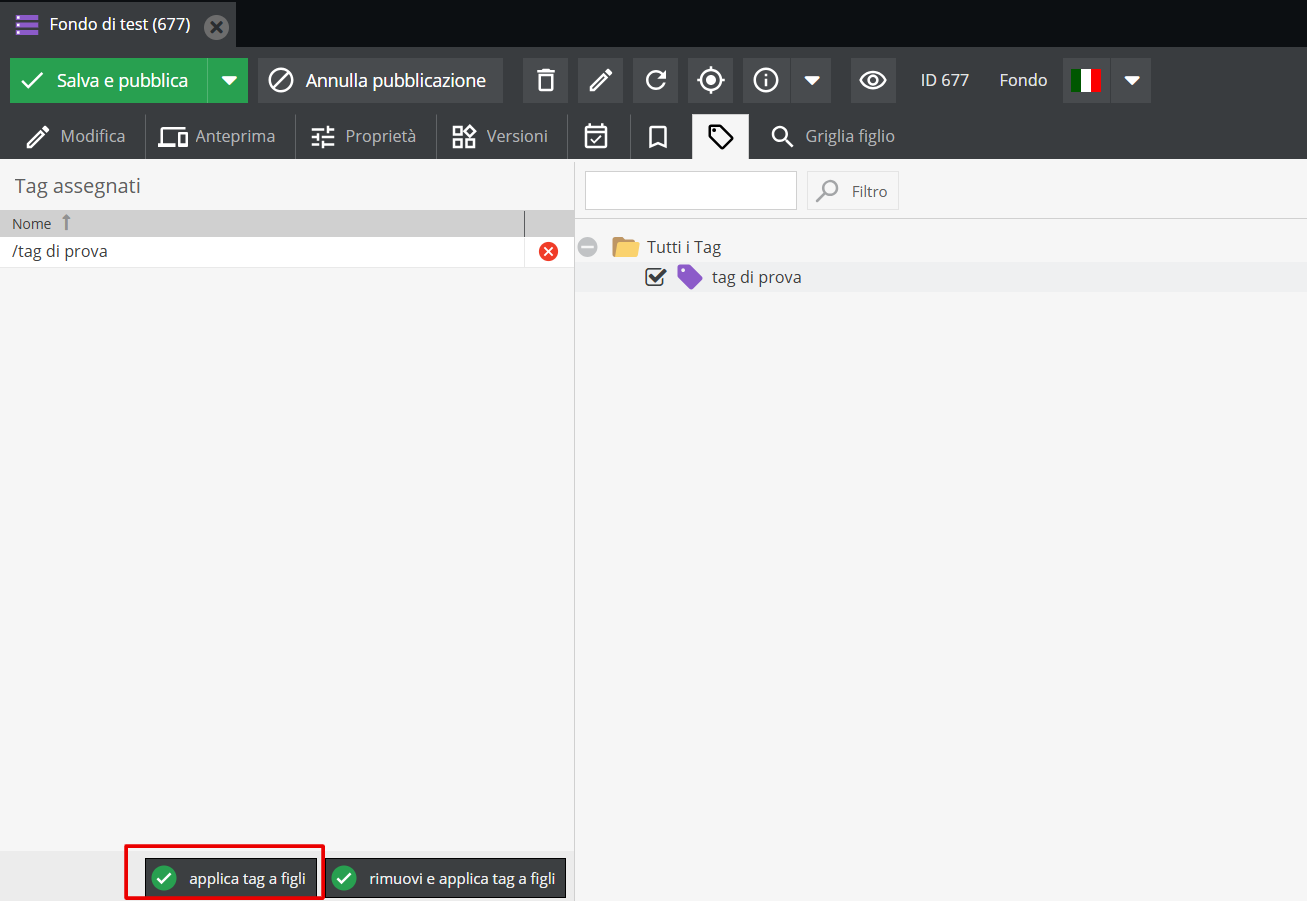
Bulk tagging means all descriptive units below the parent form will adopt these specific tags. This is an irreversible operation. It is recommended only for users who have completed training on the tool with Promemoria Group personnel.
“Save” Tab
Once changes are made, an asterisk (*) symbol will appear next to the title of the descriptive form indicating they have not yet been saved.
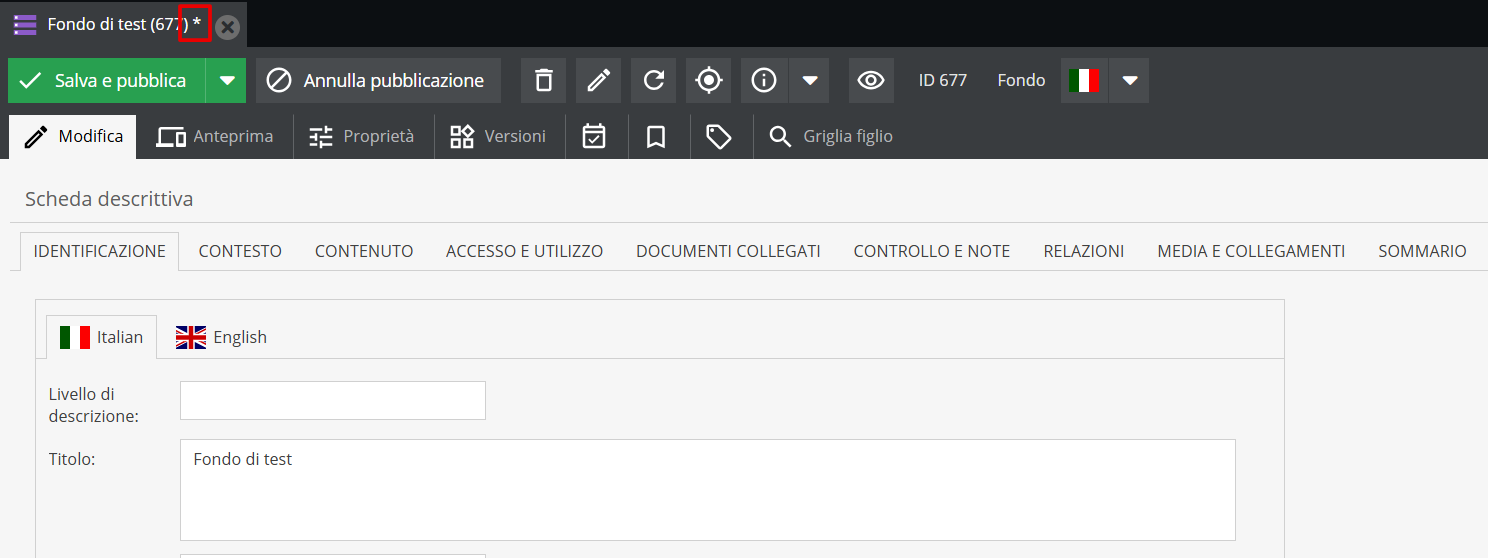
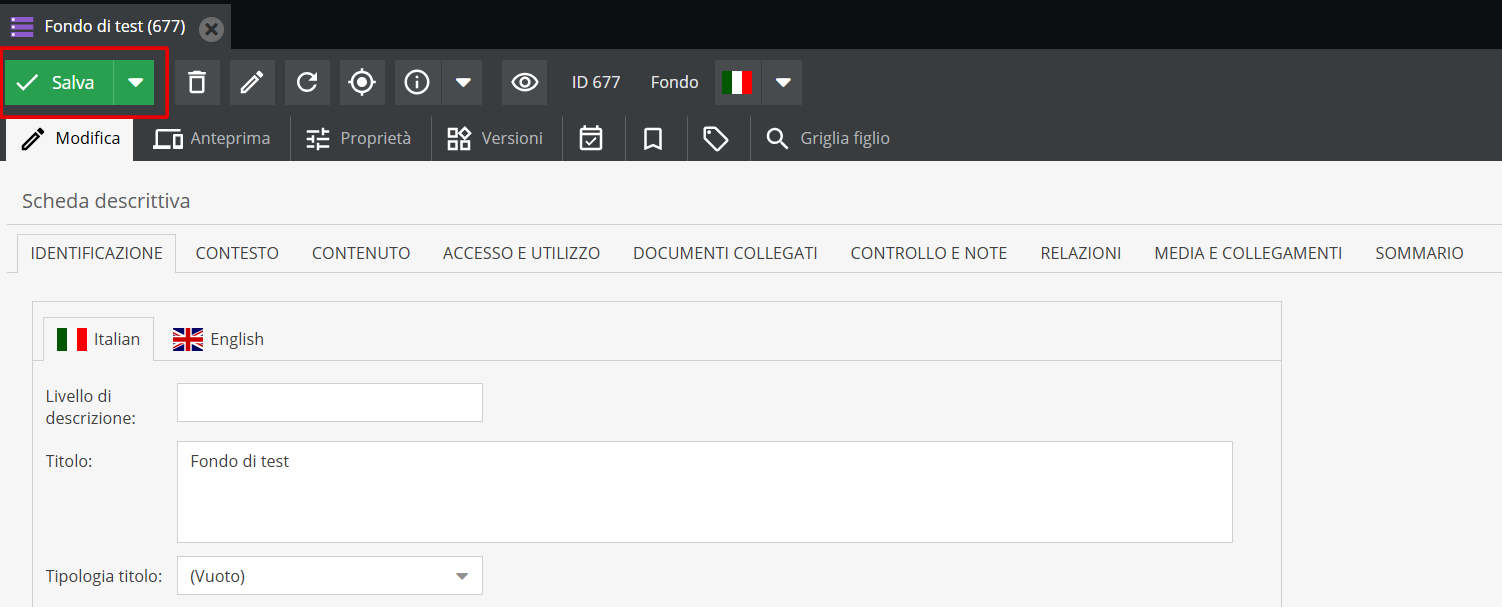
All edits made to the form must be saved to take effect. If a form has not yet been published, click the green Save button (if you wish to continue working on the form without making it visible on the front end) or click the side arrow to open the dropdown menu. Select the green Save & publish button if you wish to make the form available on the front end.
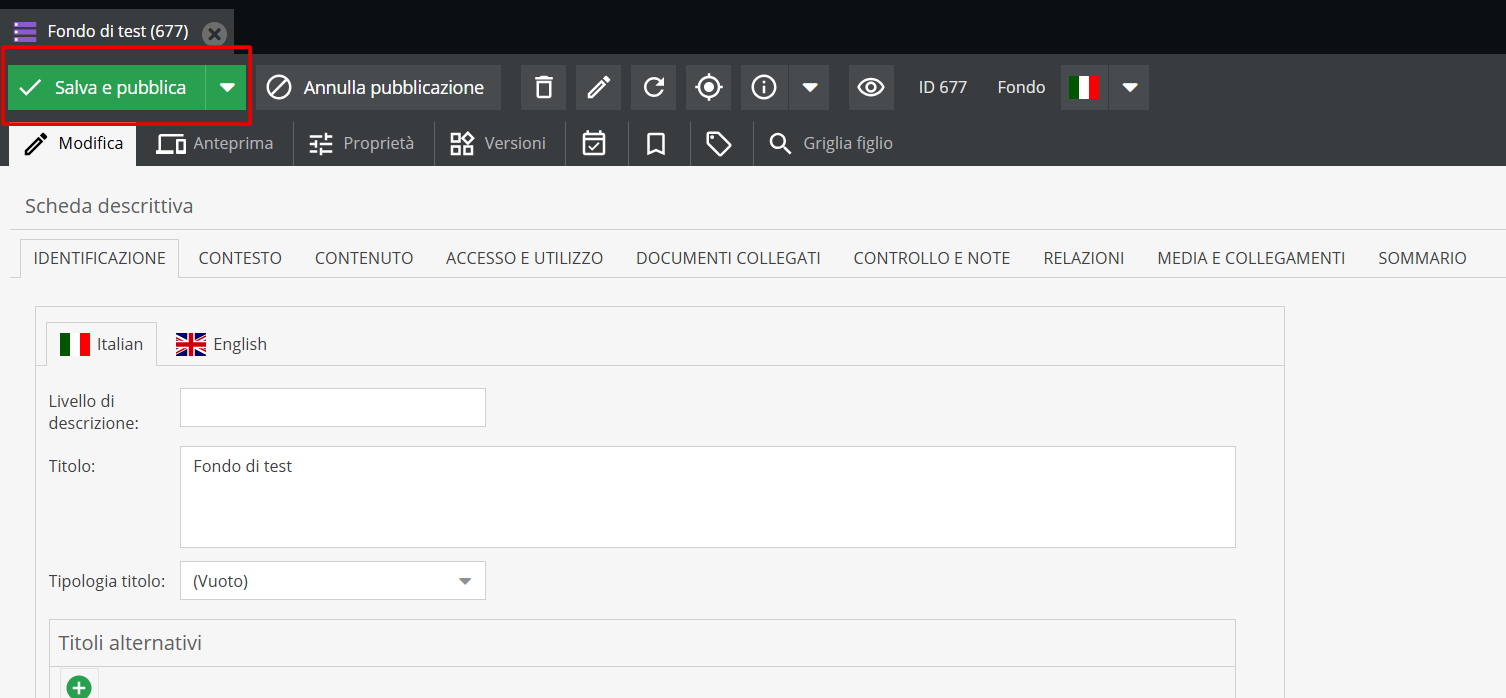
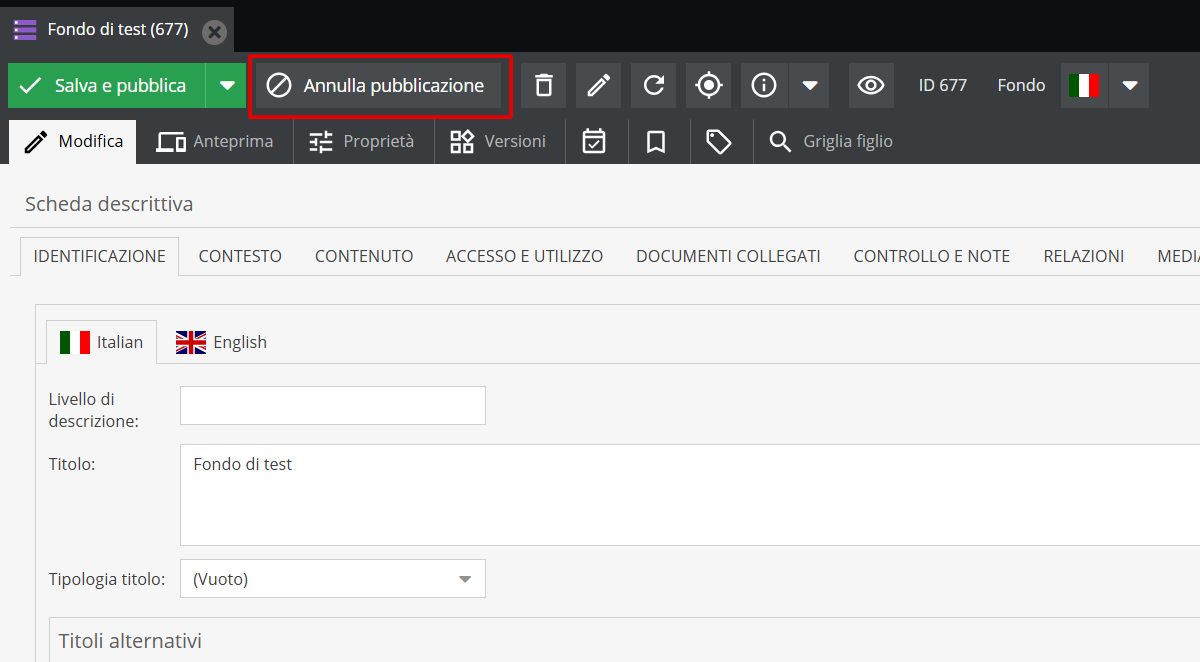
Once published, the form can be set back to back-end only by clicking the gray Unpublish button.
“Delete” Tab
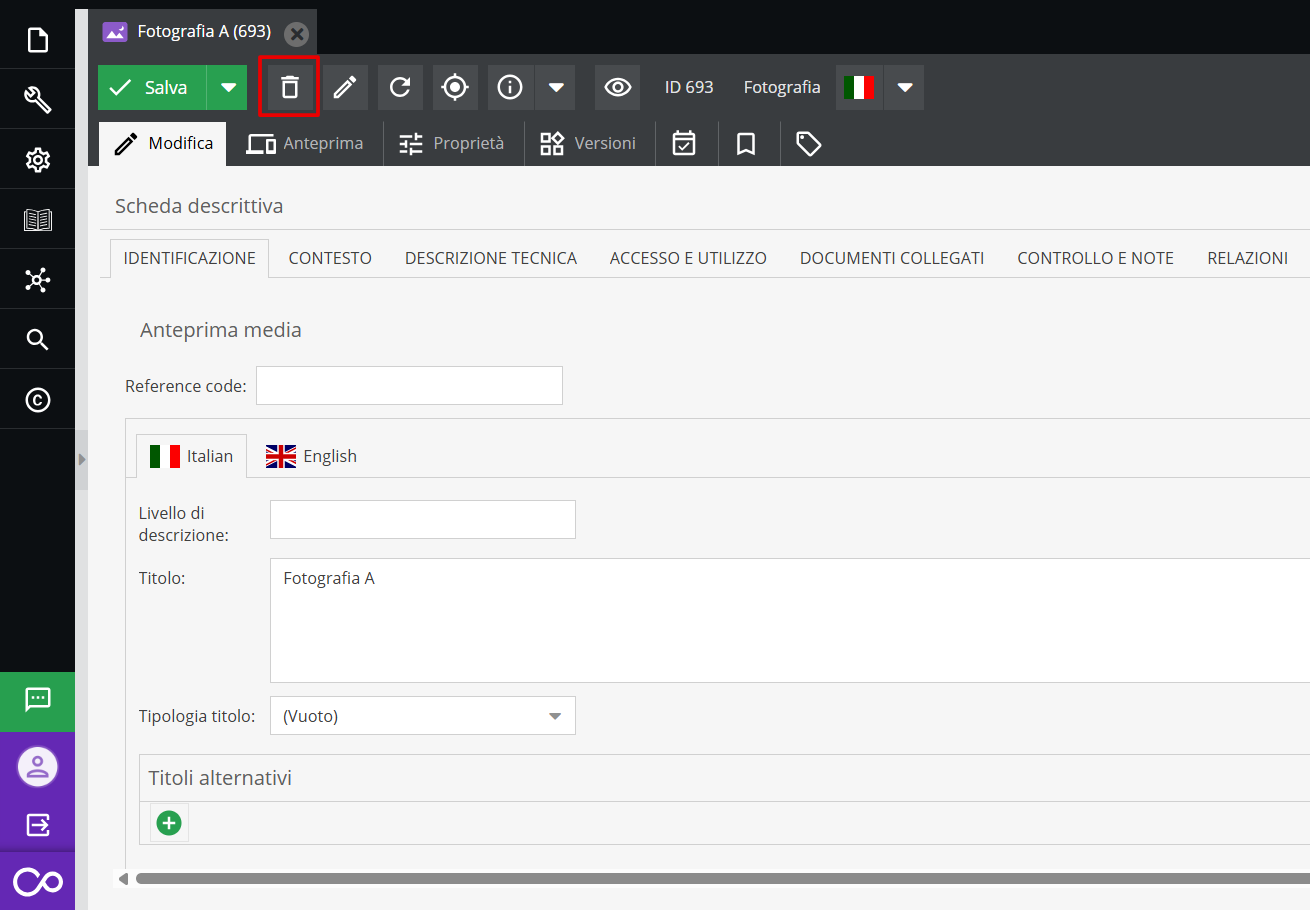
Clicking Delete allows deleting the entire descriptive form.
“Rename” Tab
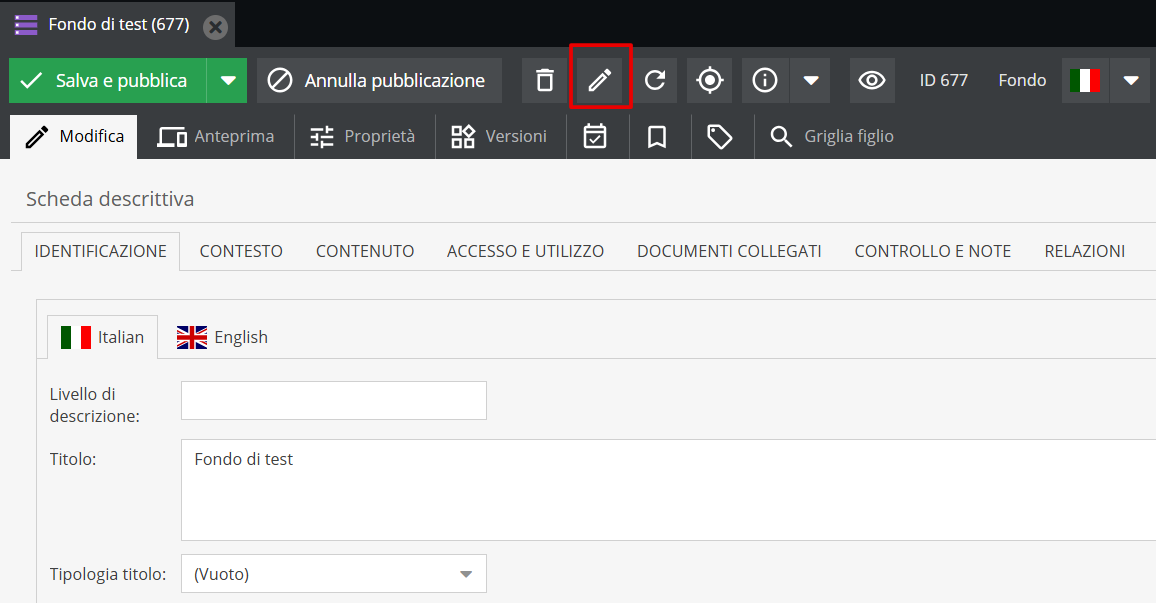
The Rename option allows modifying the unit's “Title” field.
“Reload” Tab
This option allows refreshing the individual descriptive form.
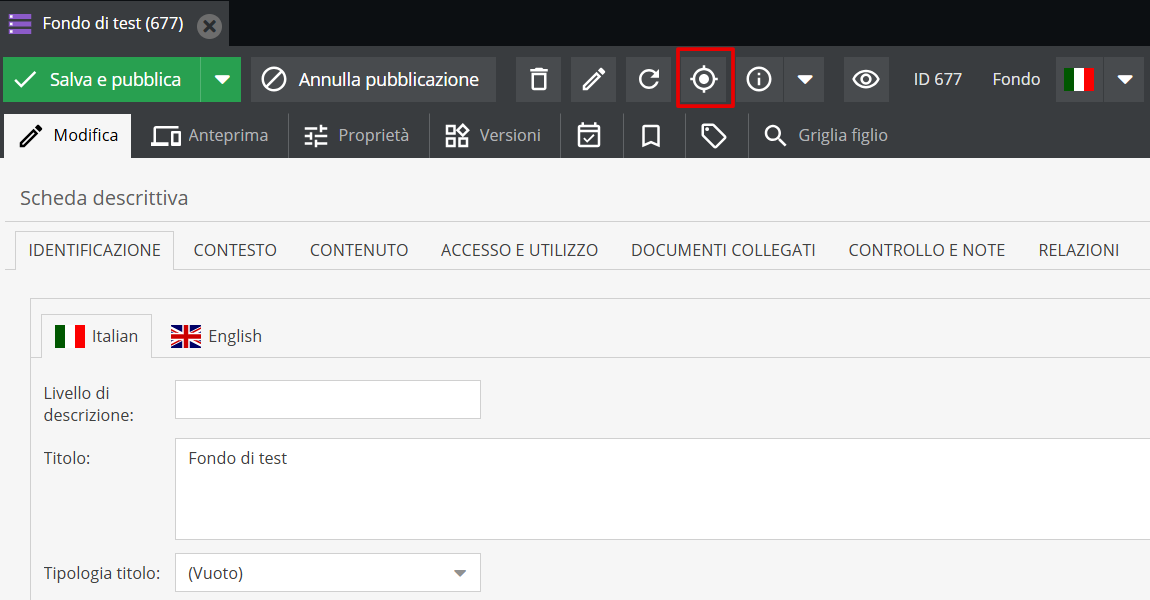
“Show in tree” Tab
The Show in tree option locates the open descriptive form wherever it is in the tree structure.
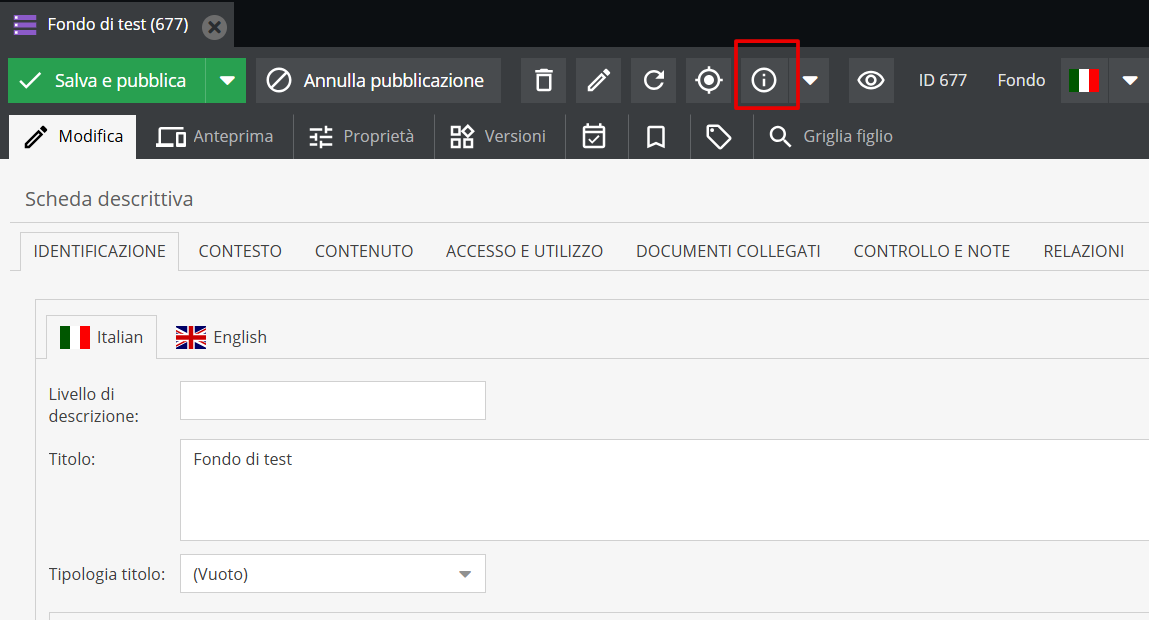
“Information” Tab
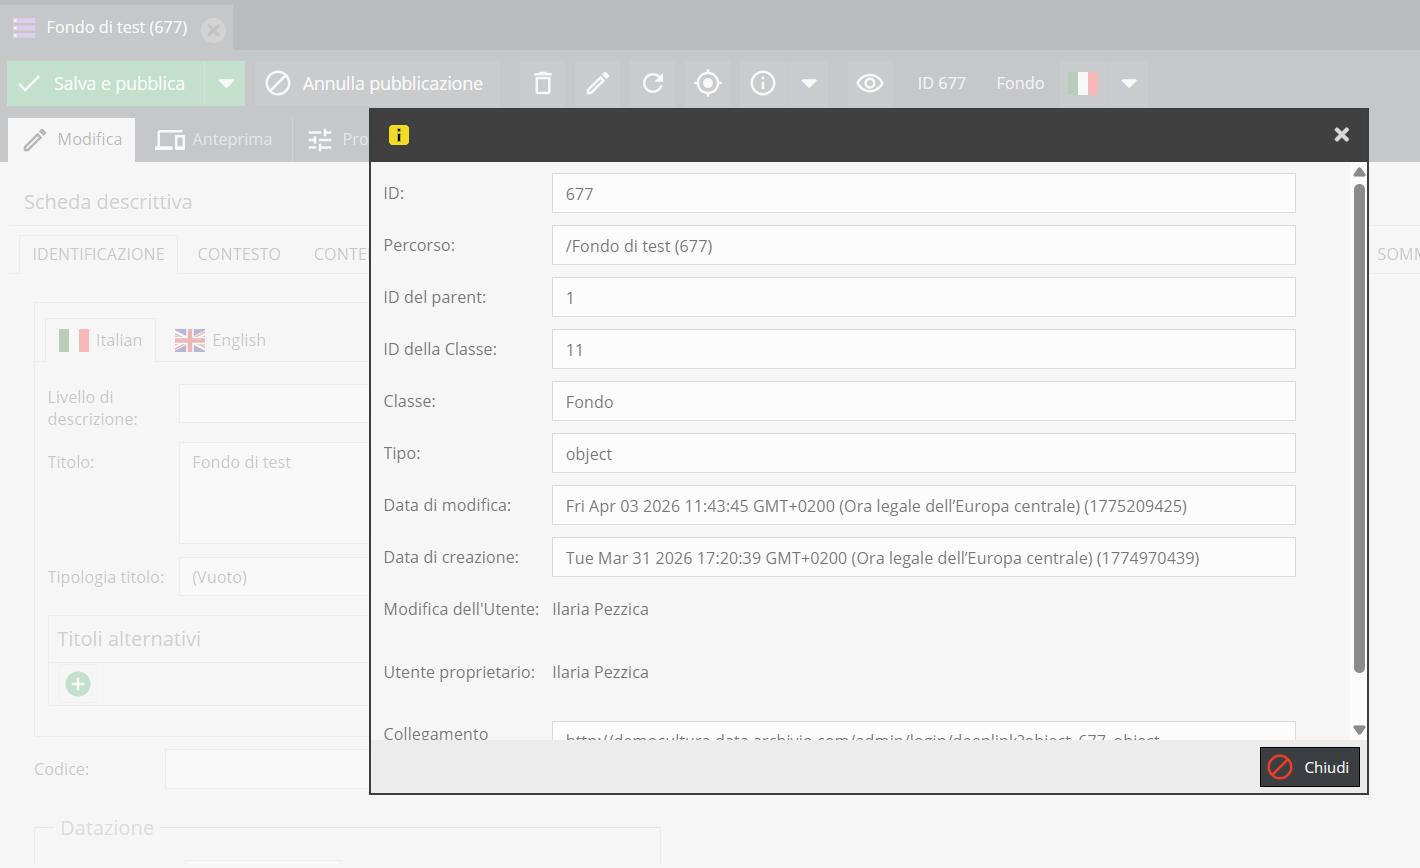
The Information option displays informational details of the generated form, such as its class, parent class ID, creation date, modification date, and deeplink (allowing you to copy the form's path).
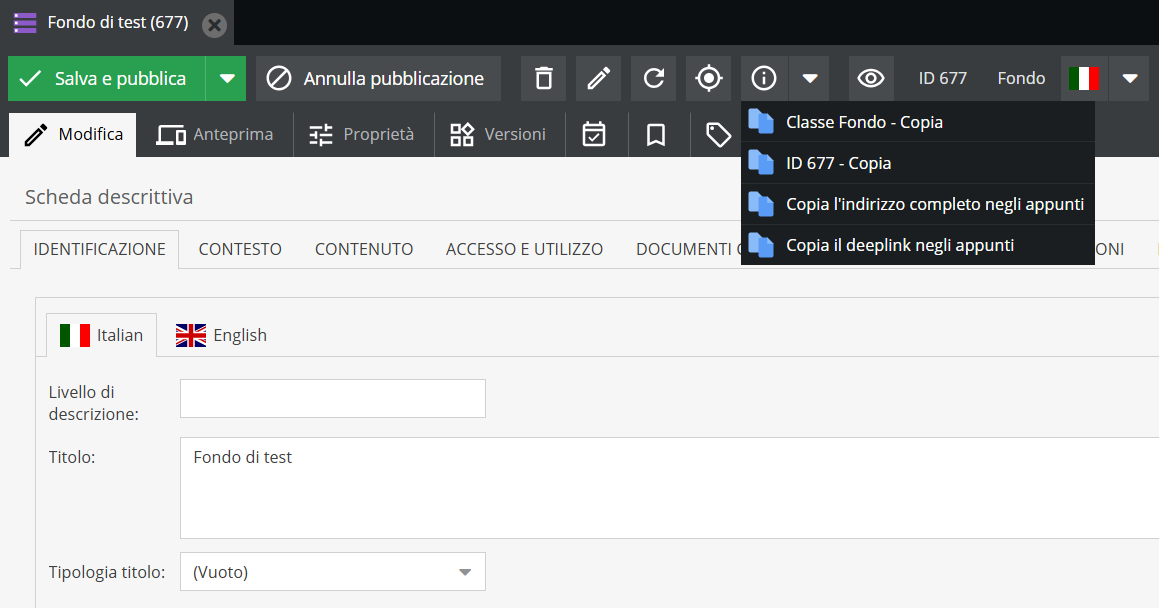
Next to the Information section, clicking the arrow opens a dropdown menu allowing you to: copy the ID to clipboard (the form's unique code generated automatically by the platform); copy the full address; copy the deeplink (the direct path to the Pimcore descriptive form).
“Translate” Tab
The "Translate" button operates on specific text fields translatable per language.
From the dropdown menu, choose the source and target languages (for example, from Italian to English): the system calls the automatic translation service and directly populates the target language tab.
The "Translate" button works only on a selection of fields: it cannot be used, for example, on select and multi-select fields.
For further details, see also Localized fields
The “Grid” option and bulk object tagging
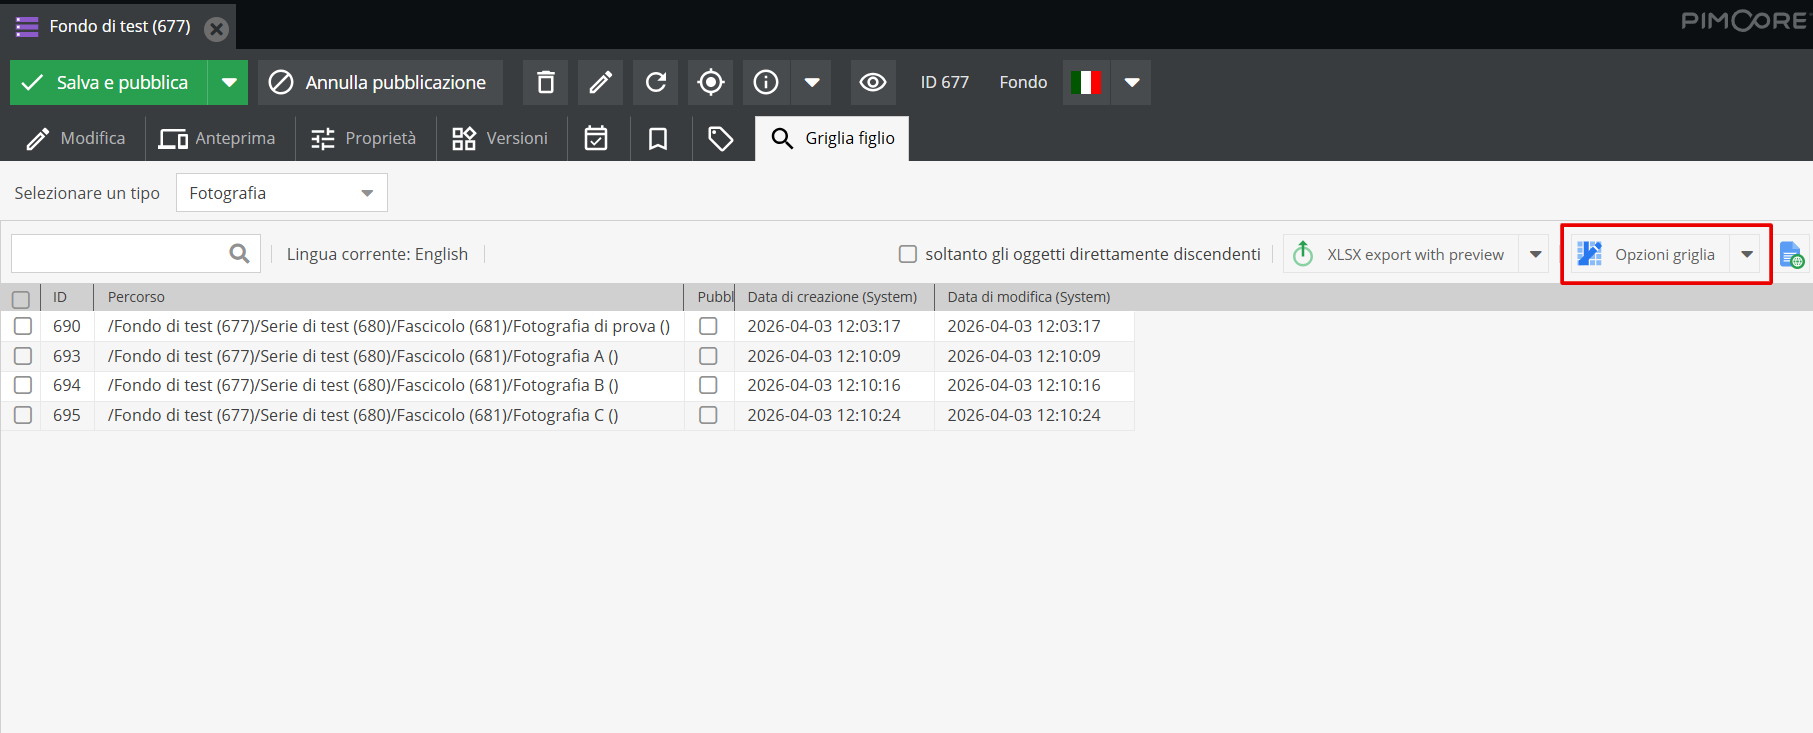
Double-clicking any aggregation (any object containing sub-units) allows viewing its contents by clicking Child Grid.
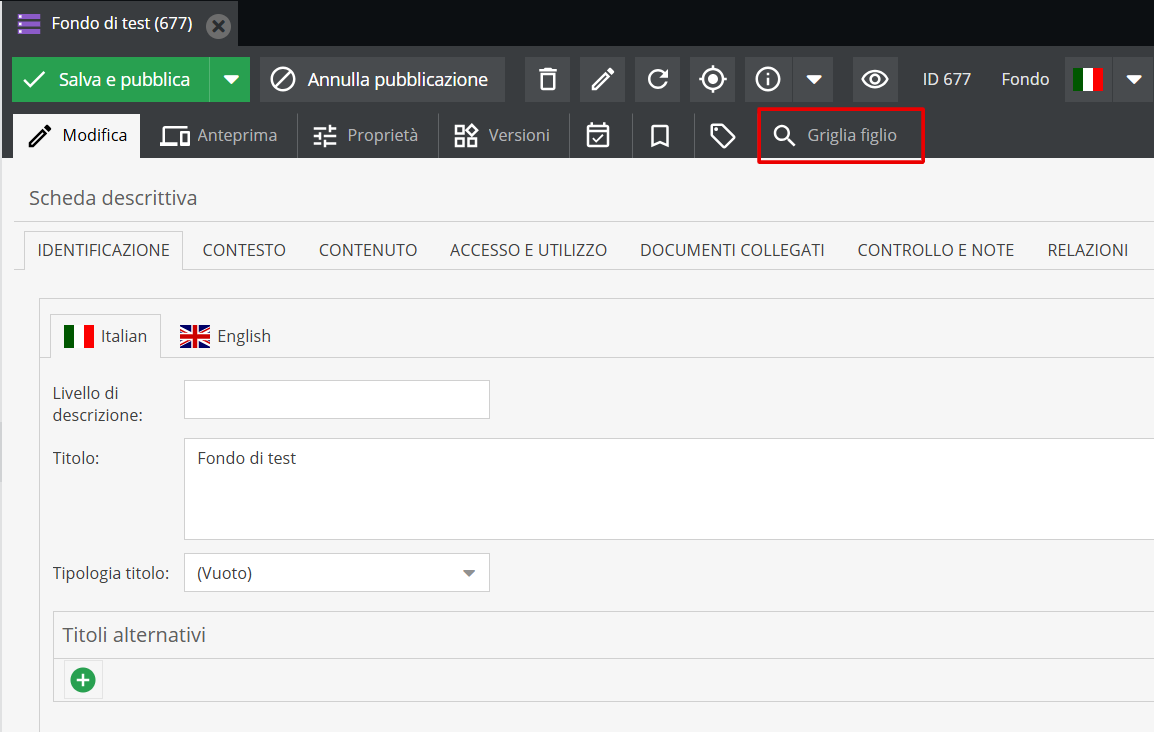
If elements under the aggregate form (also called “parent form”) belong to different classes, a dropdown menu opens from which you can select.
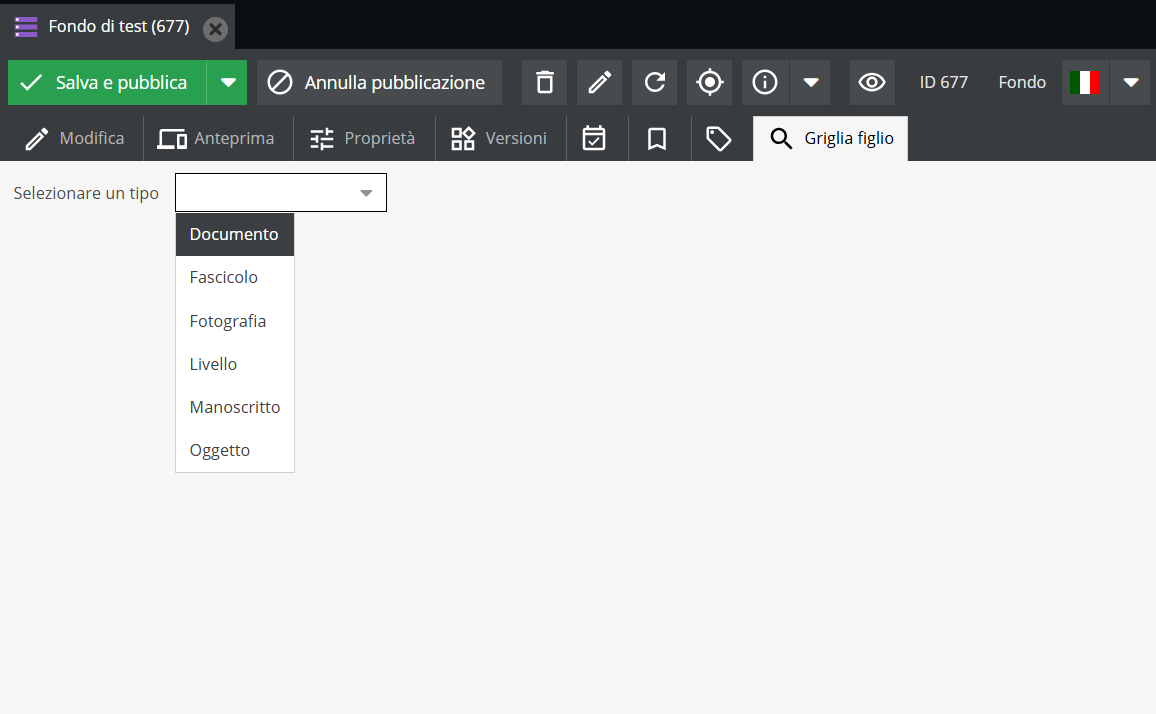
Multiple selection is not possible from the dropdown menu; therefore, items of different document types cannot be viewed simultaneously.
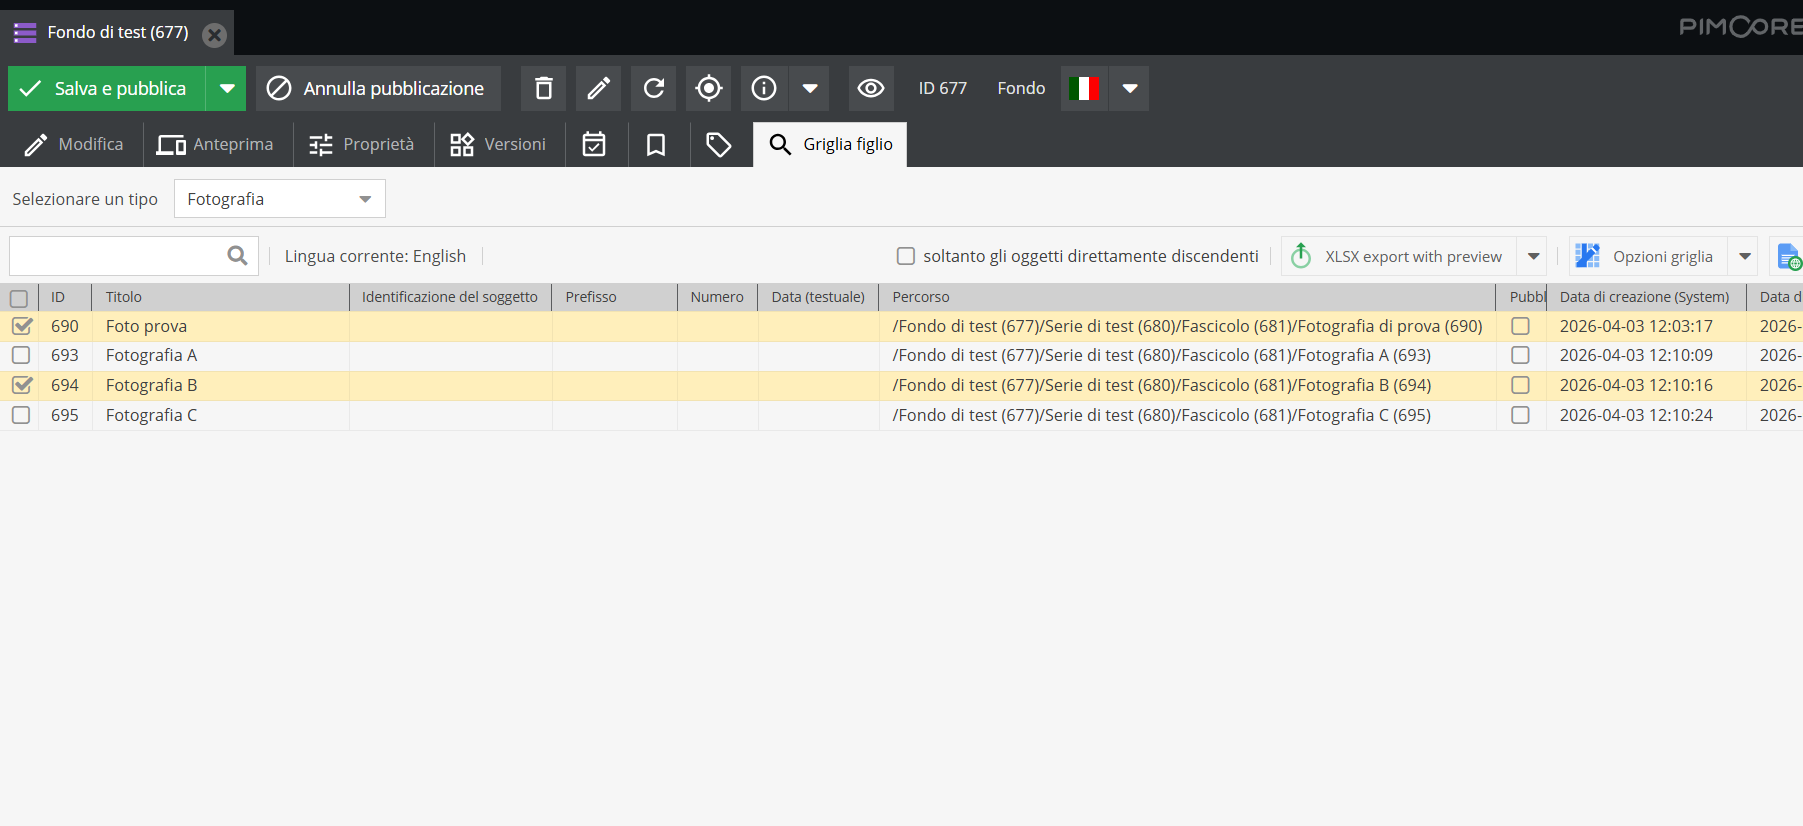
Once the desired type is selected, the Grid opens.
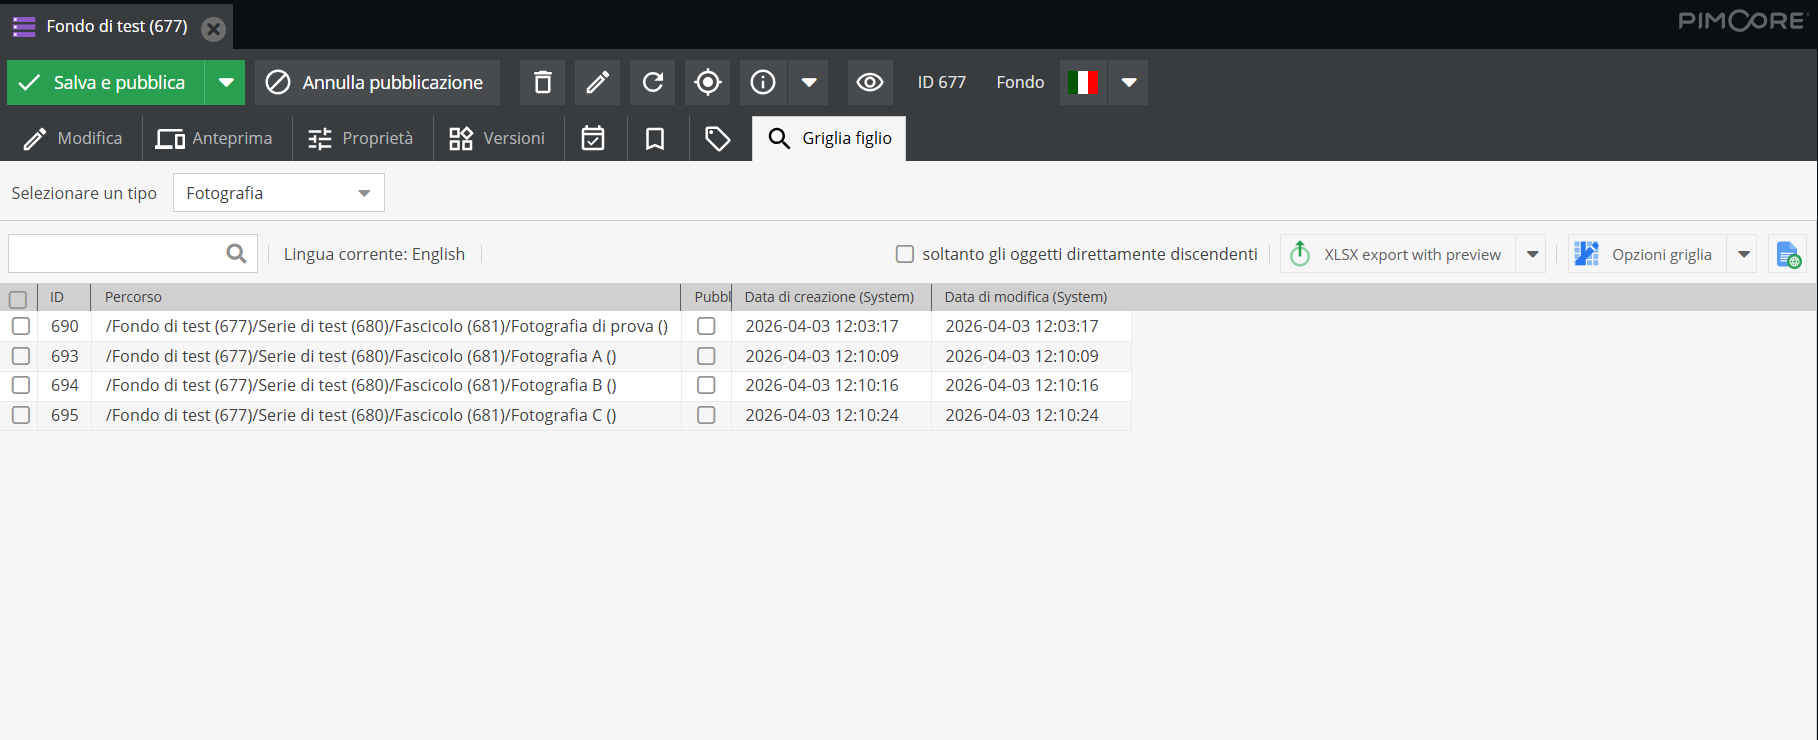
As shown, the opening list displays all generated descriptive forms matching the Photography type under the parent form. The grid view opens by default with the following information:
- Descriptive form ID
- Unit Path
- Published (checked) or unpublished (unchecked) status
- Descriptive unit creation date
- Modification date.
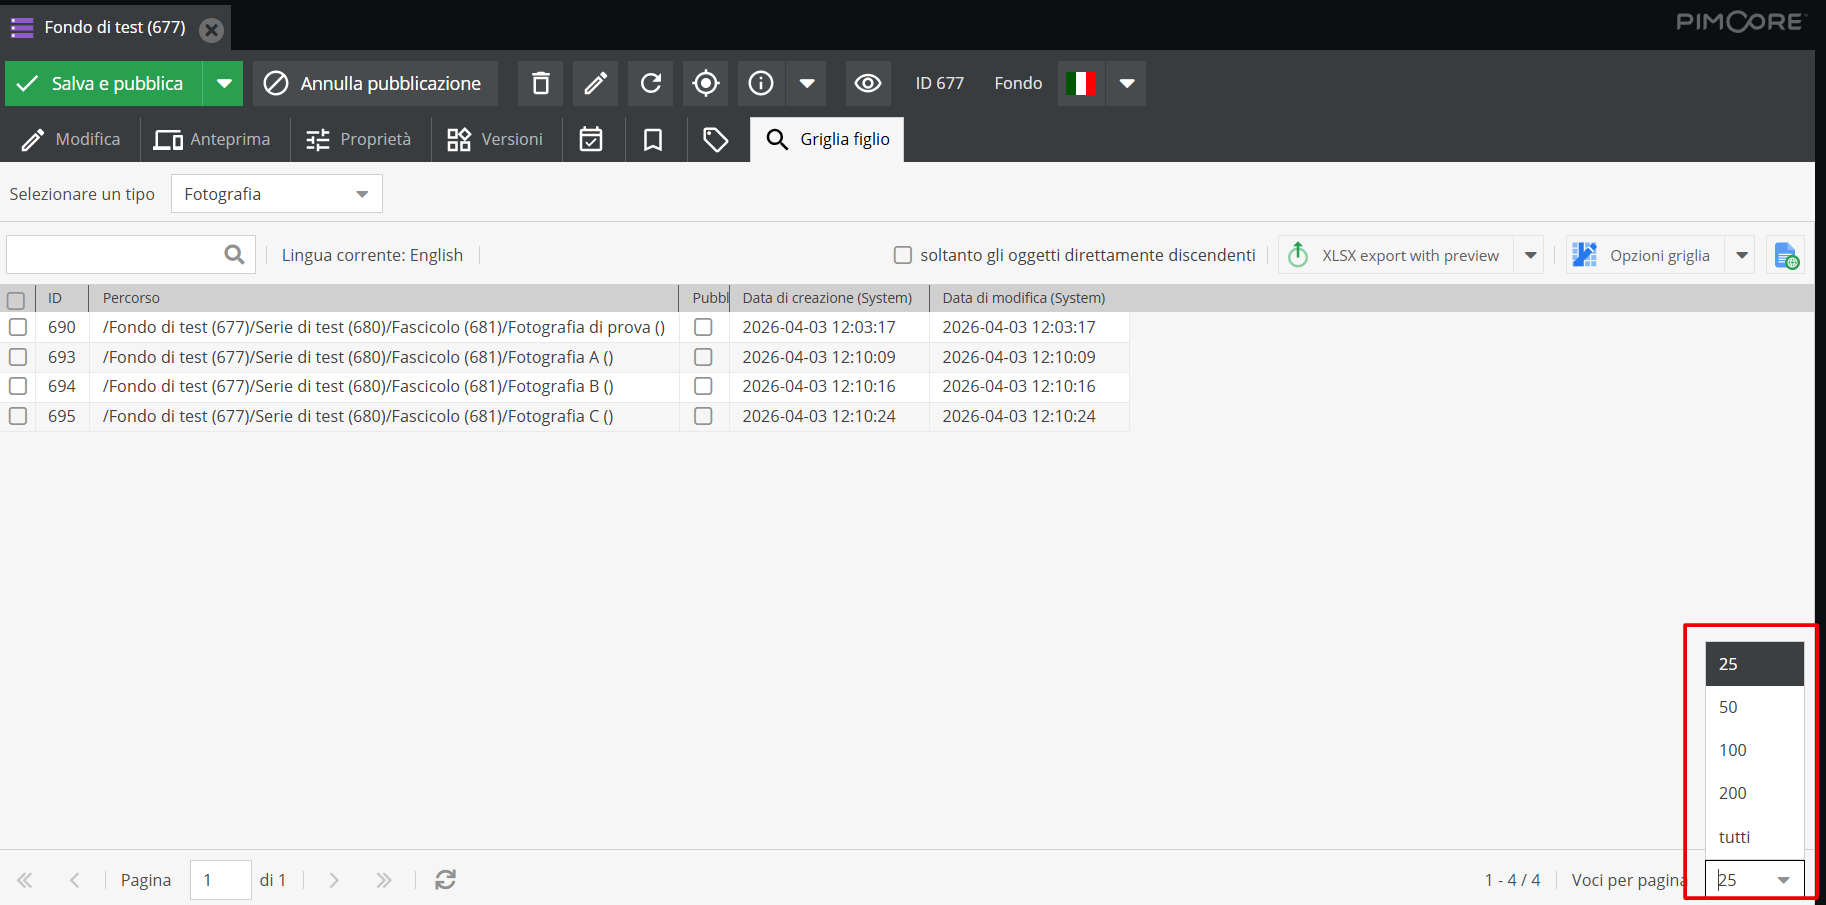
At the bottom, you can select how many items per page to display. By default, 25 items per page are shown, but you can set it to display all items.
At the top, clicking Grid options allows customizing this information, enabling the cataloger to verify, edit, and delete descriptions as well as bulk-associate relationships.
Clicking “Grid options” opens this module directly on Grid configuration.
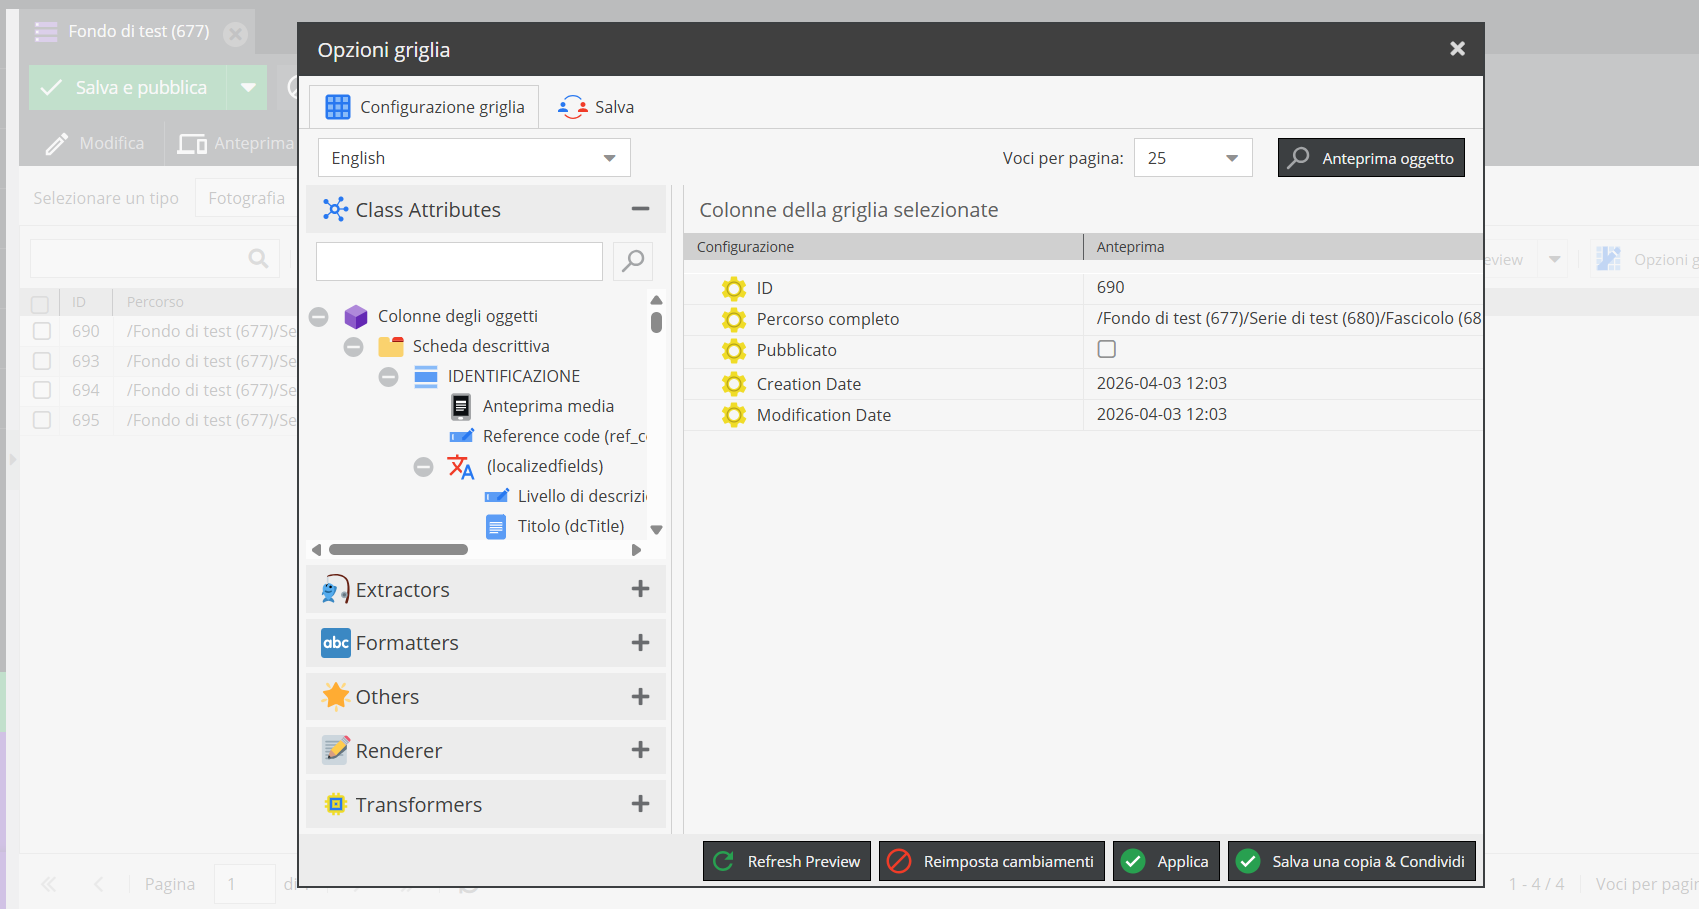
On the right, descriptive schemas for the class in question are visible (see sections Object classes and Information areas of the forms).
Using simple drag & drop or double-clicking, you can customize items visible on the grid: from title to description, including relationships.
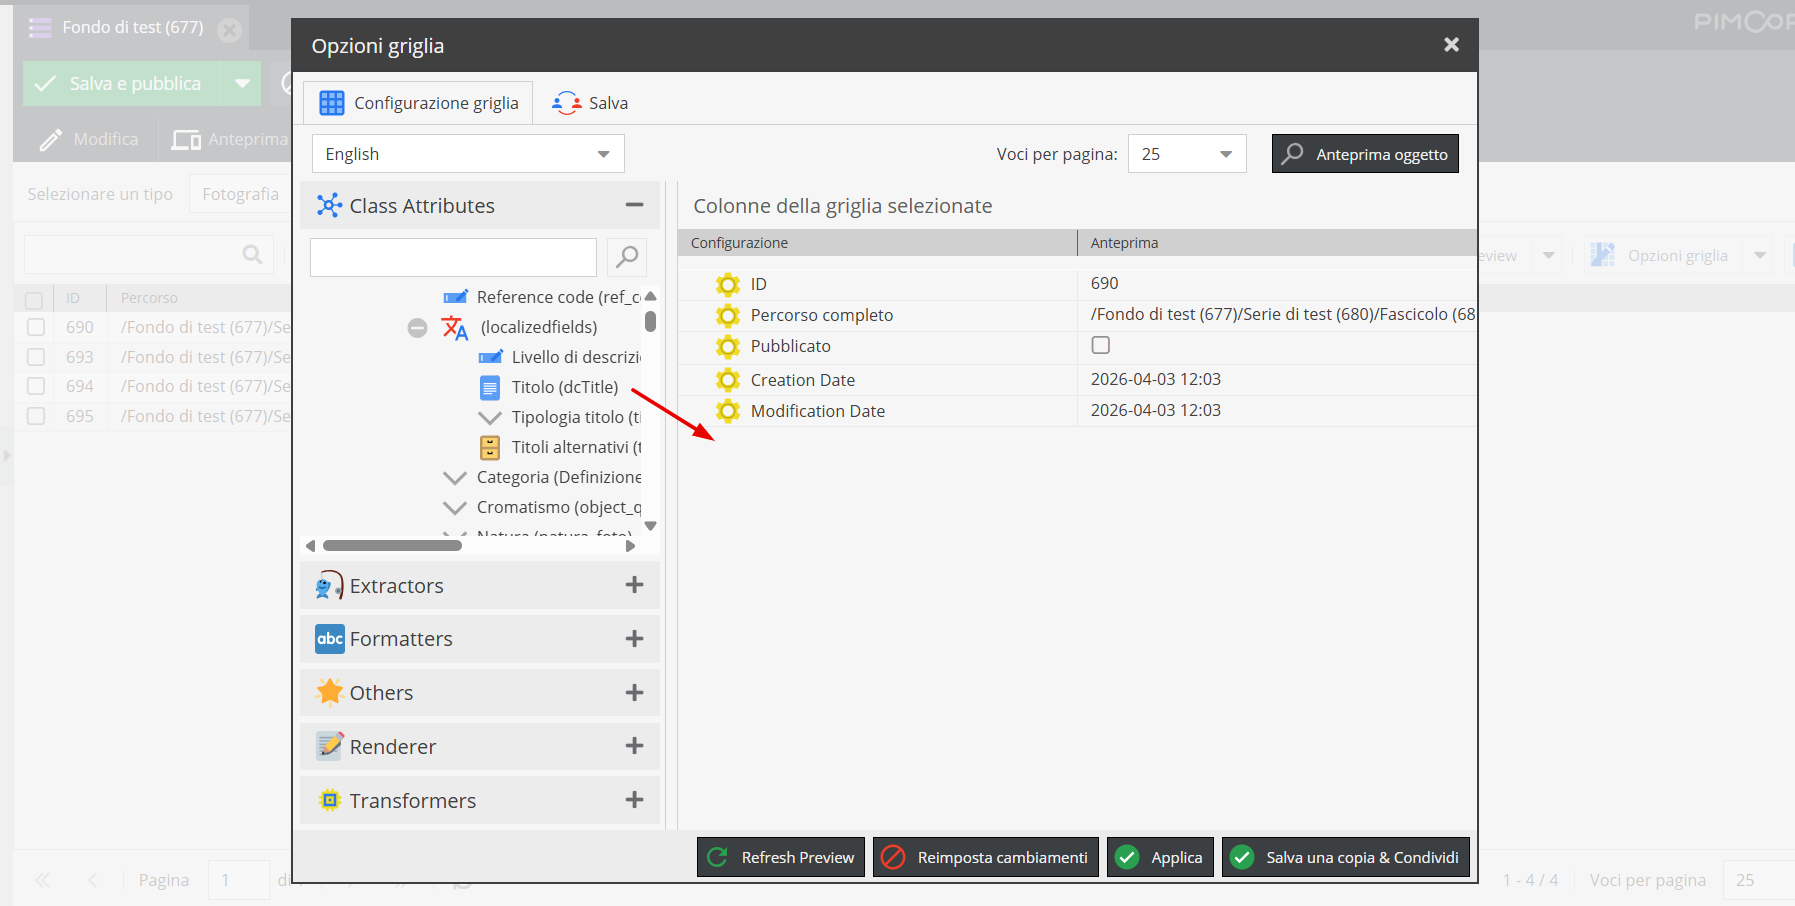
If an item is dragged onto an incorrect field or unsuitable area, a red ✕ symbol will appear next to the unit name and it will not show on the grid.
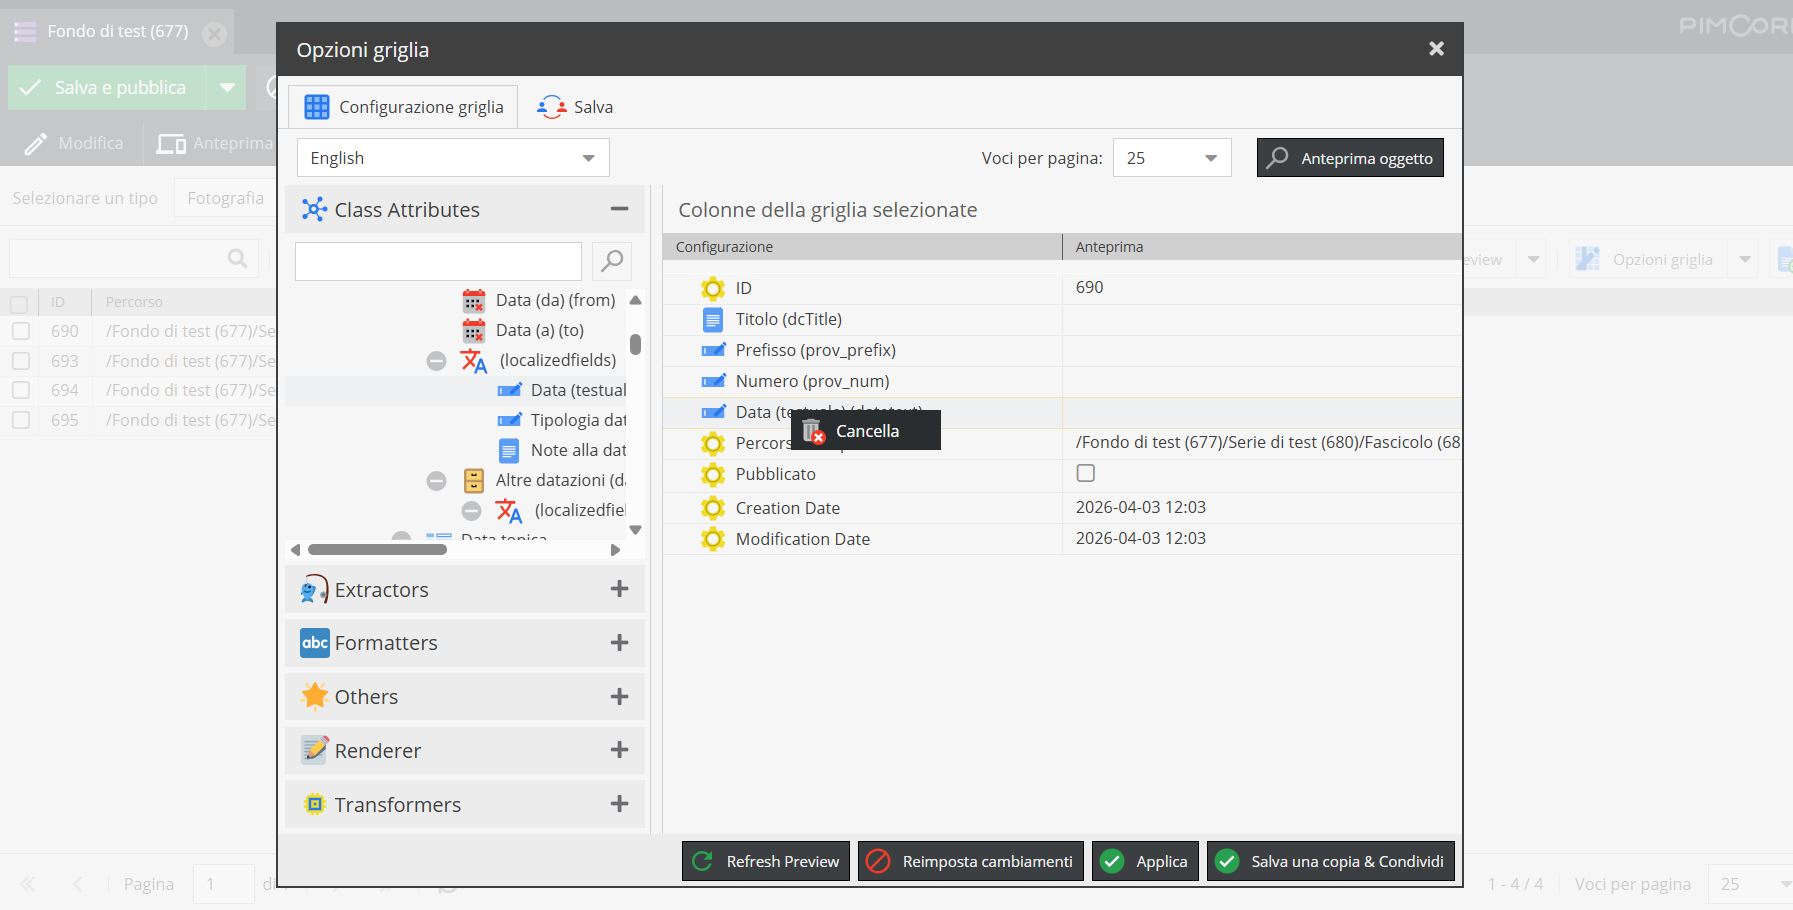
Correctly dragged items will appear as follows:
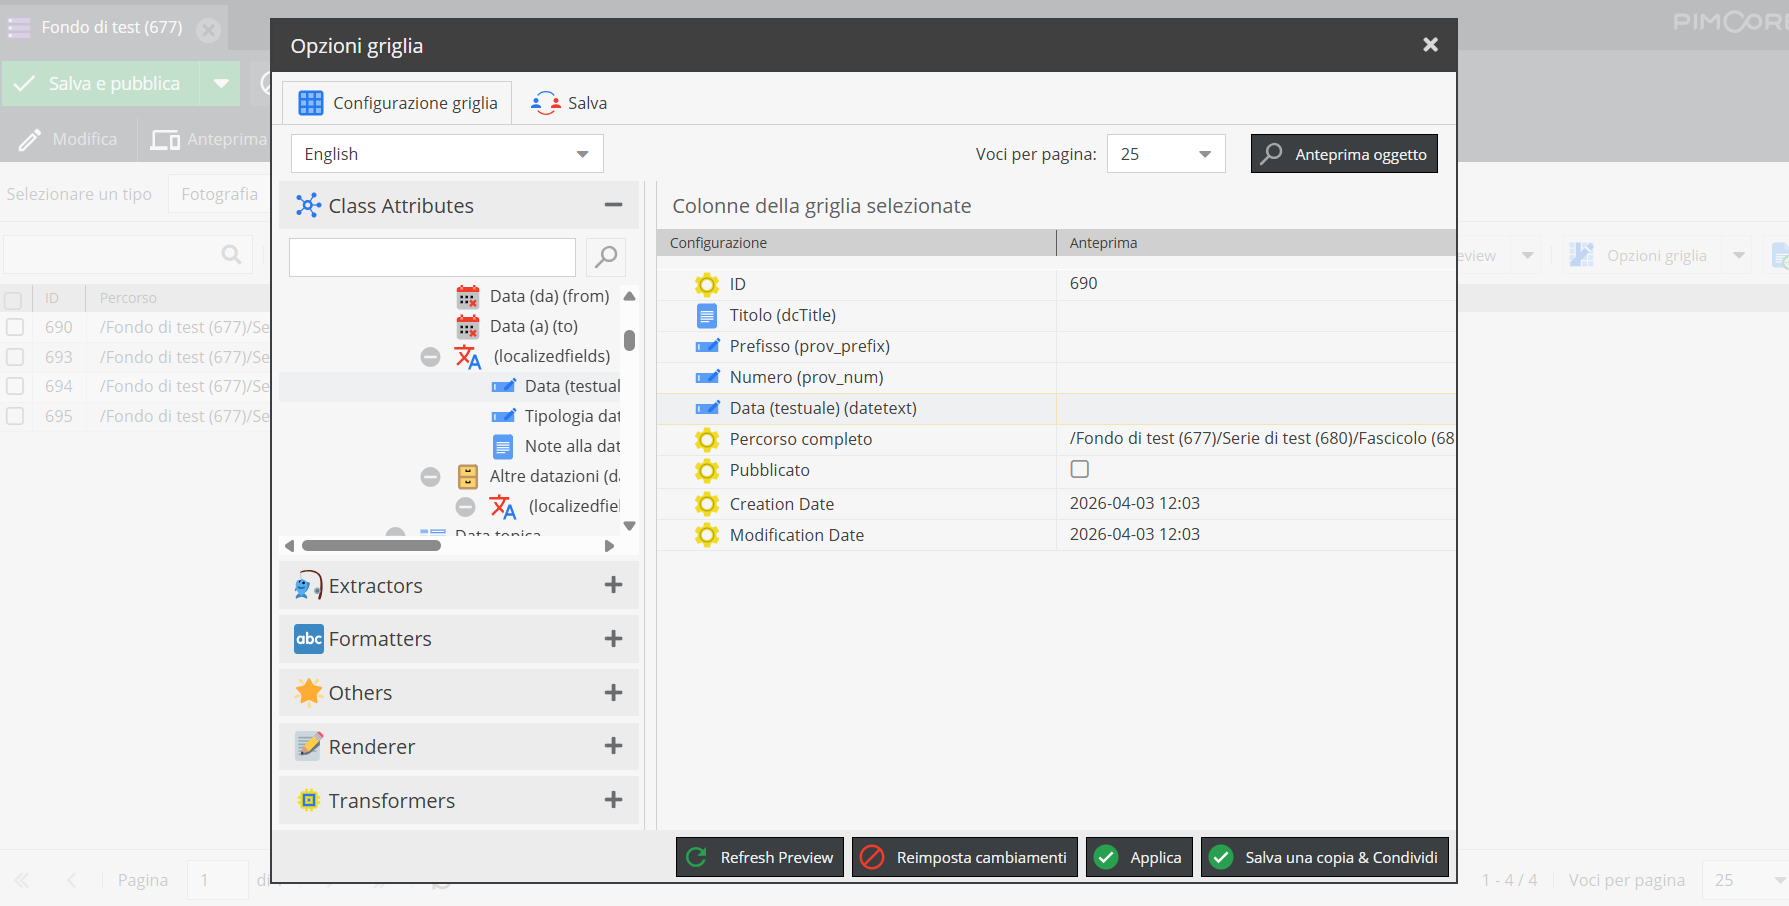
You can remove any item dragged into the grid by right-clicking on it and selecting Delete.
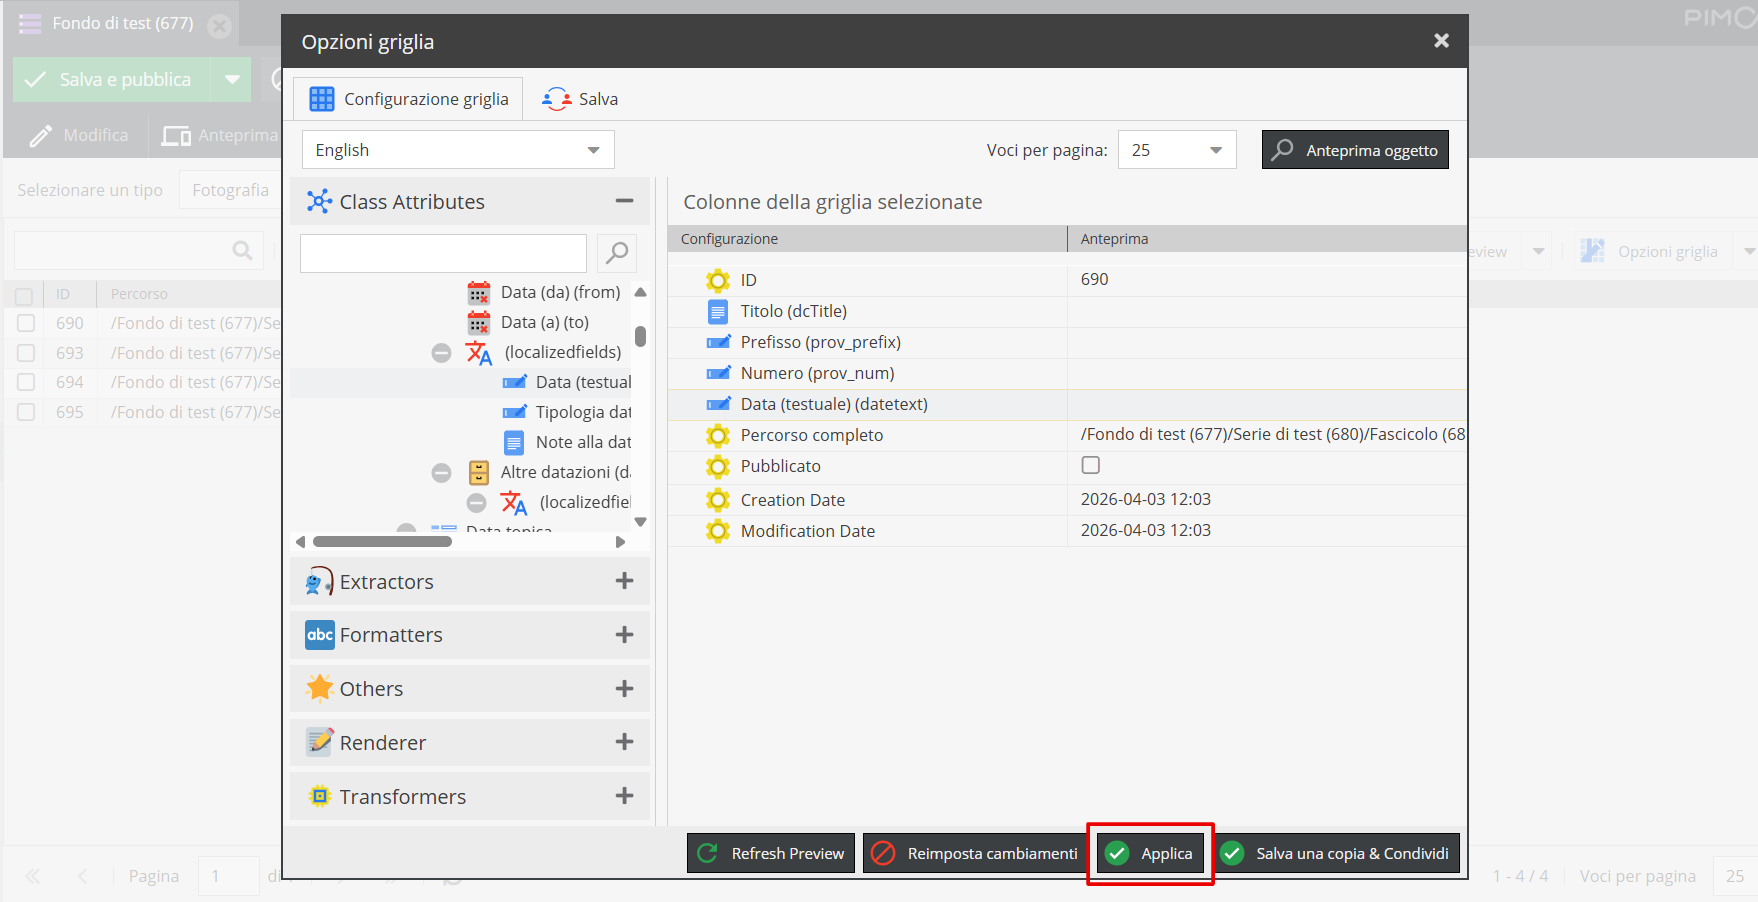
Once all elements are defined, click Apply, which applies the configured list view temporarily.
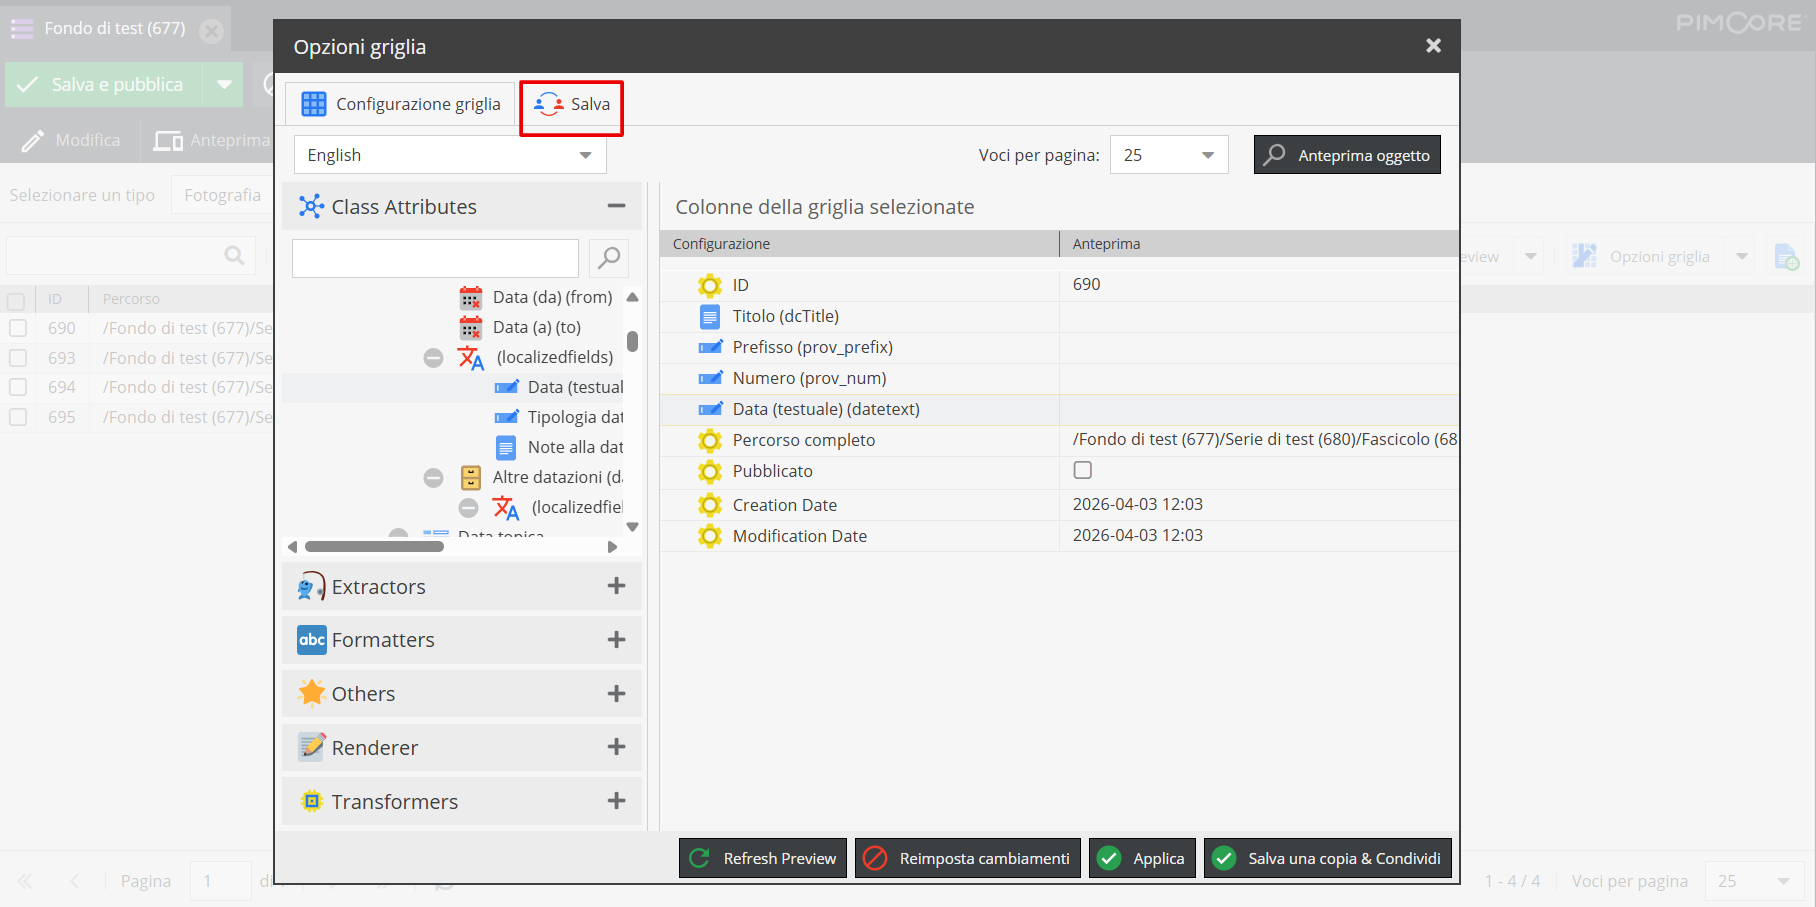
If you wish to save a copy of the schema elements configured, navigate to the Save tab.
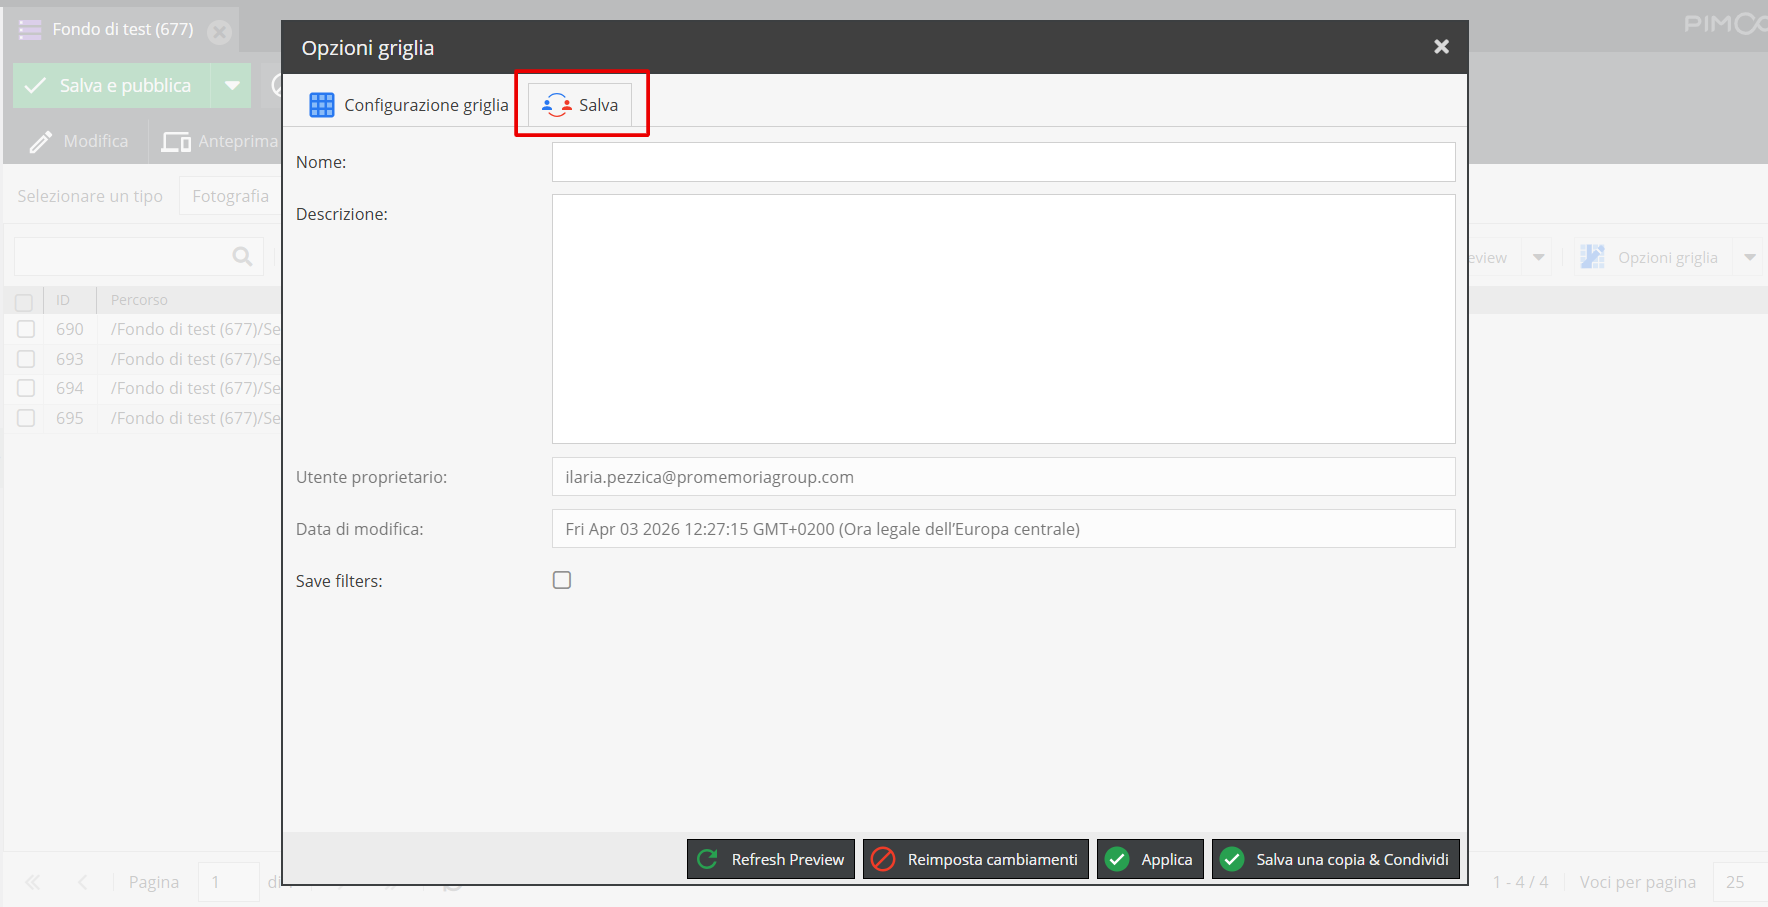
Define a configuration name to save and, if necessary, a short description. Then click Save a copy & Share.
Note that clicking Save a copy & Share before assigning a title will display a warning.
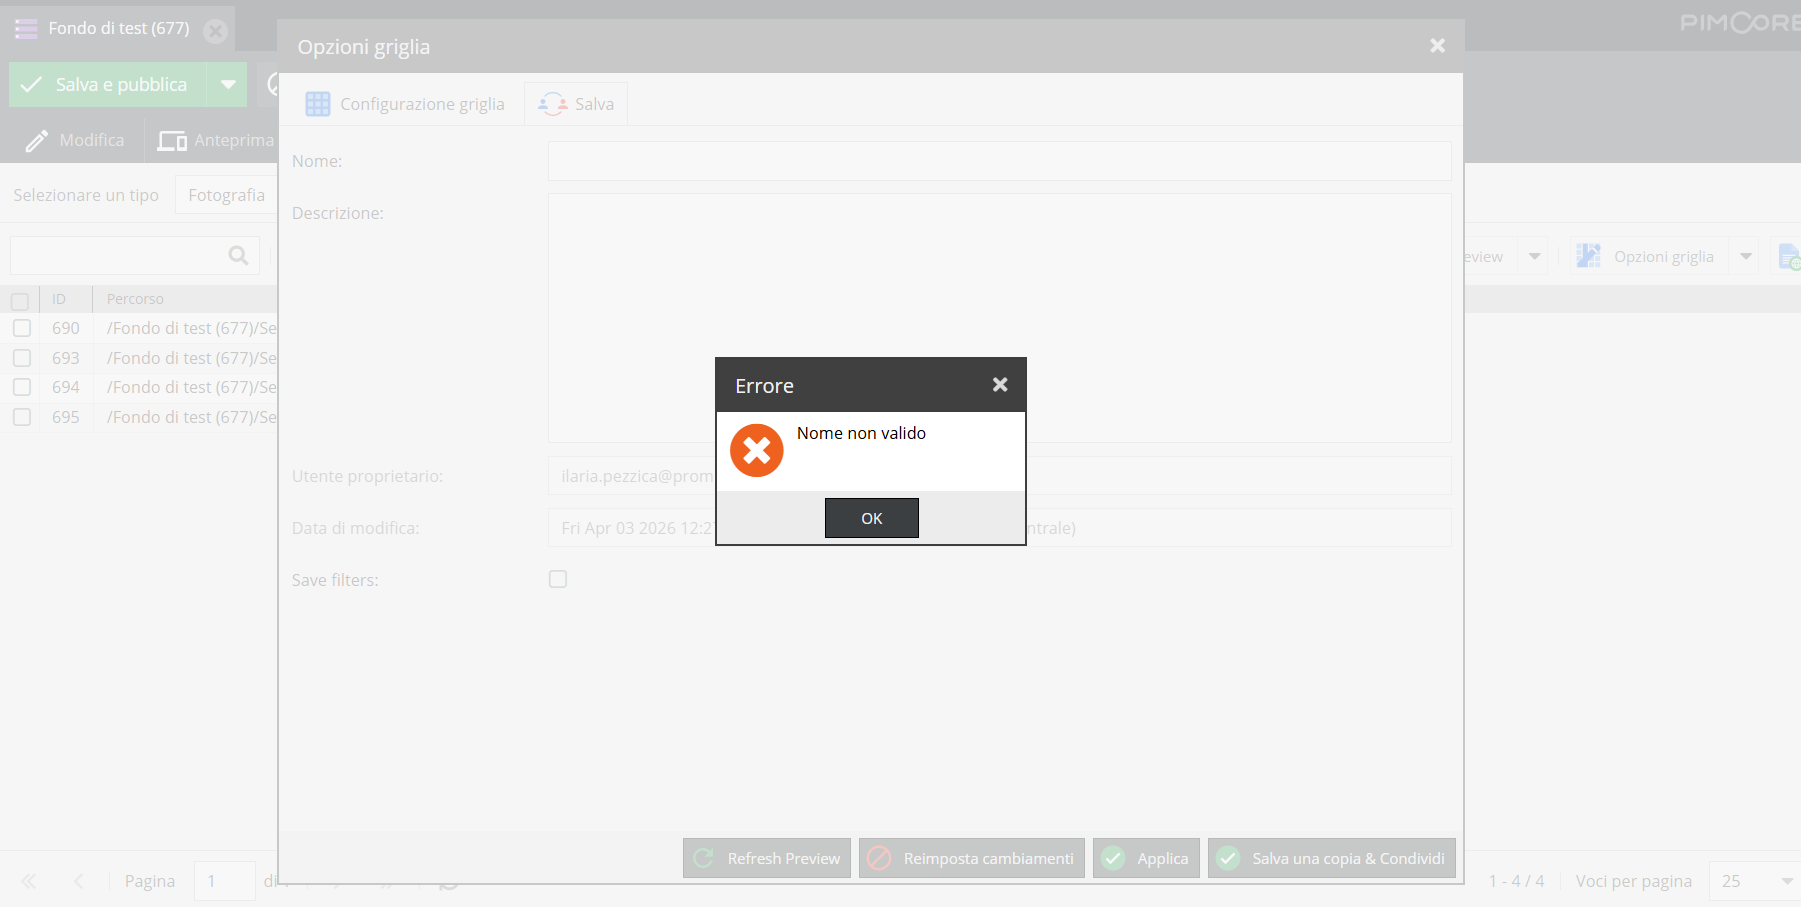
Clicking “OK” redirects you to the Save tab, where you can assign a title to the configured grid layout.
Once saved, the configuration opens: a tabular content view allowing bulk descriptive operations.
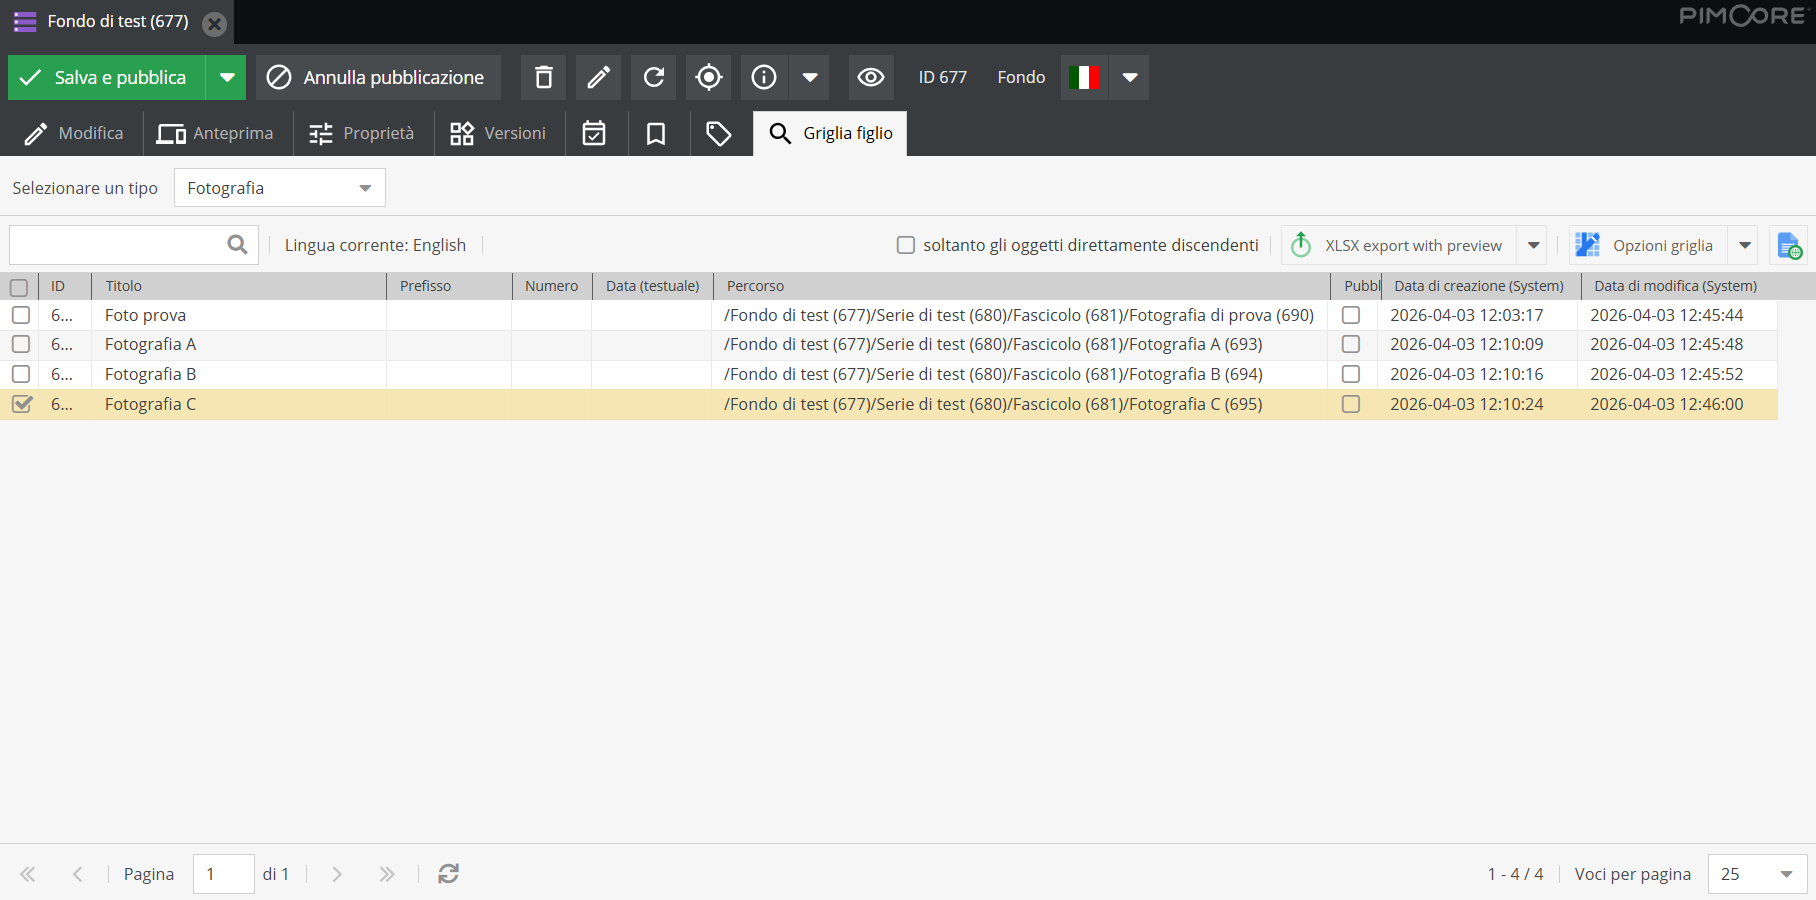
Multiple actions can be performed from the grid.
Editing individual descriptive unit details
Clicking on a specific field opens an editable tab — an active window onto the descriptive form. For text fields, you can make edits and click Save to apply them.
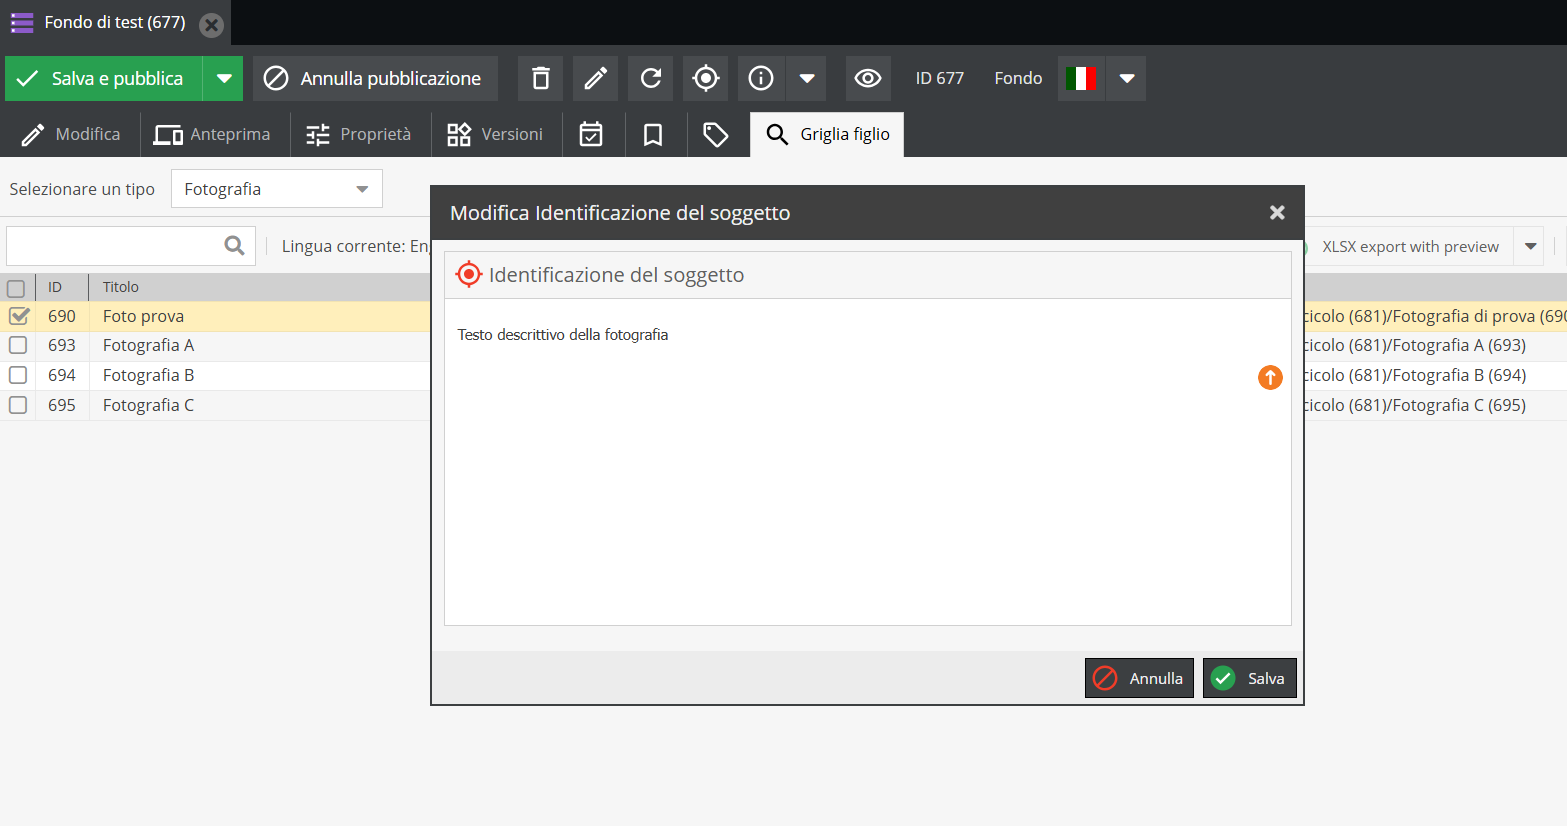
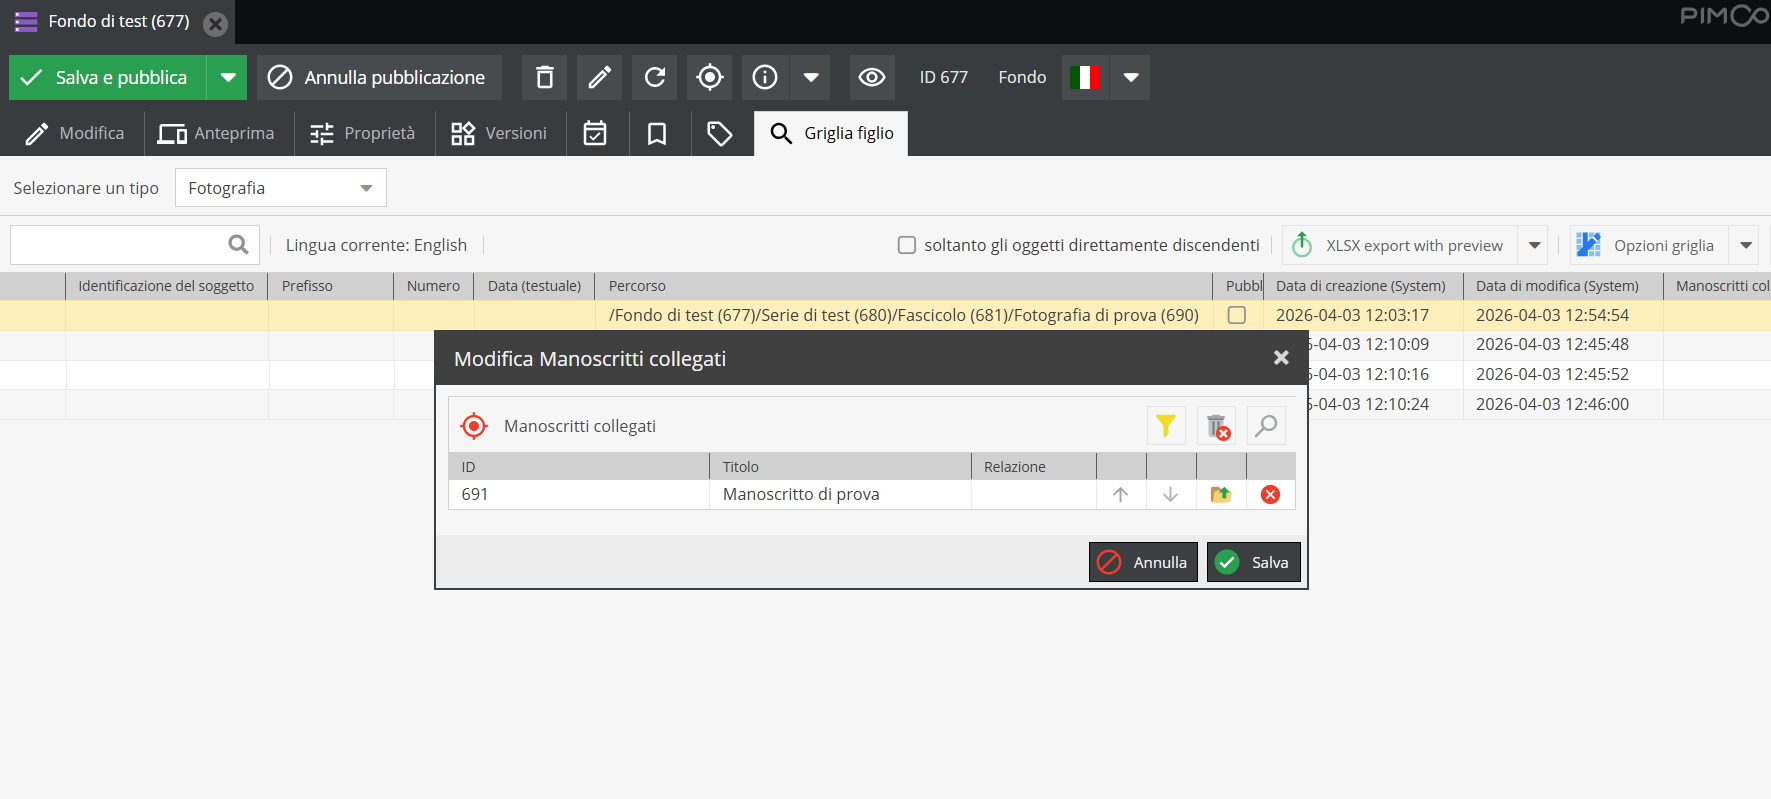
For relationships, the corresponding field opens with the same functionality presented in the “Relationships” area section under Fields common to multiple forms.
Bulk editing
Select all forms you wish to edit.
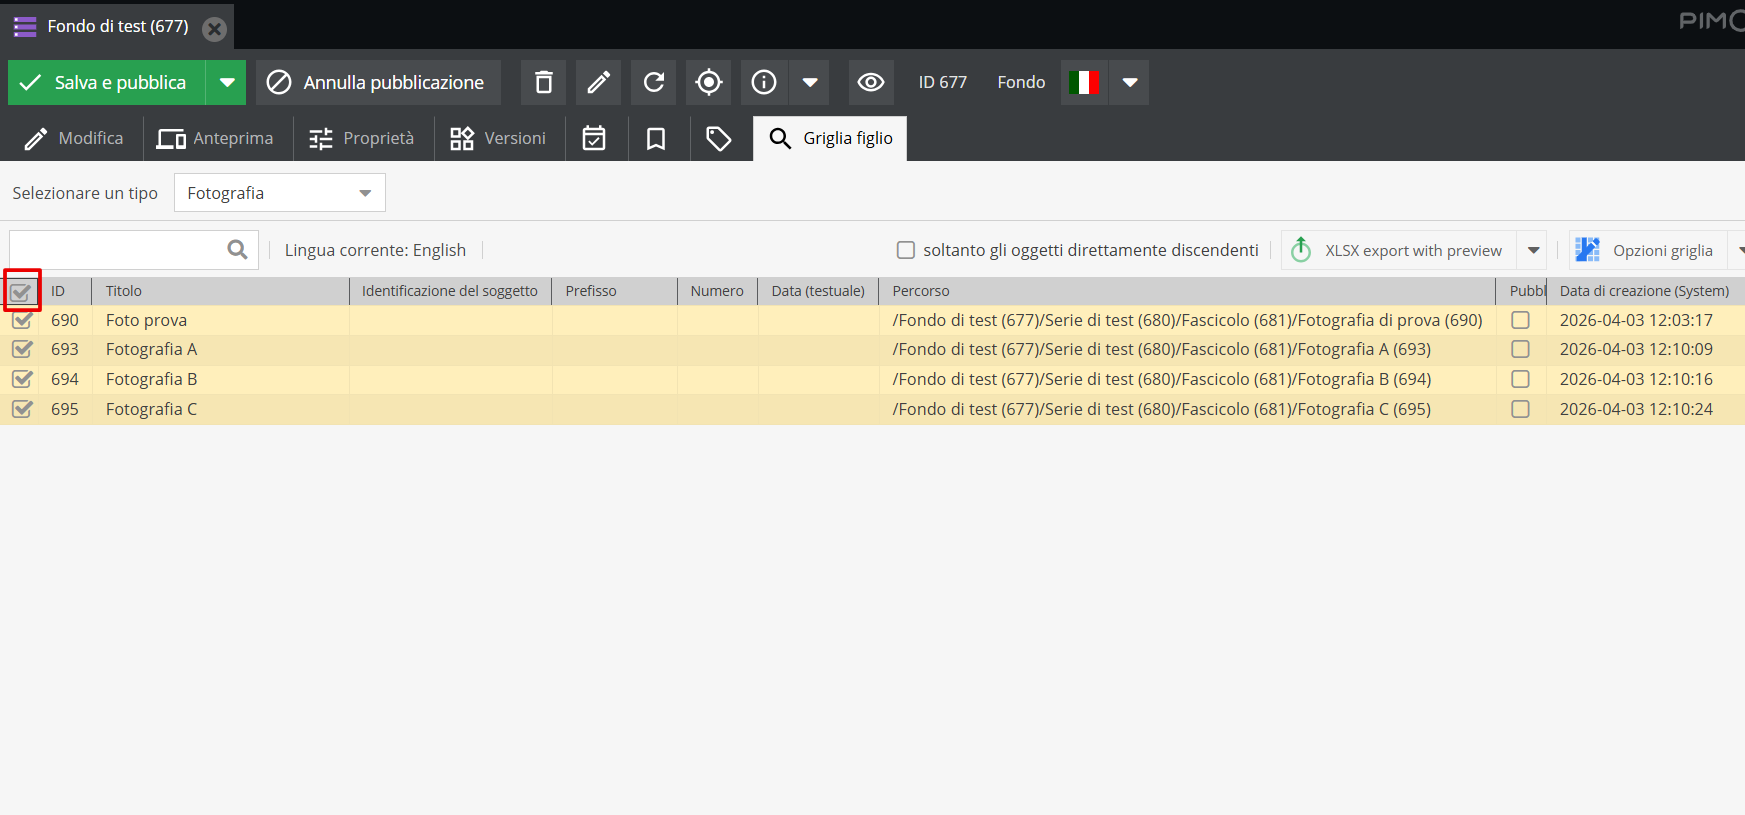
You can also select all forms present in the grid.
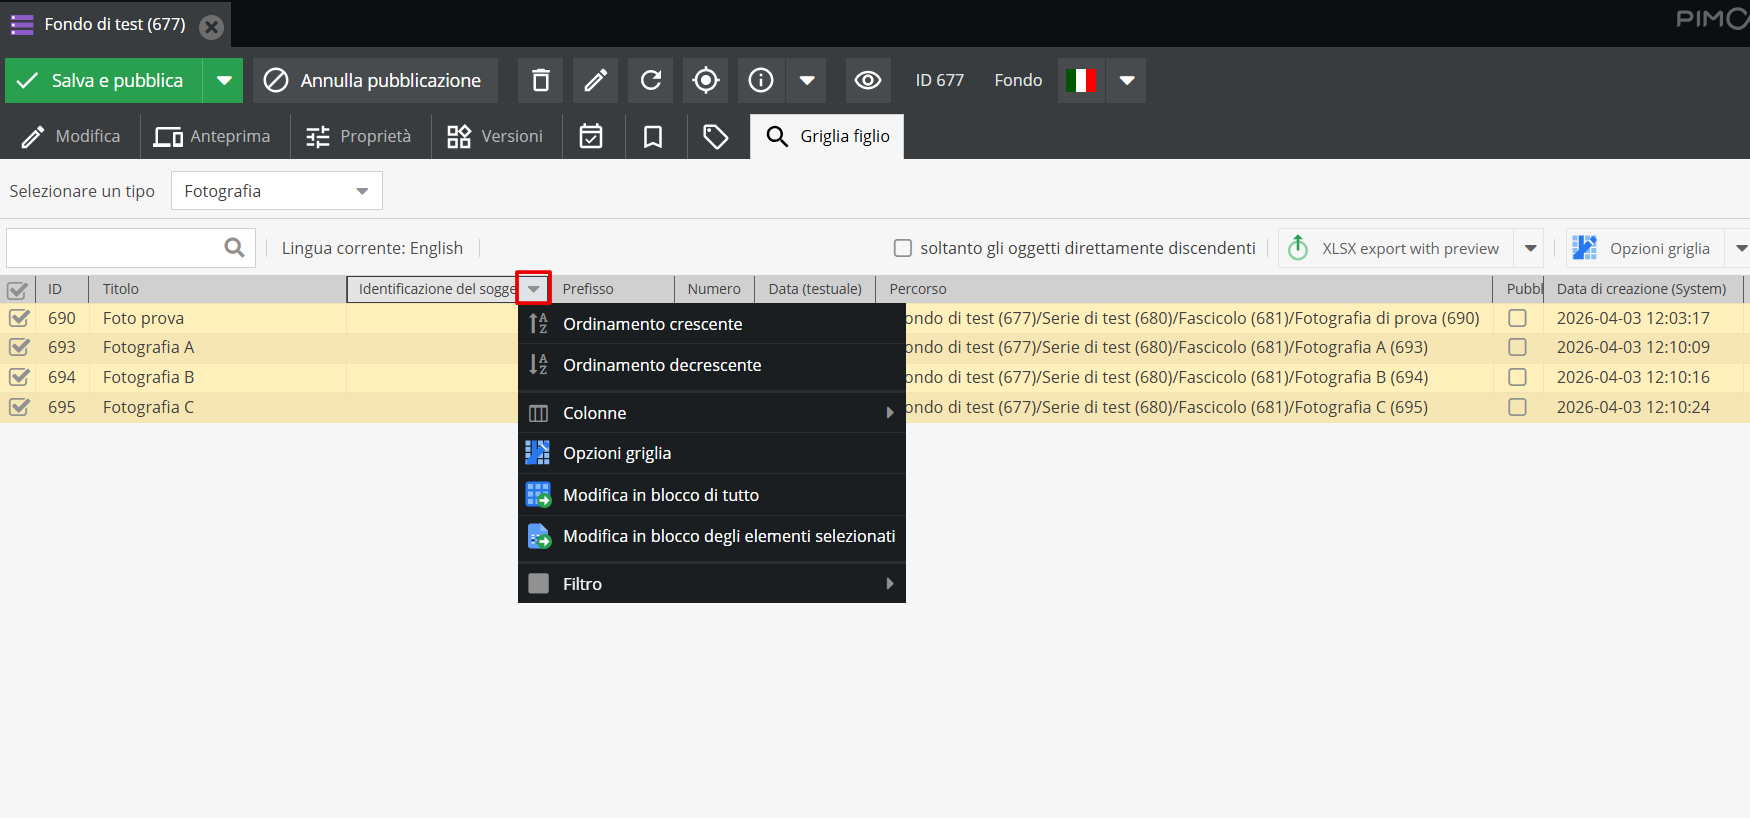
Once selected, click the dropdown menu next to the field you wish to modify.
For text fields, the menu provides options for bulk editing all or bulk editing selected items only.
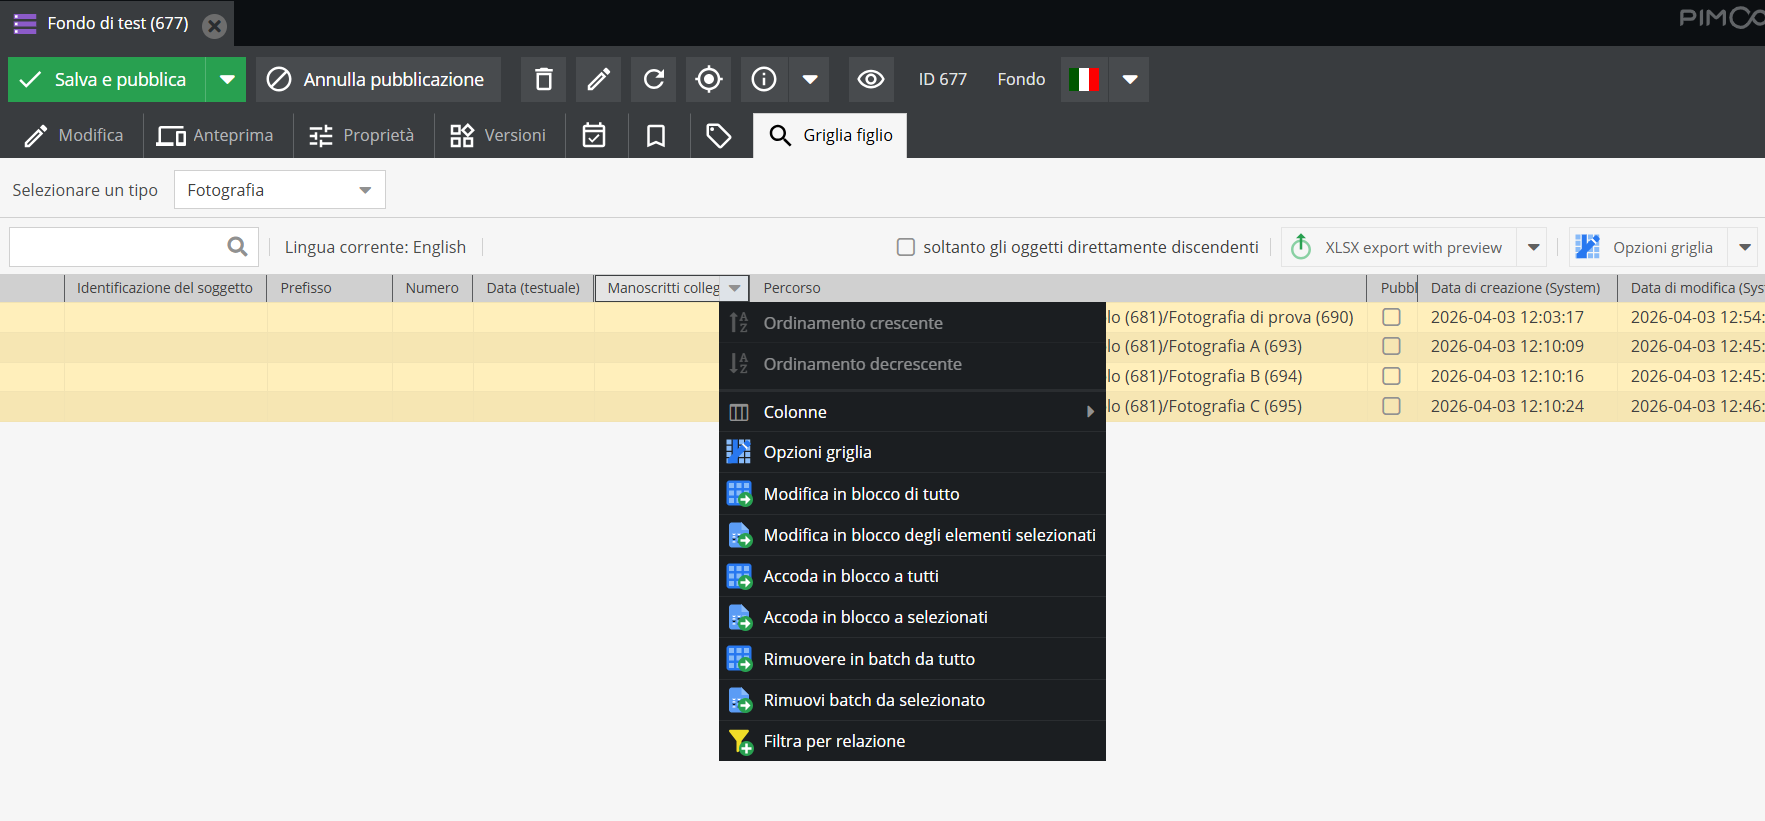
For relationship fields, you can bulk edit all or selected items (overwriting prior relationships), bulk append to all or selected items (allowing selected relationships to coexist with existing ones), or batch remove from all or selected items (deleting existing relationships).
Once executed, these actions modify items permanently. Proceed with caution and only following specific training.
Bulk tag application
Tag application can be performed in bulk — one method was illustrated in section [Descriptive Form: options and features](/Oggetti/percorso#La scheda descrittiva: opzioni e funzionalità) — by selecting descriptive forms and right-clicking near checkbox selections.
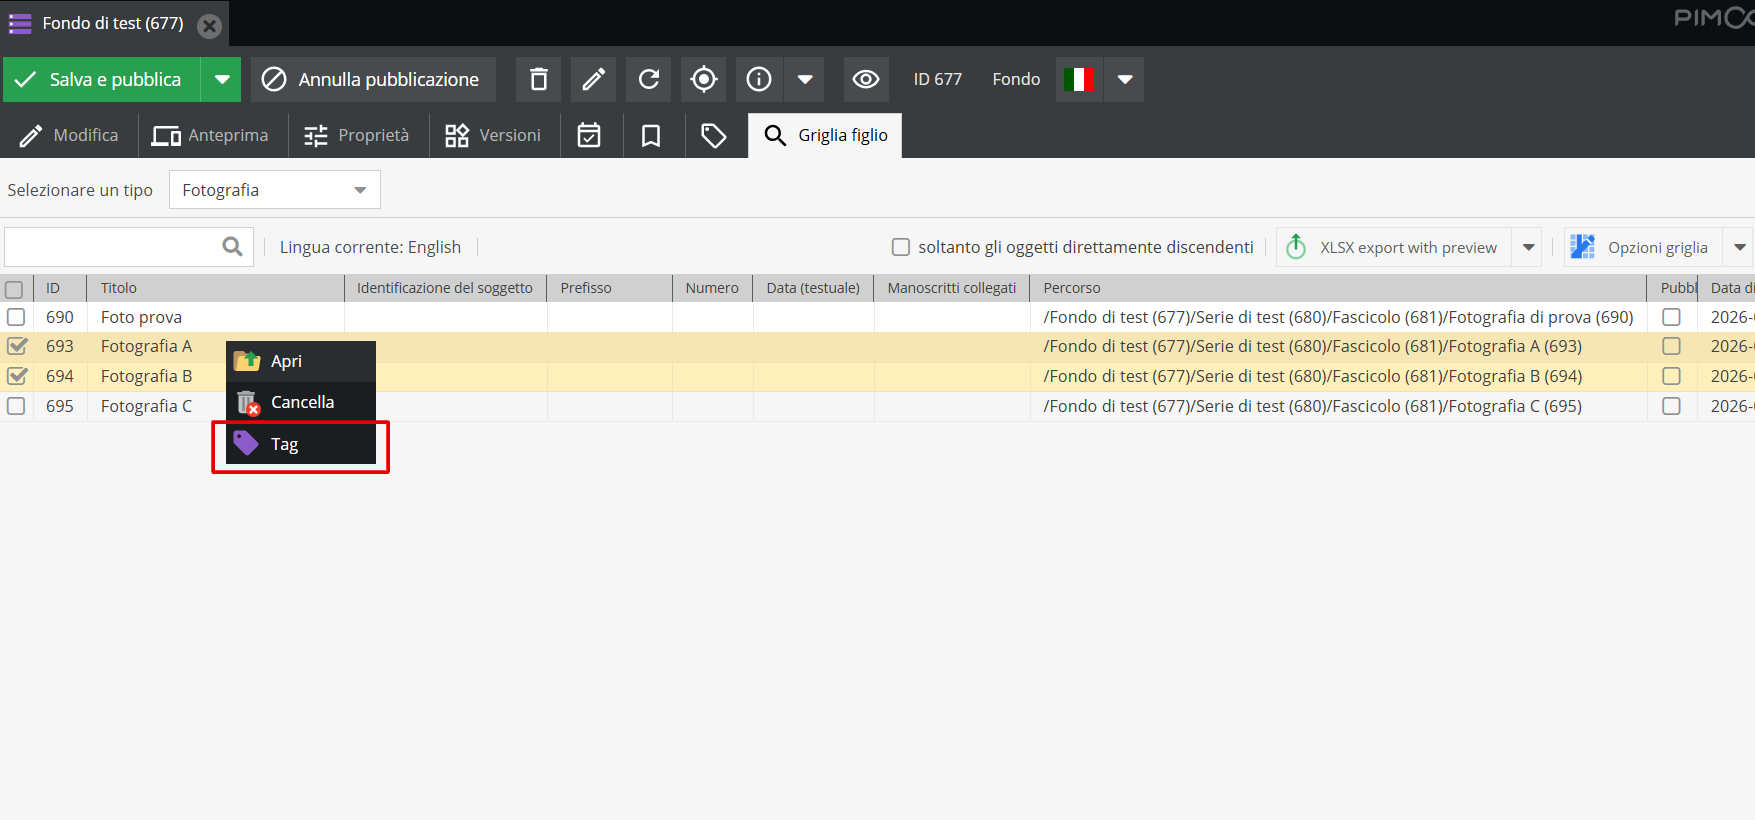
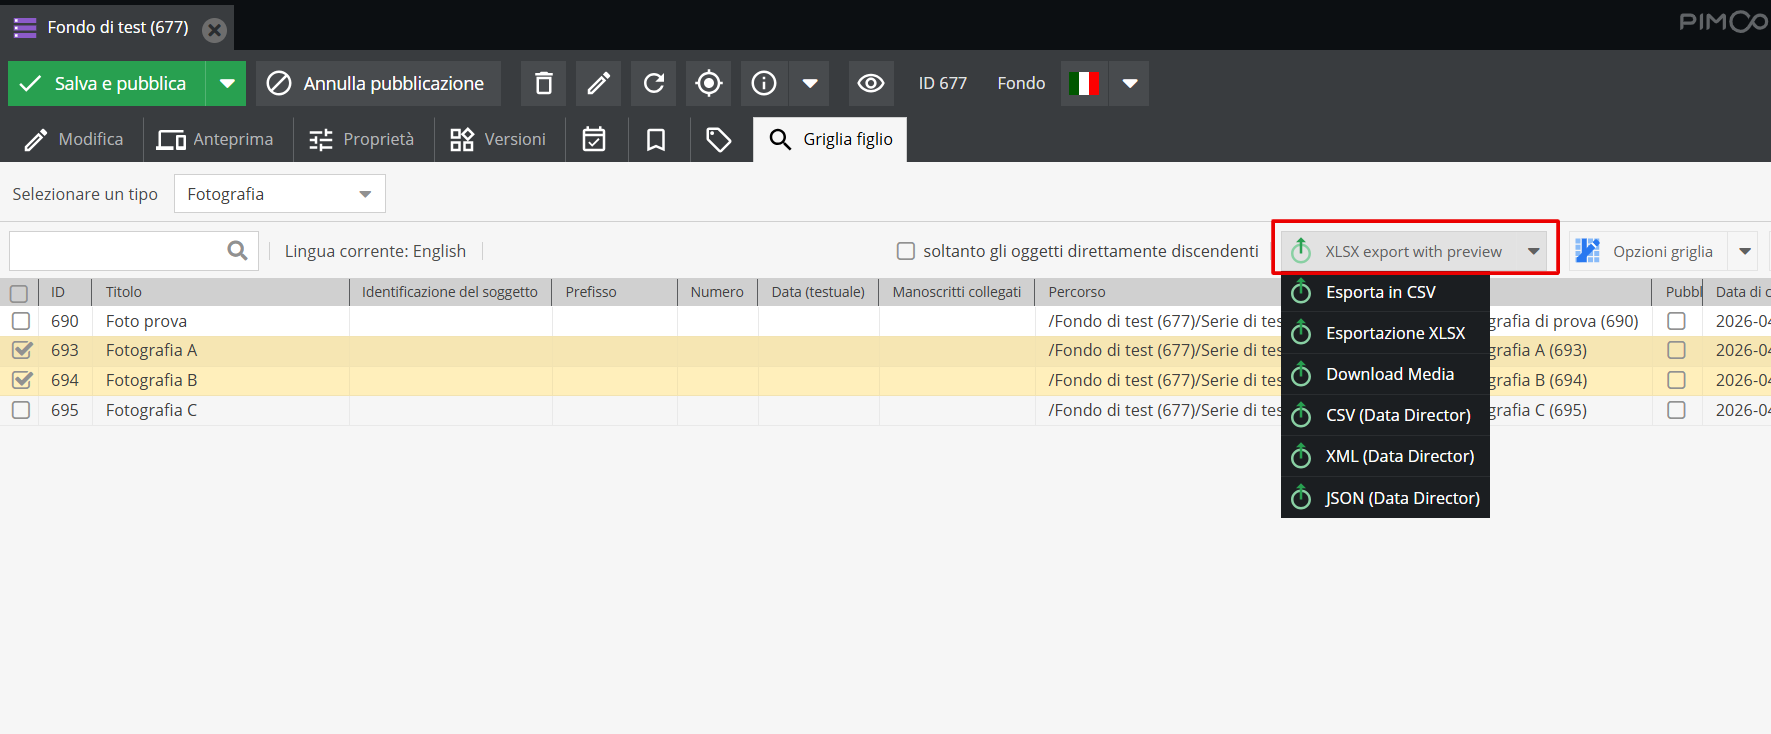
From the grid, you can also export to PDF, CSV, or Excel selected objects only, or select all objects to export a comprehensive list.
Search
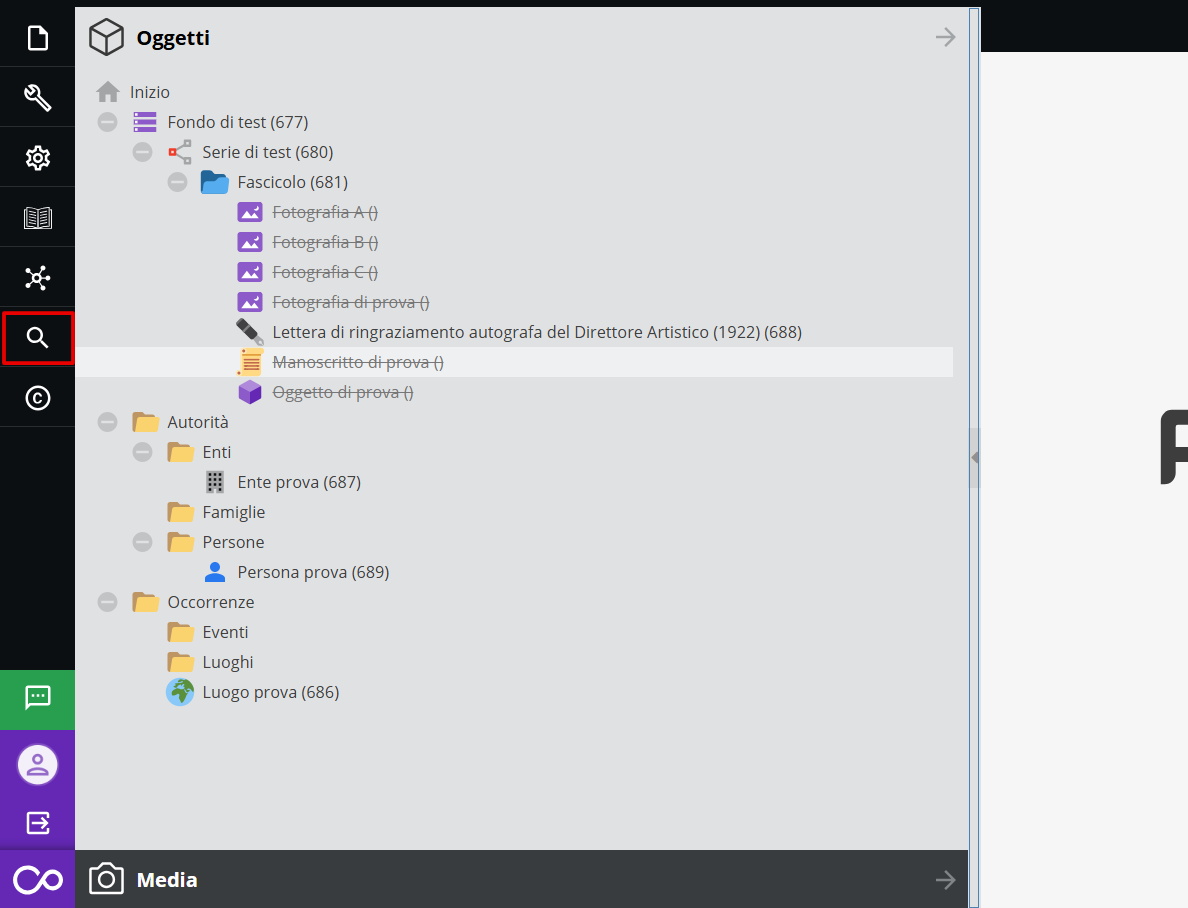
Elements in Pimcore, both objects and media, are searchable within the software via Search. Click on the corresponding icon in the main panel.
Select the desired search mode: quick search (across media and objects), search by objects, search by media.
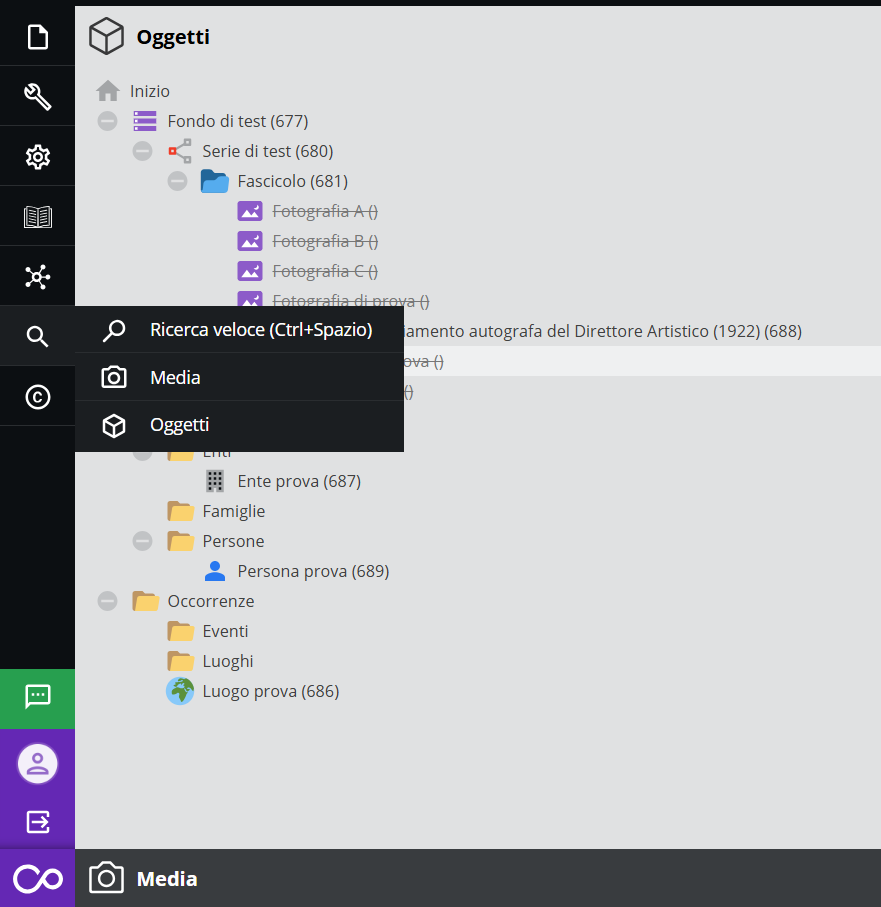
The quick search identifies items across Objects and Media environments.
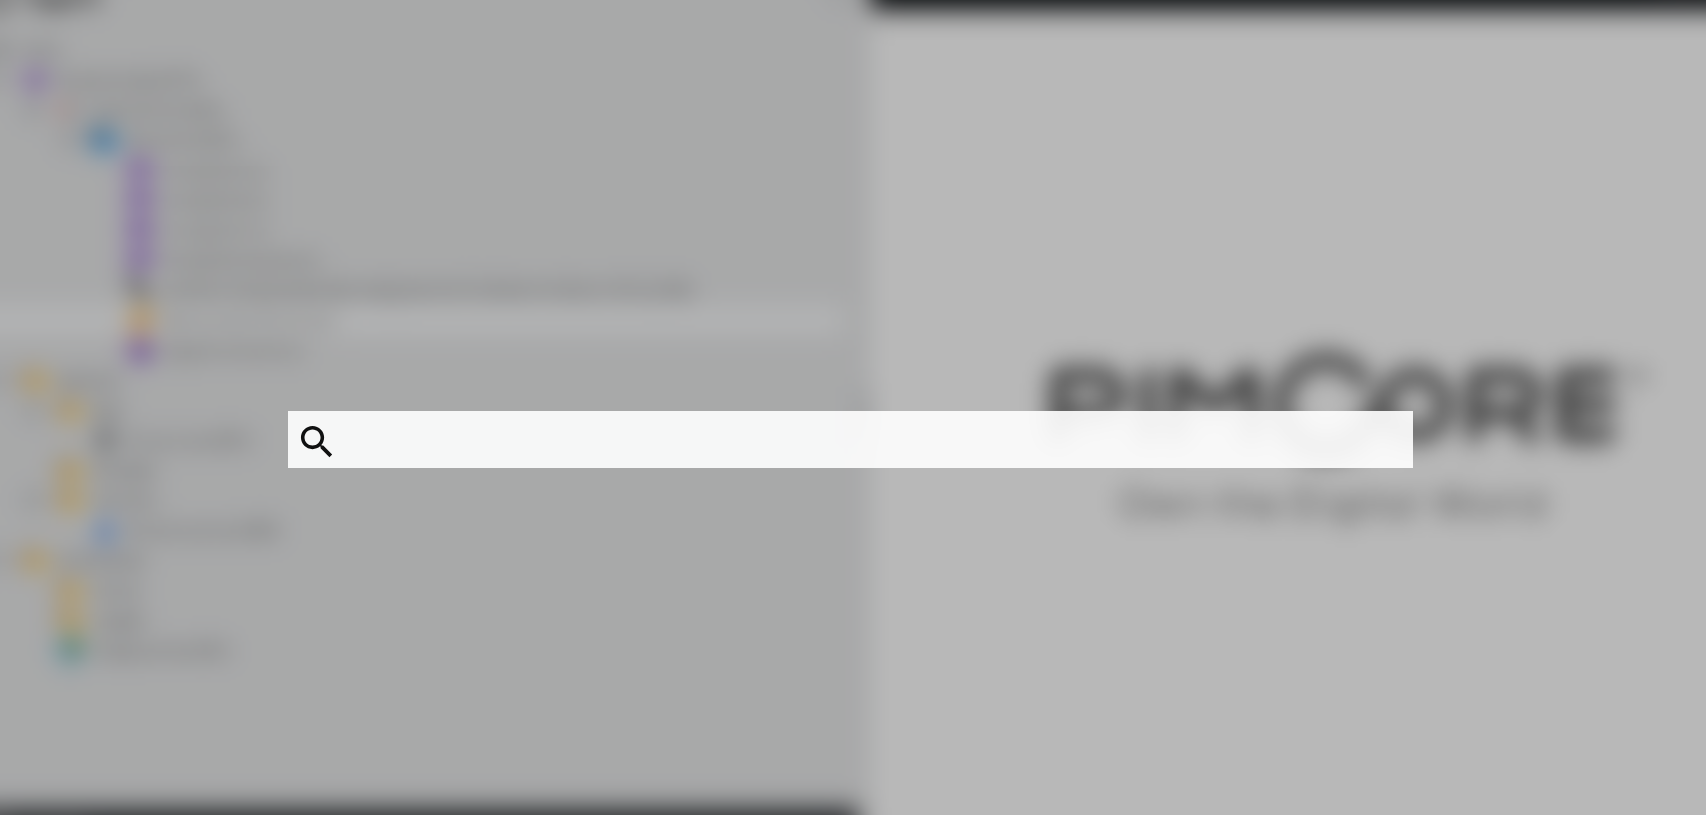
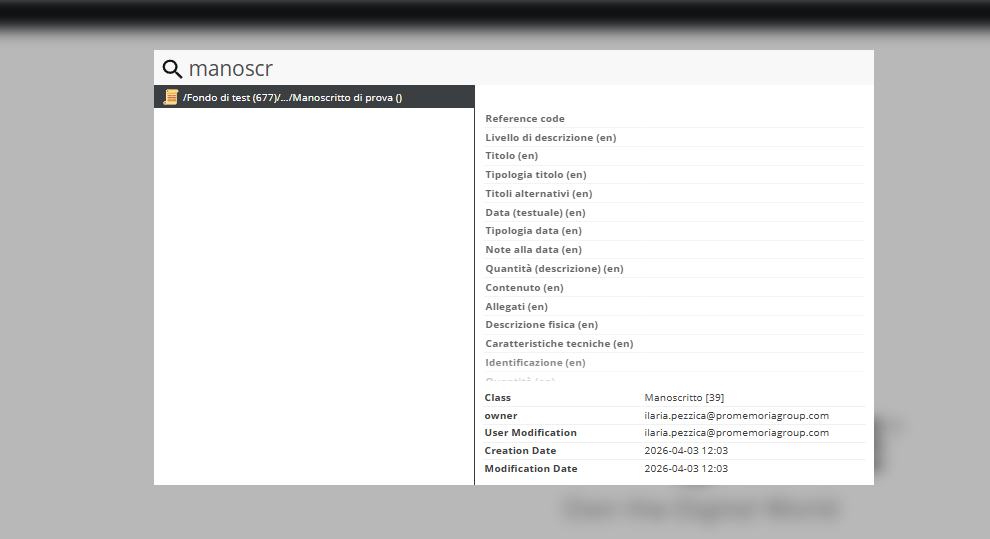
The result is a broad search across all Pimcore elements. When using this option, entering highly specific keywords is recommended to avoid overly fragmented results (see example).
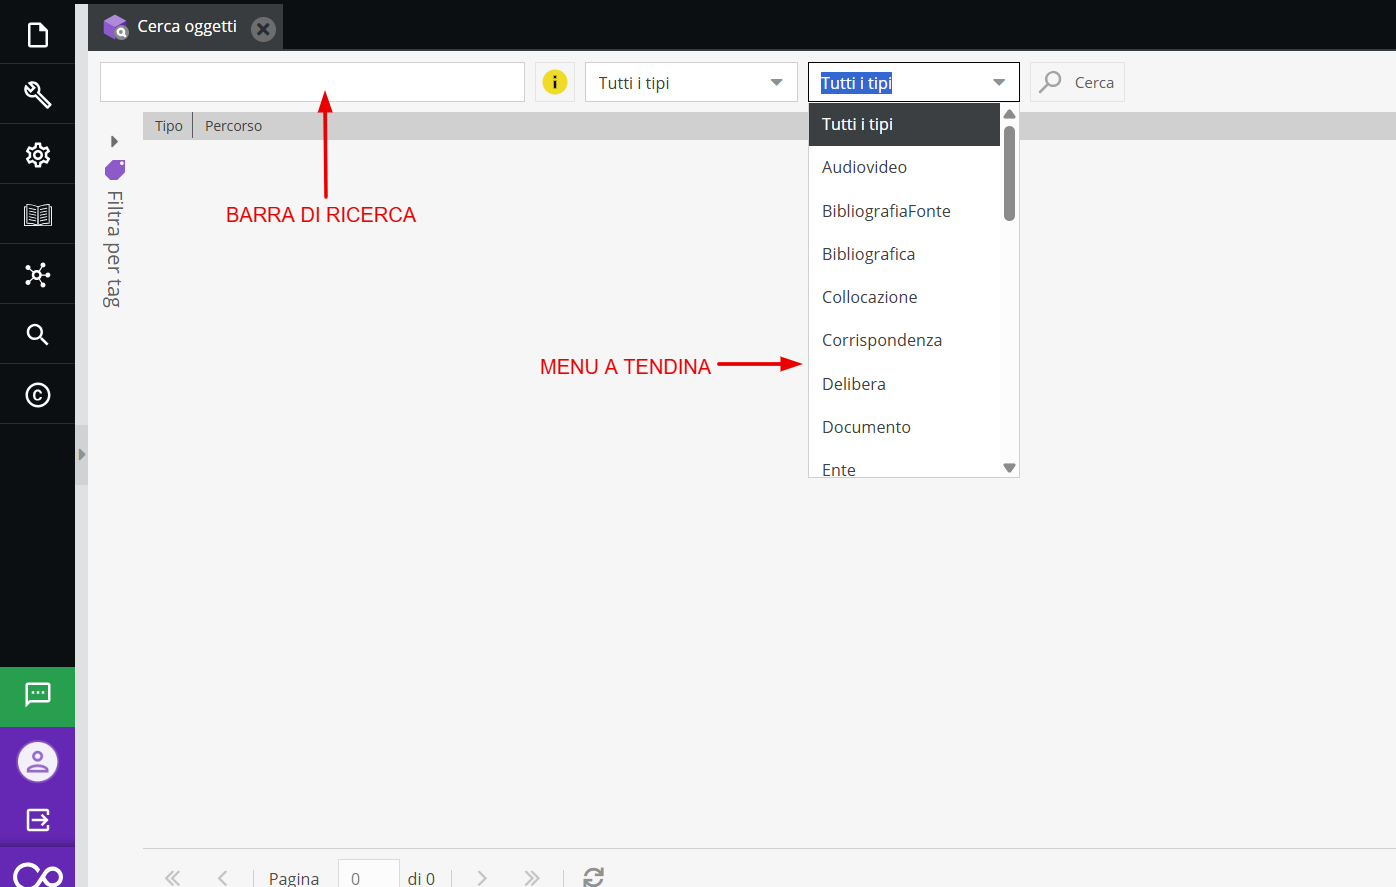
The object search locates elements within the Objects environment (Data Objects).
Search can be performed by selecting the relevant document type from the dropdown menu or entering keywords in the search bar.
Double-click on the unit(s) you wish to open.
The media search locates elements within the Media environment (Assets). Search methods mirror those described for object search.
Advanced Search activation can also be requested. Once activated, it will appear in the menu.
Advanced Object Search allows advanced searching by object class, including searches via tags.
Tag Configuration
Access keys to documentary holdings are fundamental to defining the Archive's degree of accessibility.
Identified search criteria allow classifying materials, searching them, and providing an archive content index: this function is served both by relationships within descriptive forms (on front-end relationship rendering, see the Detail Form section) and by tags.
As seen in previous sections, tags can be assigned directly from the descriptive form.
However, actions such as deleting a tag or moving it within the information architecture can only be executed via the Tag Configuration tool.
To perform these operations, click the “Settings” tab → Tag Configuration.
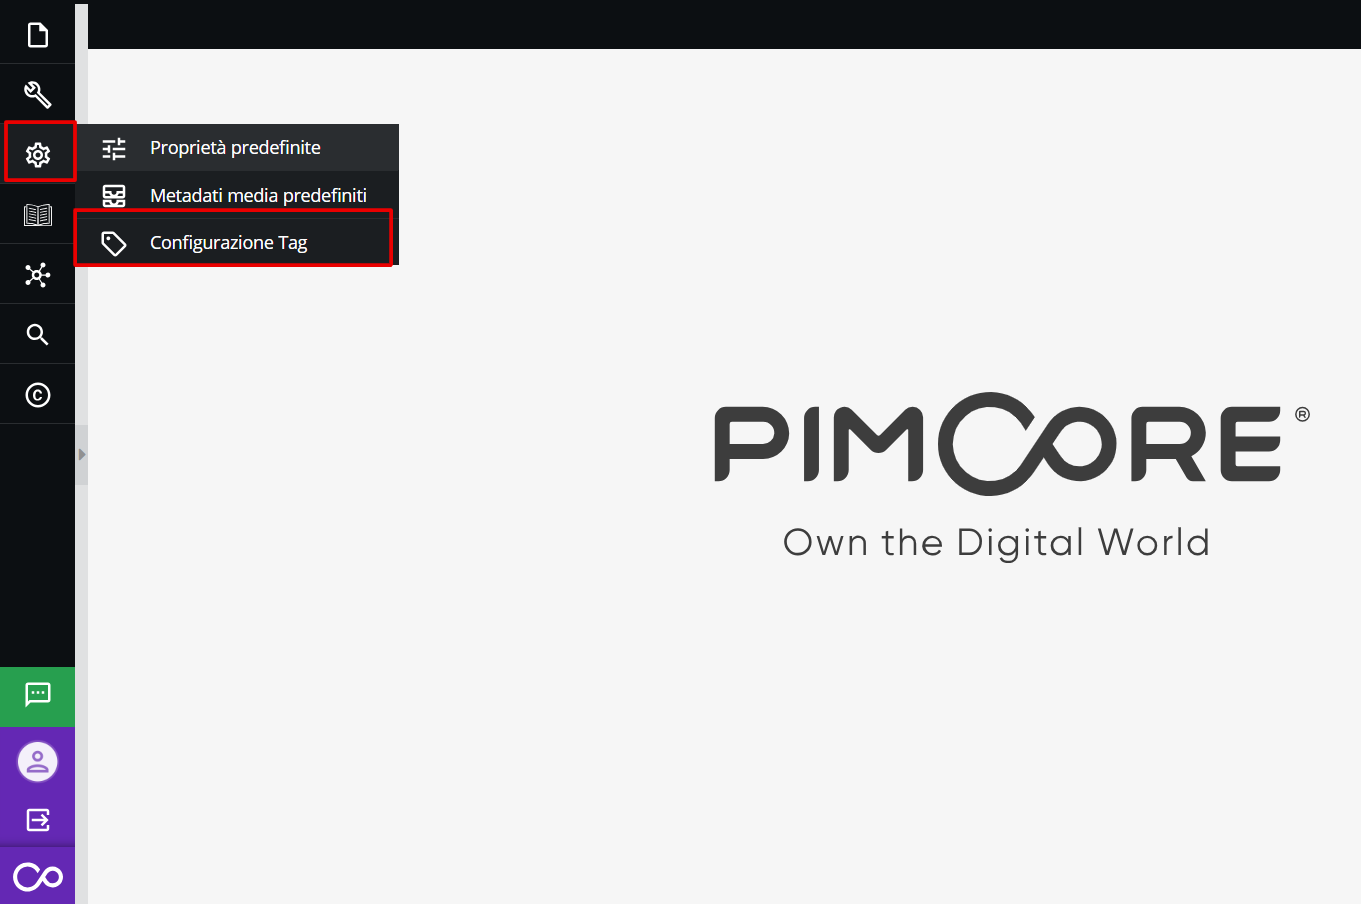
The information architecture can be explored from here. For complex information structures (multi-layered), navigating levels is done by clicking the "+" icon.
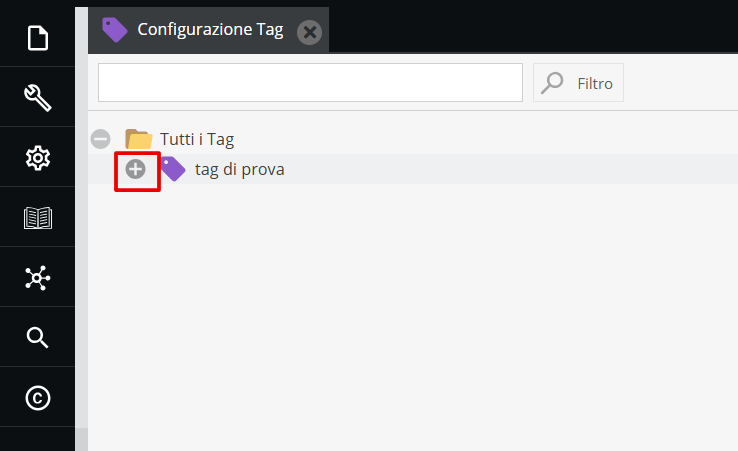
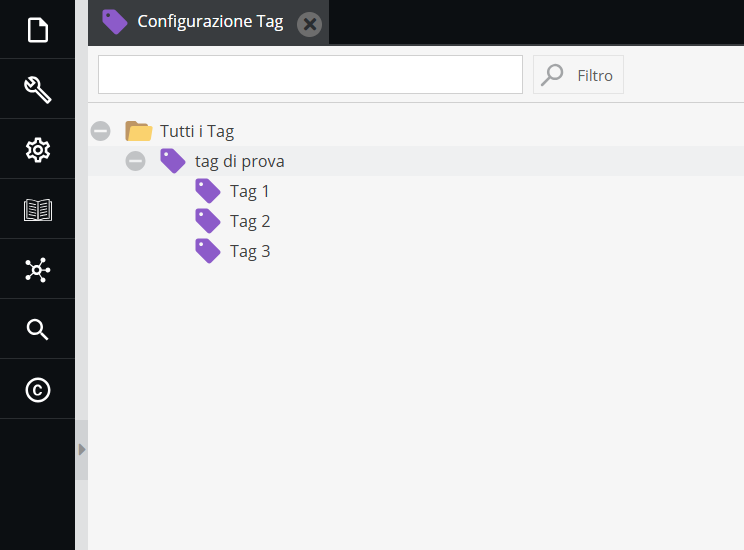
You can rename, add, and delete tags by right-clicking on the item of interest. Additionally, items can be moved using drag & drop.
Z3950 Protocol
Bulk data import can be carried out via CSV files through the "Datahub" system, accessible from the left sidebar.
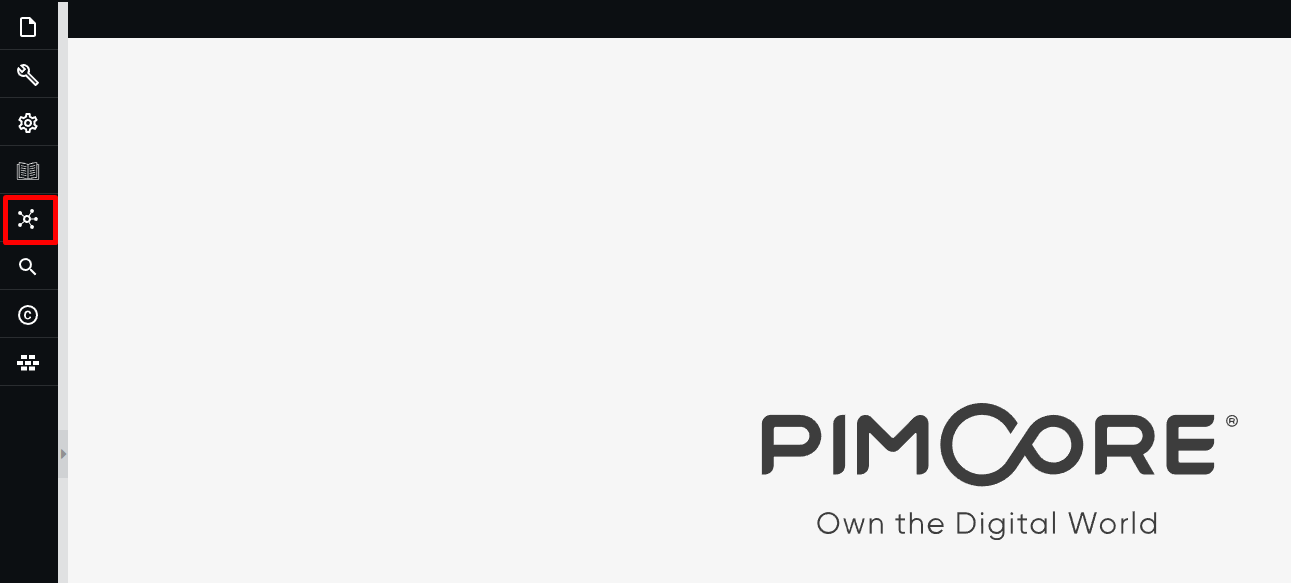
Clicking the icon opens the "Datahub Config" tab.
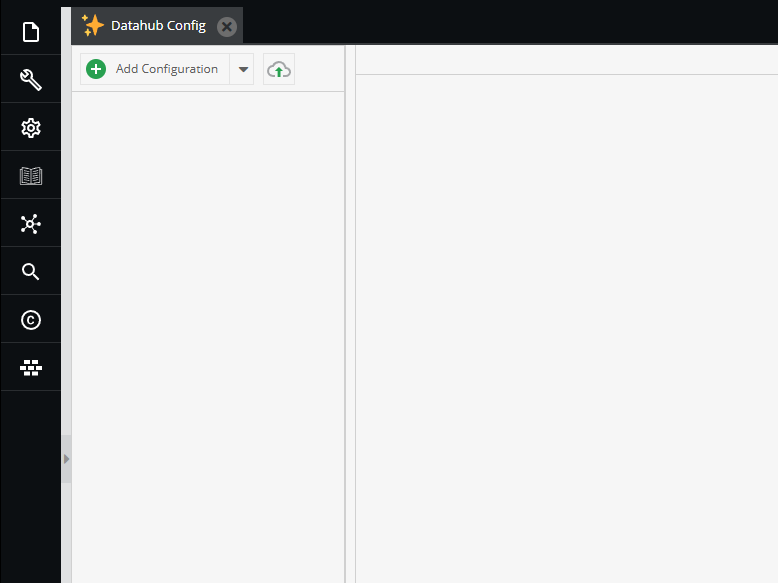
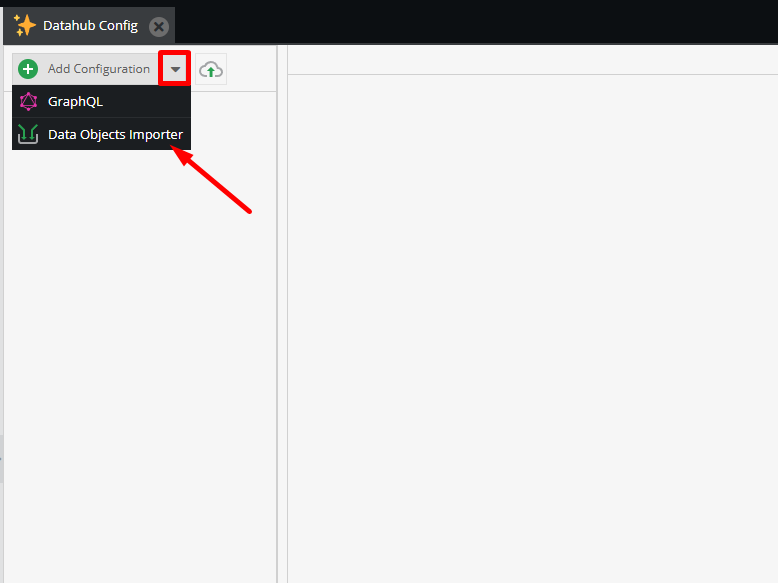
To create a new import configuration, click the arrow next to "Add Configuration" and select Data Objects Importer (the importer for Object classes described in the first section).
Each configuration is specific to a single class (i.e. for each of the described records): the system allows importing only one type at a time; heterogeneous data belonging to different classes cannot be imported in a single configuration.
Using Datahub requires specific training provided by Promemoria Group upon request. For importing complex hierarchical structures, contact the internal Promemoria IT team directly to manage the operation.
Bulk import from CSV
Bulk data import can be carried out via CSV files through the "Datahub" system, accessible from the left sidebar.
Clicking the icon opens the "Datahub Config" tab.
To create a new import configuration, click the arrow next to "Add Configuration" and select Data Objects Importer (the importer for Object classes described in the first section).
Each configuration is specific to a single class (i.e. for each of the described records): the system allows importing only one type at a time; heterogeneous data belonging to different classes cannot be imported in a single configuration.
Using Datahub requires specific training provided by Promemoria Group upon request. For importing complex hierarchical structures, contact the internal Promemoria IT team directly to manage the operation.
AI Usage
Usage of Ask AI functions is subject to a token credit system, monitorable at any time via the dedicated icon in the left sidebar.
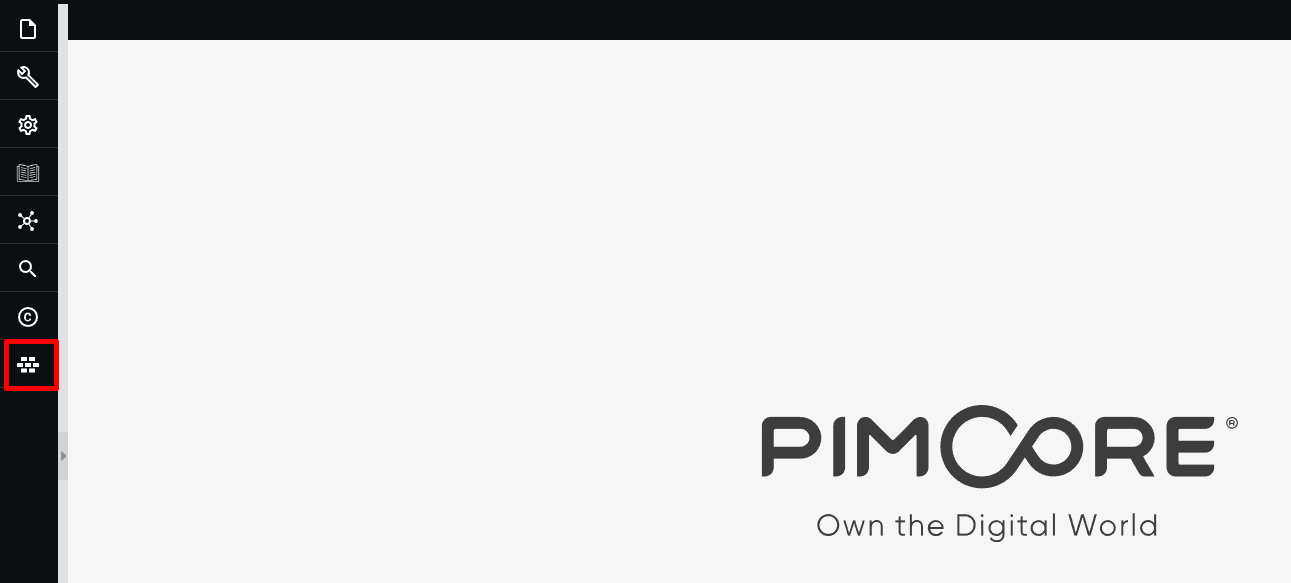
The default active package includes 5,000 credits per month. For custom solutions with higher credit packages, the threshold must be agreed upon and specified during platform activation and configuration.
Clicking the icon opens the "AI Usage" popup showing usage for the current month.
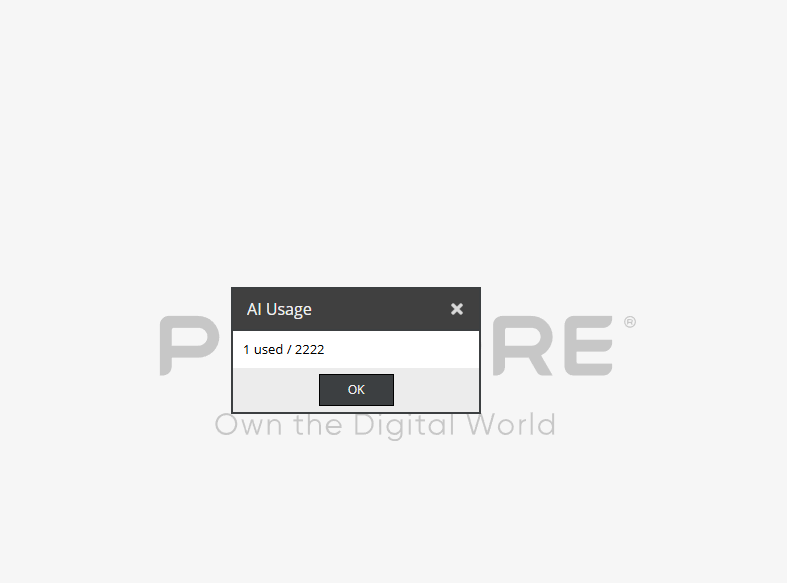
If credits run out before the end of the month, AI features block, generating an error message. The count automatically resets on the first day of each month.
Data Synchronization
The technological infrastructure of Archivio Digitale consists of two main levels: (1) the Pimcore platform for creating and managing your Corporate Historical Archive and (2) a navigation interface for exclusive company use, protected by login, designed to make heritage holdings accessible to non-specialist users as well. While individual record edits are usually processed in real time, structural or bulk operations require a synchronization procedure to ensure proper data alignment between the two environments. Specifically, synchronization is required in the following cases:
- All bulk modifications affecting digital assets and objects (practical example: if the “Restricted” field on media is populated in bulk, running a sync may be necessary to see the effects on the front-end)
- Deleting and renaming tags, as well as changes to the tag tree structure itself
- Bulk media tag application (when bulk tagging is applied from a parent folder to child assets, so that child items pick up the batch changes) Certain descriptive schema modifications made by authorized staff should also be considered.
The synchronization procedure is not automatic for the operations listed above. It is launched manually by Promemoria IT staff upon specific request from the Client, to ensure data integrity and optimize performance of the consultation system.